DO NOT MISS
>>Follow our Facebook page for updates! >>Join our Craftwell Design Team: Apply Now!
Showing posts with label office. Show all posts

November 17, 2016

DIY (Seasonal) Magnetic Memo Board

Sometimes you just need a reminder about certain conference calls or what to pick up from the store after work.  This magnetic memo board  is the PERFECT for all those little notes you need to keep.

Plus, the cute autumn theme can be changed up with different colored leaves; green leaves for spring or summer would be fantastic!  The leaves in multiple colors were painted with the siphon adapter & fabric paint.

YOU WILL NEED:

Dixie Belle Paints - Barn Red, Rebel Yellow, Midnight Blue, Chocolate, Drop Cloth
Picture frame
Paper clips
Craft blade or Exacto
Scrap of faux leather (tan)
Magnetic sheets
Chip brush
Leaf-shaped cutting dies - ProvoCraft Cuttlebug Leaves Dies
Super glue
Hard surface or window cleaner


1. Take (1) magnetic sheet and cut it to the size of the picture frame.


2. Emboss the magnetic sheet with Teresa Collins Woodgrain Cottage in the Cut'n'Boss using the following combination (bottom to top): D, A, Folder + Material, A.  MAKE SURE the magnetic side is FACE DOWN in the folder so that the pattern is DEBOSSED.


3a.  Use leaf-shaped cutting dies to cut out pieces of faux tan leather & magnetic sheet.  When cutting with the faux leather, place the leather side FACE DOWN on the cutting die.  When cutting with the magnetic sheet, place the magnetic/gloss side FACE UP.


3b.  ProvoCraft Cuttlebug dies with a 1/8" profile are quite thick for small metal dies.  The platform combination for these dies is as follows (bottom to top): D, Magnetic Shim, A, Dies, Material, A.


4.  Use an Exacto blade to cut small slits into the magnetic cut-outs.  Make sure that the small inner piece of the paper clip is on the matte/non-magnetic side of the leaf & that the small inner piece of the paper clip does not stick out of the bottom of the leaf.


5.  Use super glue on the magnetic side of the leaves & glue ONLY the large, back portion of the paper clip to the magnetic leaf.  Let dry.


6a.  Mix some Dixie Belle chalkpaints, Chocolate & Midnight Sky, to get the right shade of brown.  Mix 3 parts chalkpaint to 1 part hard surface cleaner or Flow-Aid.  I used the eBrush siphon cup, though you can also use the bottle.  Spray to cover the entire embossed magnetic sheet.


6b.  Once the embossed magnetic sheet was sprayed, use the residual paint to airbrush the sides of the picture frame.  The sides will not be covered by the magnetic sheet, so they were airbrushed.


7.  Use the chip brush to add some texture & bring out the highlights in the embossed magnetic sheet.  I mixed equal parts of Dixie Belle Chocolate, Barn Red, Rebel Yellow & Drop Cloth.


8.  Super glue the top half of the faux leather leaf to the non-magnetic, matte side of the leaf.  It is important to only glue HALF of the leaf to the side of the small inner paper clip.  Super glue the painted, embossed magnetic board to the picture frame.  Let dry.


9.  TADAAAA!  Now you have a mini magnetic memo board!
BONUS: Use fabric paint in the eBrush siphon to add colors to your leaf memo clips!


Hope you enjoyed this little office accessory!  Look forward to seeing what you make for your office!

-Judith

November 10, 2016

Quick Weekly Organization by Emily Rudolph

Hello lovely crafters! My days get slammed with odds and ends, most of which are thrown to the side to be sorted later.  I am always looking for ways to streamline, simplify, and organize myself to keep the clutter down and my mind free.

This project is SUPER EASY, FAST, and EFFECTIVE.  Sounds like a diet commercial doesn't it!? In a way, that is exactly what we are doing...reducing the excess...on our desk!

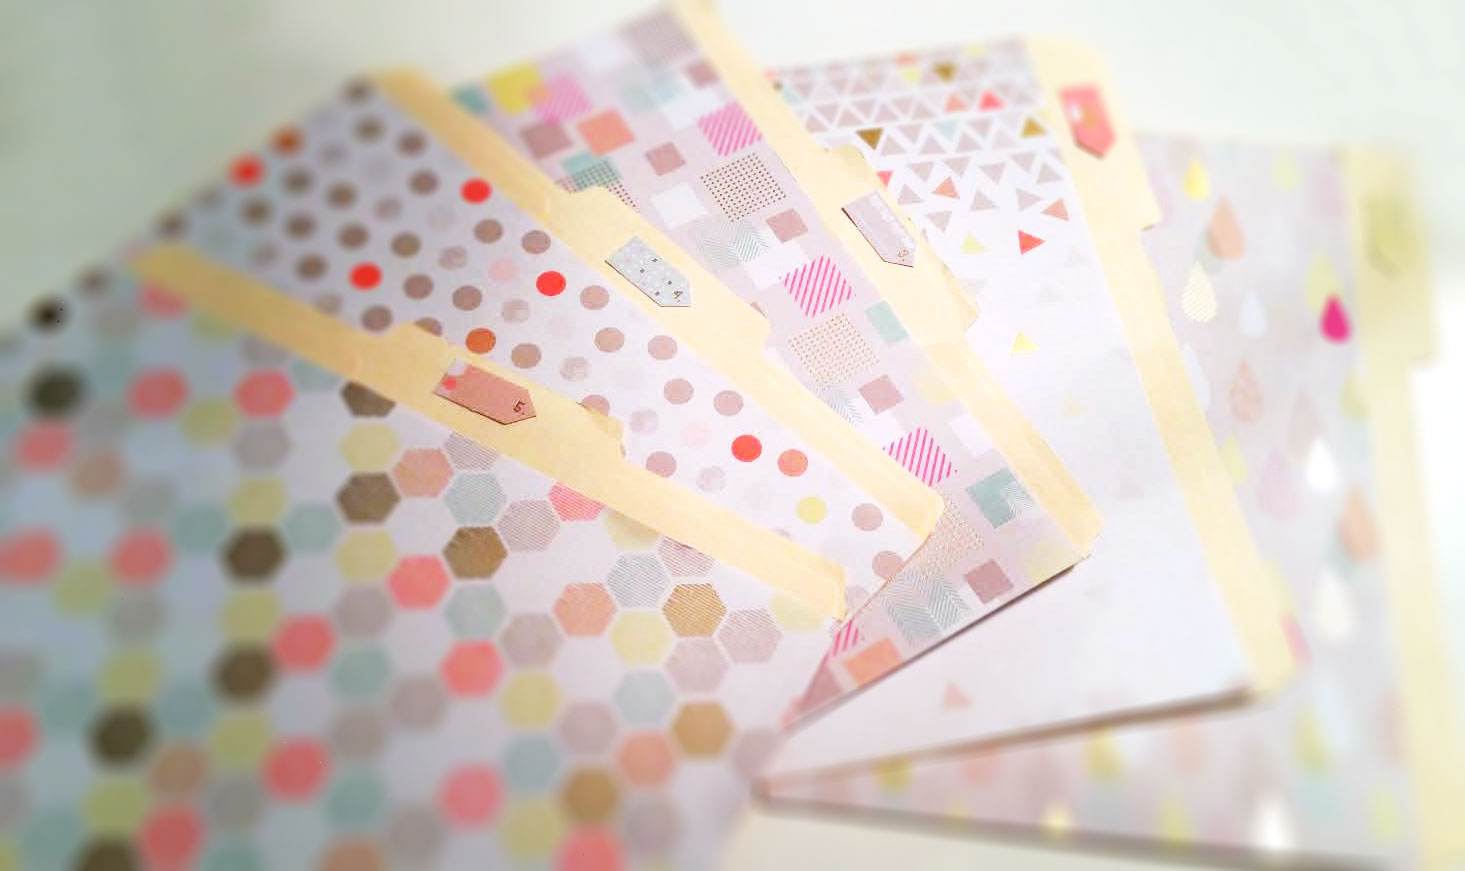
I started out by taking 5 plain file folders and selecting 5 decorative papers.


The process is easy-breezy! Simply grab your spray adhesive (I used Soctch Super77), applying a thin coat to the back of your decorative paper or the front of your folder depending on what floats your boat!

Apply the decorative paper to the front of the file folder, sealing it into place.  Remember: you can always use your Cut n' Boss to add amazing texture to your decorative paper before applying!


Add decorative elements and spruce it up as you see fit! I added small numbered tags to the tabs of each folder, allowing me to keep track of one folder assigned to each day of the week.

Now, get organized! Simply assign all of your documents/files/papers into folders that represent each day of the week. Now you can worry about only what is INSIDE your folder for that day. Phew! What a relief!


November 1, 2016

Office Bliss by Claire Campanella


My office can get a little crazy and my supplies end up everywhere, especially after finishing a project. I wanted to create some simple storage containers that I could leave out on my bureau or desk and not be visually assaulted by another cluttered mess. 

I used the Cut ’n Boss to repurpose these cans into beautiful storage containers for my craft supplies. I was able to clear up the clutter and display my supplies at the same time. 

To complete this project, I used:


Different sized vegetable and spice cans
Goo Gone
Razor blade
A clean dry towel
Double sided tape
Scissors
X-acto knife
3 differently patterned papers from Michael’s
Pencil
Ruler
Cut n’ Boss
Cut n’ Boss plates A and D
Craftwell Modern Stripe folder
Craftwell Alpha A6 folder
Lace trim

First, I removed the labels from the cans using soap, warm water, and Goo Gone. I also used a razor blade to scrape off some excess glue on the cans and then rinsed and dried them.


I measured the cans and cut the strips of patterned paper to size. 


I fed the papers through the Cut n’ Boss to add pattern and texture to my containers and give them a nice pop.


I mostly used double sided tape to attach the paper to the cans. I used the glue stick for the edges that weren’t laying perfectly flat. I also used an X-acto knife around the rim of the can to even out the edges of the paper if they weren’t perfectly aligned with the edge of the can. 


Now my arts and crafts room is that much more organized plus the containers are a work of art in themselves!
'
 
Copyright © 2014 Craftwell Blog. Designed by OddThemes - Published By Gooyaabi Templates