DO NOT MISS
>>Follow our Facebook page for updates! >>Join our Craftwell Design Team: Apply Now!
Showing posts with label handmade gifts. Show all posts

July 9, 2015

Owl Gift Bag

Ebrush Design Team: Mitsyana Wright Week 6 Cycle 2


Hey Crafty Friends... I'm here bring you another project for team ebrush with our awesome sponsor Latina Crafters!! I love this owl stamp! I think this little owl trio is just corky!! And they always seem to bring a smile to my face. So I decided to use them to decorate a gift bag... because who says that stamps only have to be used on cards?!!


Supplies Used
Ebrush (Craftwell)
Some Birdy's Birthday (Latina Crafter)
Spectrum Noir Markers (CG3, CG4, OR1, OR2, TB1, TB4, TB5, LY3, CT2, GB3, GB5)
Cupcake Embossing Folder (Cuttlebug- Once Upon A Princess Set)
Spellbinder Nestabilities Fleur de Lis Squares
Canson 150lb Illustration Paper
Patterned Paper (DCWV- The Great Vacation Stack)
White Cardstock
Momento Tuxedo Black Ink Pad (Tsukineko)
Small Gift Bag
Grosgrain Ribbon
Button
Glue Gun and Glue Stick
Scissors

I start off with stamping my Latina Crafter's Some Birdy's Birthday Stamp with Momento Tuxedo Black ink onto illustrator paper... this paper is made for manga illustrators that generally use alcohol ink markers. It is very heavy weight and dense so it keeps the ink from bleeding so much.
I colored in my image with my Spectrum Noir Markers. For the Blue parts I used TB1, TB4, & TB5. For the Orange parts of the body and wings I used CT2, GB5, & OR1.
For the beaks and feet I used OR1 & OR2.
For the Green parts of the birthday hats I used CG3 & CG4... and for the Yellow parts I used LY3, CT2, GB3.
I embossed a cupcake background from a 4.75"x6.25" piece of regular white cardstock.

Then I ebrushed my embossed cardstock with the same colors I used to color my image (with the exception of the yellows). I did it in sections at a time starting with the lightest of the colors and using the darker toward the edges.

 Here it is with the rest of the colors filled in.

Then I used my die to cut out my ornate square from patterned paper and then again used the same die to cut out my image.


I trimmed away the scroll work off my image die cut.

I then ran it through my Xyron 3" Sticker Maker and adhered it to the blue cut out making it looked framed.


I quickly ran my ebrushed background panel through my Xyron 5" Create-a-Sticker...

And adhered it to the front of my gift bag, right above the fold line. I didn't all my hard work to get smashed in the crease of the bag. And if the recipient want to store the bag it would fold easily.

I used foam adhesive to the back of my image and added it to the front panel.

I then tied a double loop bow and hot glued it to the front of my bag. Then I immediately glued my orange button to the front of my bow.

At the last minute I decided I wanted matching tissue paper to go with my gift bag... but all I had was white tissue paper... which was just fine by me!!

With the help of my decorative edge scissors, in this case a Zigzag edge, I cut the two ends of my tissue paper. I then ebrushed the cut edges with OR2. Just doing the ends gave it a nice ombre effect... and I love it!!

And here is my finished gift bag...


I hope you enjoyed today's project!!

Happy Crafting and THANKS for stopping by!!
~ Mitsy

June 19, 2015

Flowering Heart featuring the eBrush Siphon Adapter!

Ebrush Design Team: Jan Hunter shows some siphon work!

Thank you to Jan Hunter for this beautiful piece of work featuring the eBrush Siphon Adapter! It is a winner!!!


Clay, paper, burlap and cotton cording make for some fun with this heart.  Add some color, beads and a button and you're good to put this project together as a very nice gift for someone special. 

You'll need:
Oven bake clay (Sculpey was used for this project)
scrap paper
cotton cording
markers (Spectrum Noir)
burlap/canvas scrap (mine is from Canvas Corp)
circle wafer die 
Die Cutting machine
ebrush, siphon adapter
straw
cookie cutter or mold
E6000 glue
2 step bird punch, 3/4" circle punch

Prepare your clay according to the manufacturer's directions.  Form into desired shape.  I chose to string a cord through the top and down to the bottom, so using the straw, I make two holes to string the cording through.  The size of the shape you use will determine how much cording you'll need.  Using the ebrush *siphon adapter, mix some pearl ex with  enough water to make it fluid.  Bake as directed. Let cool.  *If you don't have a siphon adapter yet, you can brush the pearl ex on the unbaked clay. 


 While your shape is baking, begin to prepare your paper pieces.  Cut as shown in the photo below.  I ran put each piece through a paper crimper about 10 times.  Enough to break down the fibers and separate each disc into 2 layers.  See the photo below (click to enlarge).  Wad it up to add more texture to the piece.  With the "suede feeling" side facing you fold in half and in half again so you have a quarter circle.  Carefully make two cuts towards the folded center  for petals.  Unfold.  Using a piercer, make a hole in the center and place a mini/small brad. 


Cut a burlap circle using your die cutting machine.  Set aside. 


Thread your cording through the heart (as shown in the photo above).  To keep the cording from sliding, secure by adding a knot behind each of the holes.  Thread your beads on the bottom ends of your cording.  Knot each end and for extra security, slide your bottom bead up a bit and add a dab of glue on the cording and slide the bead back down in place.  Using the bird punch, cut 3 wings and color those as well using the eBrush and markers.  You can add some dimension by turning the leaves over and using an embossing tool, "draw" in veins.


Place all of your embellishments on the heart as desired.  The burlap goes down first, then the flowers and leaves and the button/charm last.  I used the E6000 glue to secure everything and let it dry overnight to make sure everything is secure. 

Have some fun!  Make this one yours.  I got the idea from here

Thanks for dropping by... hope you've got some crafting time on the calendar!  And don't forget to drop by here frequently to see what the rest of the design team has been up to.


April 23, 2015

Monogrammed Tile Coasters

Ebrush Design Team: Mitsyana Wright Week 2 Cycle 2

Another Creative Project! Thank you Mitsyana!

Hello Crafty Friends... DT Mitsy here with another eBrush project!! I'm on a monogramming kick. I've always loved the way monograms dress everything up! Who knew one simple letter can make all the difference?! I especially love stuff that not only looks good but can be used. Sorry, this gal like nice thing but I'm practical... everything has to have a purpose.

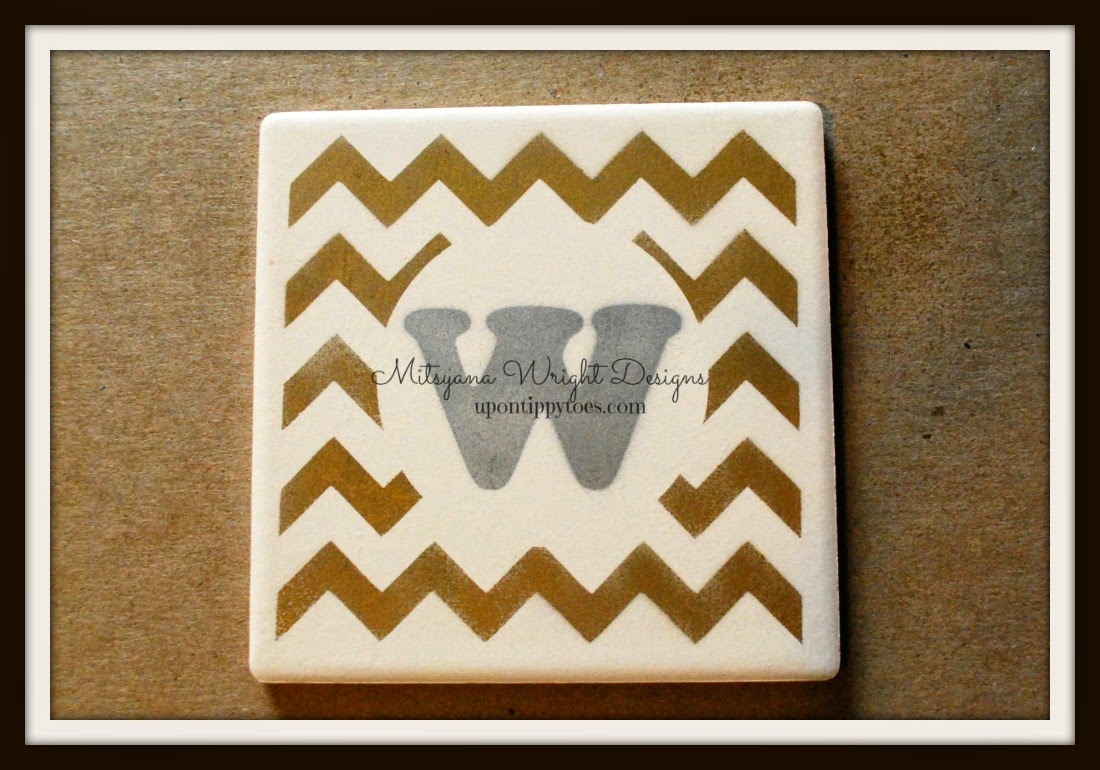
So, I decided to make the monogrammed tile coasters....


Supplies Needed
Tile Coasters
Stencils
Shelf liner
Metallic Sharpies (Gold & Silver)


I pre-cut my shelf liner into 2.25" cirlces. I used my electric die cutter for this, it cut all four out at the same time which cut down my crafting tome down quite considerably. Way better than tracing and hand cutting. 

I then peeled of the protective backing and adhered the liner to the center of each tile. This will serve as a mask. I want the centers to remain clean so my monograms can stand out.


 You can buy stencils from your local craft store or opt to make your own.  Mine were homemade. Again, I used my electric die cutter to pre-make these ahead of time.

I then place my chevron stencil over the circle. If you need help holding down your stencil or are afraid the stencil will shift during spraying, just go over the back of your stencil with some repositionable adhesive. I used some my glue pen ... when it dries it becomes a repositionable adhesive.


I then ebrushed my stencil with my GOLD Sharpie. Gold is still all the rage and I know it'll mke my coasters look ultra chic!!


The great thing about "eBrushing"... virtully NO wait time!! The ink practically dries instantly! I simply removed my stencil and peeled off my circle....

AWESOME!!

I simply repeated the last step with my "W" stencil in the center of the circle with my SILVER Sharpie.


Removed the stencil and VOILA ... Fabulous monogrammed tile coasters...


These are for me but will make an awesome easy housewarming gift or hostess gift!

Look, I'm already putting them to good use and reaping the benefits of my hard work!! Now it's time to relax and enjoy!!

CHEERS!!


Hope this project inspires you to make some of your own. Super quick, super easy, super affordable... and always SUPER FABULOUS!!

~ DT Mitsy


For more fabulousness visit my personal blog here!

March 26, 2015

Faux Stain Glass Vase

Ebrush Design Team: Mitsyana Wright Week 12 Cycle 1


Hi Crafty Friends!! Today I decided to step away from the paper crafts and try my hand at something I wanted to do for a while... Faux Stained Glass.

The art of stained glass is too time consuming and far too expensive to invest in yet again, another craft to spend my already tight budget. Buying all the specialized tool cutters and glass panes are a little to rich for my taste. And, on top of all that, the time it takes to cut and piece and then somehow weld the pieces together to make one solid... um, no thank you! It's not for this busy mommy!! 

And, if you are a busy bee like me... and if you already have an eBrush... then this is a great alternative that won't break the bank or take up very much space!


Supplies needed:
eBrush by  Craftwell
Glass Vase
Liquid Leading
Sharpies (bright blue, bright green, mustard/ tan, purple)
Image 
Blue Painter's Tape


I started by doodling a peacock feather about the length of my vase. I used the actual vase to trace along the top and bottom of my vase for an approximate drawing area to draw in. Make sure you take into consideration  the base of your vase may have a thick base and accommodate your drawing accordingly. 

It's ok if you have no drawing skills. There are a lot of  free images online to search for. And if you are using someone else's art work, always ask for permission before using.


Once you have your image to the desired length and size, tape to the inside of your glass vase. Always put your image in the opposite side you will be spraying on.


I then ebruhed my colors directly on the glass, using the image as a guide. Usually, you would have to put your liquid leading down first but I wasn't filling it with more liquid. And if I sprayed over it , you would see where I sprayed on the liquid leading as well.


After spraying down your colors to your liking, finally, trace the outline of your image with your liquid leading. Set aside and let dry! And, you are all done!!

Now, all I need is my darling hubby to fill my pretty vase with pretty flowers!! Anyone want to send him a hint for me?! LOL

Hope you enjoyed this eBrushed project and decide to give it a try!!

~ Mitsy

To see more inspirational projects visit my personal blog here!


'
 
Copyright © 2014 Craftwell Blog. Designed by OddThemes - Published By Gooyaabi Templates