DO NOT MISS
>>Follow our Facebook page for updates! >>Join our Craftwell Design Team: Apply Now!
Showing posts with label Cut 'n' Boss. Show all posts

May 18, 2020

Coral Flowers

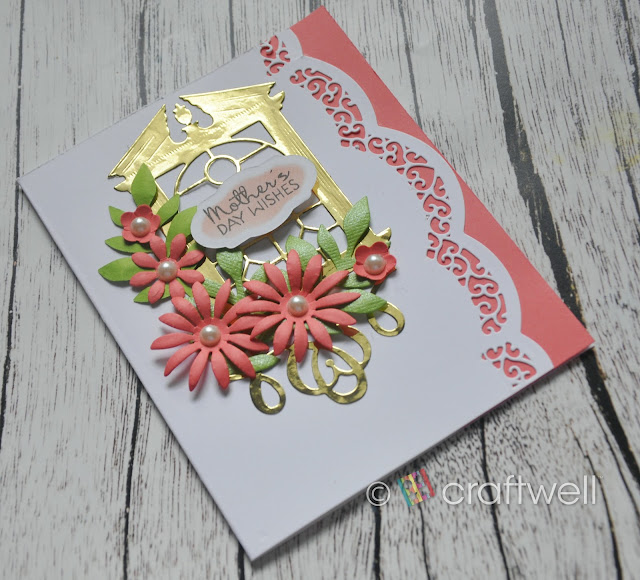
Hello everyone!! This is Berina here on the blog today, sharing this Mother's Day card with flowers that I made for my Mom. I got to spend Mother's Day with my Mom after a few years :)


I took an A2 card base and die cut the edge with 2 dies from Spellbinders Scalloped Borders 3 die set. I used the same dies to die cut the edge on a panel of Coral cardstock and adhered it on the inside of the card. I used the Spellbinders Stained Glass die on gold mirror cardstock to cut out the center piece and adhered it on to the card base. Then I die cut some flowers and leaves using the Karen Burniston Flower Pot pop-up dies. I shaped the flowers with the tools and added a half pearl in the center. I arranged the flowers and leaves and adhered them on to the card. I die cut the swirl from the Graceful Corners die set from Amazing Paper Grace & Spellbinders on the same gold card stock, cut a tiny bit on both ends and adhered it below the flowers. For the sentiment panel, I die cut the label die from Inspired by Stamping on white card stock and while the die cut was still in the die, I inked it lightly with Brutus Monroe Stargazer ink. I stamped the sentiment from one of the Verve Stamps stamp set and added it on to the card. Here's a look at the inside of the card:


How do you like this card today? Please do let me know. Thank you for stopping by. Have a great day!!

-Berina

July 2, 2019

Stars and Sparkle

Hi Everyone! 
This is Katie again with another project just in time for 4th of July 
and I wanted to make this one quick & fun!

With this project, I kept it easy and simple that anyone can do theirselves. First, I die-cut some stars in varies sizes and a square frame with a thicker paper. Die-cut the word "Sparkle" the Cut'n'Boss machine.

Next, I used Spectrum Noir marker's DR3 (Red shade) and TB6 (Blue shade) with the eBrush system. Took turns spraying both colors to my liking onto plain printer paper.

I placed all my cut outs on top of my airbrush work and started brainstorms where they would go.

So I couldn't decide how to cut the background and left it as is. Just for now, I assembled all my cut outs and placed it like I was making a card.

Hope you all enjoyed this project! Until next time :)

May 10, 2018

Postage Stamp Mini Album

Hi friends! Linsey here today sharing my latest Craftwell project using the awesome new SNAP Machine Electric Embosser and Die Cutter!

I have used this fabulous machine to cut cardstock and vellum with beautiful results, but I wanted to see if it would be suitable for cutting a bit thicker material. I keep plenty of old cereal boxes around for various crafting needs and decided to upcycle the thin cardboard and transform it into a fabulous  mini album. Once again, the SNAP machine did not disappoint!
For the pages, I cut the cereal box and thick designer cardstock using a large postage stamp metal die with the appropriate platforms and ran through the SNAP machine. I used embellishments like stickers, mulberry flowers and a few more metal dies including the Teresa Collins Tabs & Tags Project Dies to decorate throughout the album. 
So, my experiment was a success! I'm so happy with the SNAP Machine--it's little, but mighty!  And what fun it is to create something out of what would otherwise be trash. I highly recommend it. 😊
Thanks so much for stopping by today! I hope you found a bit of inspiration in my project and I hope you to see your beautiful creations too! Until next time, happy crafting!

April 18, 2017

Pretty Pineapples by Heather Wilson

My friend and I have been working on ideas to decorate her new apartment, and her primary decorative color is yellow. She wanted something pineapple related for her kitchen, so I put this project together for her using my Cut 'n' Boss and eBrush!

Materials
Decorative cardstock
Cut 'n' Boss
Embossing Folders (I used Checkered Argyle)
Scissors
Pencil and Paper
Double sided sticky tape
eBrush and Sharpies

First, choose some colored paper for the pineapple, leaves, and background. I chose a stack of some decorative paper that had watercolor-like effects on it.

Now you're ready to cut out your pineapple shapes. You can either print the picture I drew of one on the left to use as a template, or cut one free handed. To make your own, cut out a square, then round off the corners.
Now place your pineapples inside your embossing folder (this is Checkered Argyle) and place into the Cut 'n' Boss.


This is what your pineapples will look like using Checkered Argyle. Use your double stick tape to attach to your background paper.
Tip: Love Triangles also make great textures if you want smaller pineapples!
 Now take your green cardstock and start cutting long, thin triangles for the leaves. Make different sizes, and have a variation of light and dark greens so the leaves don't blend into each other. For the medium and small leaves, round off the bottom corners (those ends will be showing on the pineapple)
Now for the leaves to look 3-Dimensional, take the edge of your scissors (NOT the sharp edge) and quickly run it down the length of the cut out leaves. (If you have ever curled ribbons or feathers with scissors, do the exact same thing to the paper.) Do this to sections of the top and bottom part of the paper.
  If your paper is white underneath, you'll want to avoid the leaves curving too far outwards. I did mine in an S curve, so leaves still popped out towards the viewer. Attach your leaves with double stick tape, starting with the longest and having the shortest leaves in the front.

 Next, draw some flower leaves (or print mine to use as a template) on plain white paper. Then cut out each individual petal separately.
 Now take your eBrush and colored Sharpies of your choosing, and begin coloring in your petals. For mine, I started with yellow on the tips, then light pink in the middle, and a brighter pink in the center. I carefully made some darker spots by placing my bright pink Sharpie a little too far down the eBrush (make sure to practice this on a separate sheet of paper to get this just right.)
 Now curve your petals like you did for your leaves, and stick them down.
 I also made leaves and centers for the flowers. I slightly bent the middle of the leaves and tucked them under the petals with tape. Then I tucked in my second pineapple behind them.

After completing the second pineapple, draw in some vines with a light green Sharpie. Experiment and get your shapes right with a pencil before drawing over with a Sharpie, if you like. Draw very carefully when going over the textured parts of the pineapple, and use a light touch.


 The finished piece! Use a matte when framing it, so the leaves overlap with it instead of the frame itself.

April 5, 2017

Oh Hoppy Day!


I've been wanting to make these for a very long time -- and even bought the Fall Pumpkin Blocks from MyScrapChick last Fall when it came out. I LOVE that the files go together as a dimensional project so easily!  Let's get started.
You'll need:
12 x 12 white cardstock (Fun Stampers Journey)
Fall Pumpkin Blocks (MyScrapChick)
Butterfly and flowers (unknown source)
Heart (eShape store)
Sizzix eclips and eCal software
eBrush
Tombow Markers
Scor-tape
Wood Grain embossing folder
Cut-n-Boss
Twine
Glue Dots
mini brads
Canvas
Scissors
Mod Podge

Open the cutting files for the blocks.  I chose to use all four blocks.  Cut at the import size for the Fall Blocks and resize the flowers and butterflies as desired.  The wings on the butterflies are pretty fragile so be very careful when you take them off the mat.  Cut 2 of each front.  One of each of the front cuts will be embossed.

Using the Wood grain folder and the cut-n-boss, emboss a front for each of the blocks.
2017-03-09 21.59.10


Since all my paper started out as white, now's the time to add some color!  Using the eBrush, TB marker adapter and Tombow markers, color as desired.  I used a light gray for the embossed block fronts to add a little more texture.  It doesn't show well in the photos, but it is there.  Using shades of yellow and orange and dark gray, color the flowers and butterflies.  With a pink marker, color the hearts.
2017-03-08 20.45.25

2017-03-08 21.00.11
2017-03-08 21.00.58
2017-03-08 21.10.34

Using your favorite curling tool,  shape the flower petals and cup slightly.  Use a brad to secure layers.  I colored a small center and placed that onto the brad for a couple of flower centers.  Glue the butterfly top to the bottom cut of the butterfly.  Shape for a little more dimension.  I added a little bit of sparkle to the edges using the clear sparkle pen from Crafters Companion. 


Cut the canvas into a bunny ear shape as shown in the photo below.  Protect the surface of your table with some wax paper and brush the canvas with some ModPodge to stiffen.  Let dry overnight. 

2017-03-10 22.12.53

But the blocks together.  Use the un-embossed front.  Use some scraps of paper and glue to the inside top flap for a little more bulk to support the ears.  Cut a slit or punch a hole in the flap.  Apply the embossed front to the block.  Add some whiskers using some twine.  With some pop up dots, add the heart cut.  Fold the canvas "ears" in half and secure in the flap.
2017-03-15 14.46.10

2017-03-15 14.46.28

Depending on the weight of your cardstock, you may need to add a little weight to the base.  I used about 1/3 cup of rice* in a small plastic bag .  Secure the top flap in place with scor-tape.

TIP:  If you wanted to use these as gift bags, you certainly could.  Just use removable glue dots on the top or bottom flap for ease in opening. 

Secure your embellishments using glue, pop-dots and/or glue dots as desired and display!

2017-03-17 08.35.57
Enjoy some time in your happy place this week!  Hoping to see you again next week! 
Teambadgespring2016Oh

March 23, 2017

Tool Book for all of your Craft machine needs! By Heather Wilson


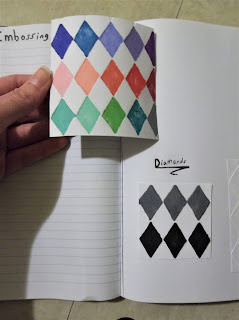
This is a little guide book I put together as a reference for my crafting tools. In this, you can put in samples of each cut-out and texture that can be made with the Cut n' Boss, color references when you need to find just the right shade with the eBrush, and more! Instead of taking time away from crafting to test your materials, this book will have everything you need to use as a reference right now!

Materials:
A notebook
Decorative paper
eBrush
Cut n' Boss
die cuts and embossing folders
Sharpies
Gluestick
Hot Glue
Double sided tape


The journal I picked has blank pages on the right, and note taking pages on the left, which was perfect for what I wanted! However, I didn't like the cover, so I picked out some decorative paper and traced around the book for a fancier look. Cut 2 separate pieces for the front and back.


 Leave extra room around the tracing of your book cover for folding neatly over the sides.


Make creases where the folds should be. The folds for the edges is similar to wrapping a present.


 I wanted the inside cover to be decorated too. Cut a piece of paper slightly smaller than the book itself, center, and glue. Next glue the outer cover and edges down.


Cover the binding edge with a piece of ribbon wide enough to reach the  edges of the paper. Hot glue sides of the ribbon to the edge of the decorative paper. Do not put glue directly down the center of the ribbon, otherwise the book won't open properly and the ribbon might come off.

Now you can practice and experiment with your Cut n' Boss! I started by coloring in different embossing patterns.

Attach the embossed paper with double stick tape. 

 Next I moved on to the die cuts, and used my eBrush to make them look pretty! For some of these I had to use a glue stick to attach to the paper.
 While I had my eBrush out, I filled a page using all my different colored sharpies!
 And there ya go! Don't forget to add to your book as you find new techniques.
'
 
Copyright © 2014 Craftwell Blog. Designed by OddThemes - Published By Gooyaabi Templates