DO NOT MISS
>>Follow our Facebook page for updates! >>Join our Craftwell Design Team: Apply Now!
Showing posts with label Crafter's Companion. Show all posts

May 24, 2021

Spring Birthday

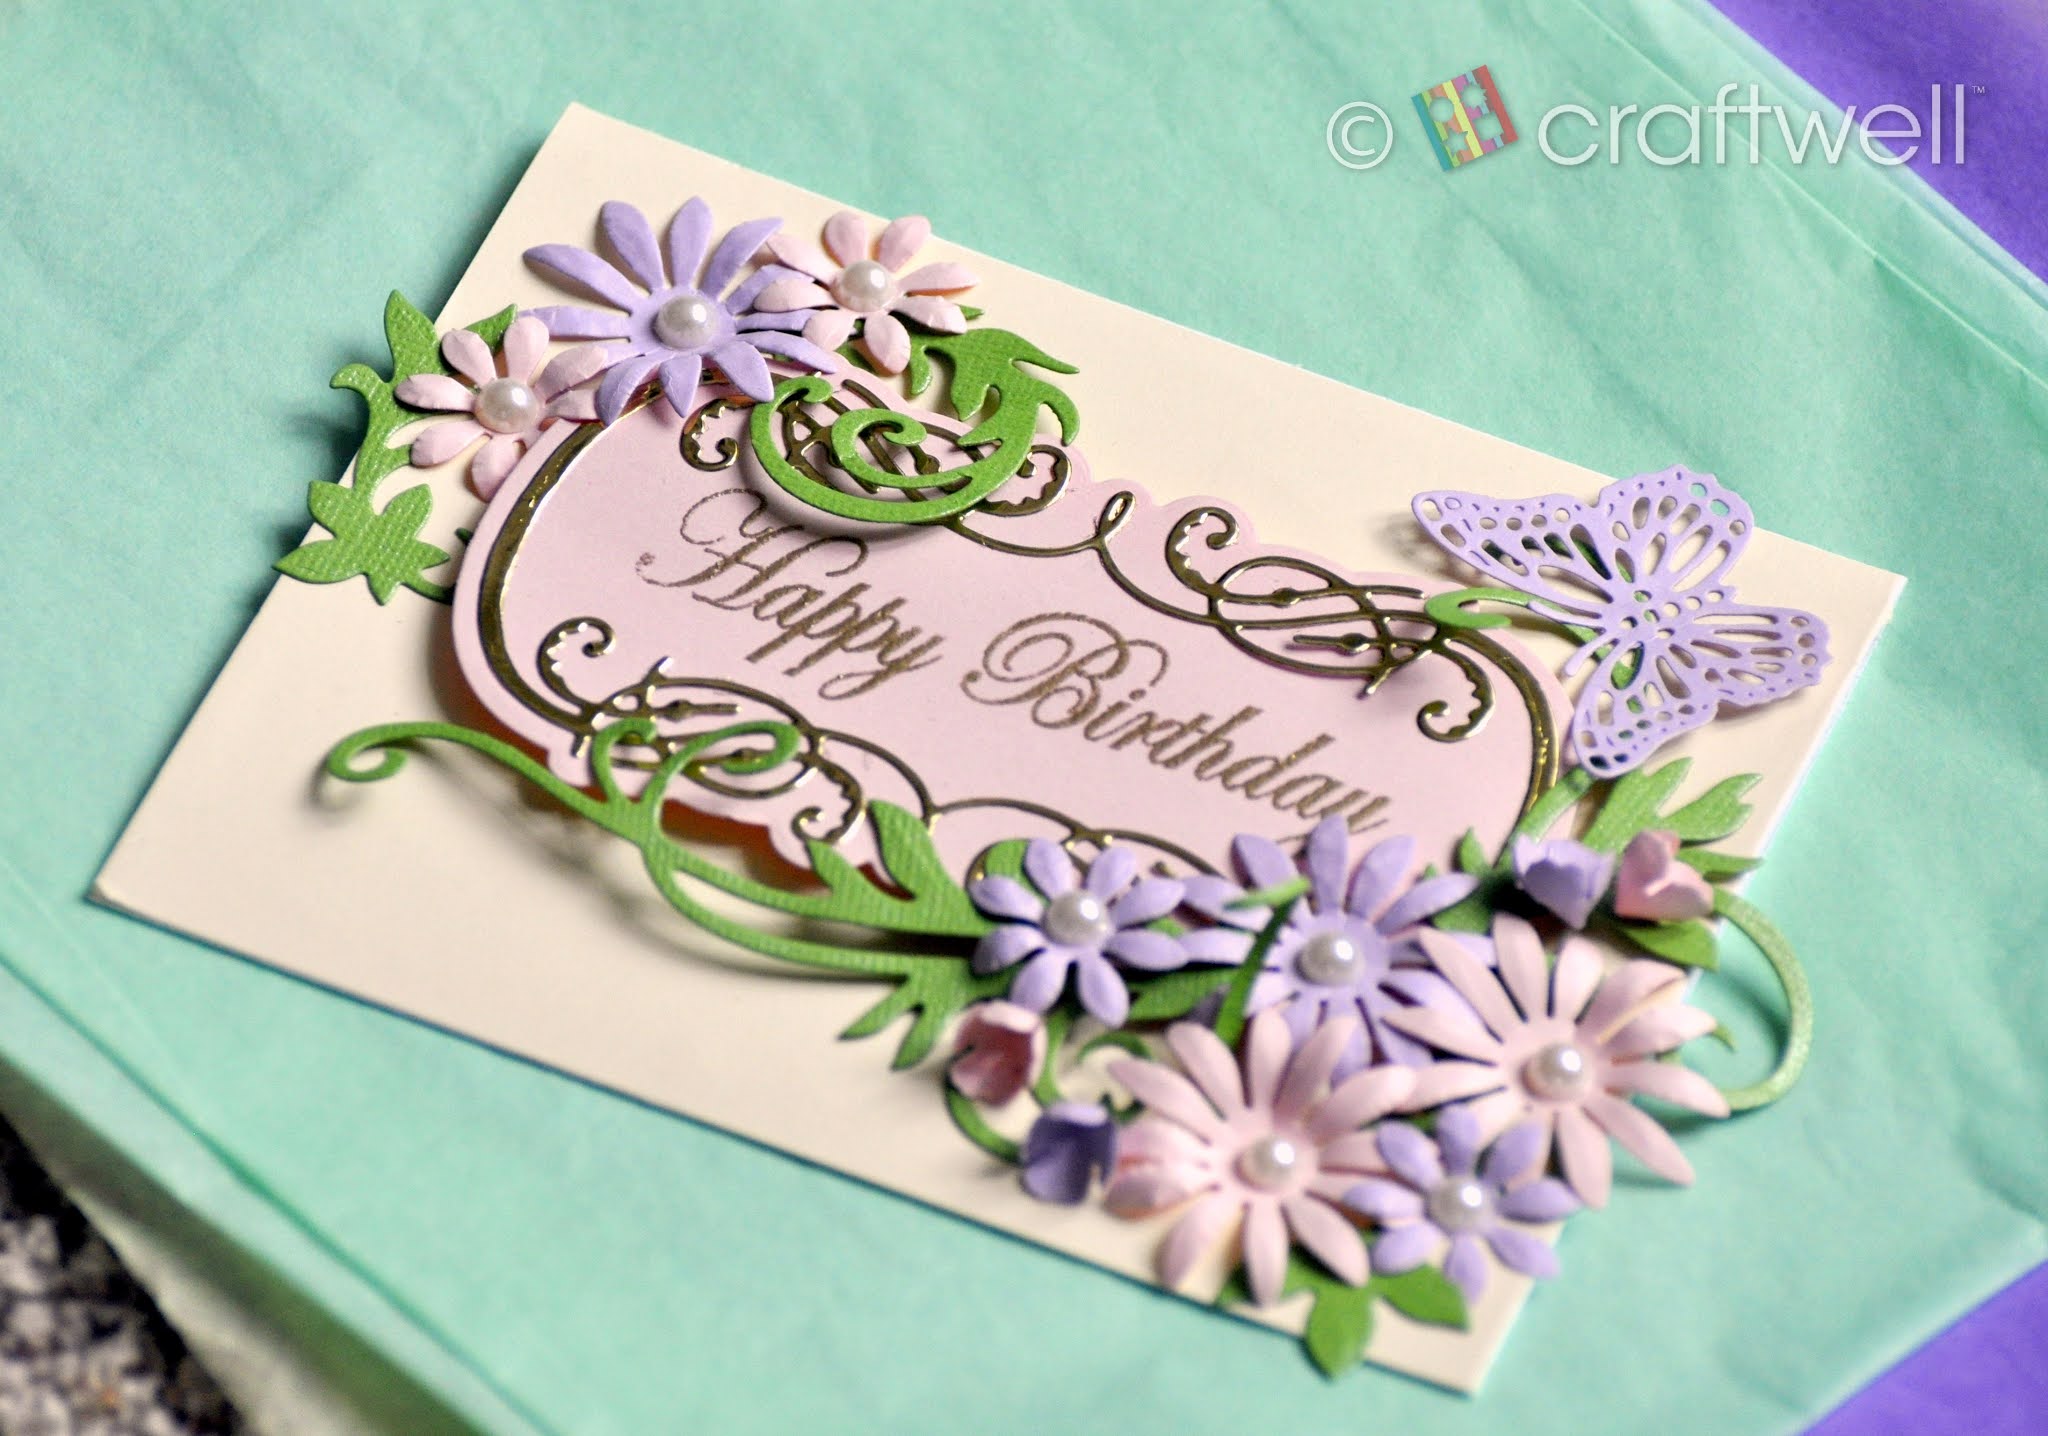
 Hello everyone!! This is Berina here today, with a Spring Birthday card.

I decided to use pastel colors for this Spring card. I've used a bunch of different dies on this one. The flowers were die cut using the Karen Burniston - Pop up Flower Pot die set. I shaped the flowers and added a pearl for the center of the flowers. For the leaves and flourishes, I used the Floral Flourishes die set from Spellbinders. For the sentiment panel, I used the Amazing Paper Grace - Sentimental Christmas die set. The sentiment is from Tubby Craft stamp set. The butterfly is from Crafter's Companion die set. I assembled all the die cuts on an ivory card stock. I think ivory looks better than white for this color scheme. 

Here's another pic of the card. What do you think? Let me know! Thanks for stopping by. Have a great day!

- Berina

November 4, 2015

Guest Poster!!! Pam Bray does the eBrush!

Guest Designer Pam Bray is sharing her new experience with Craftwell's eBrush! Thank you PAM!!! We love your style!!!


Hello to all of our amazing eBrush friends here on the Craftwell Blog!!! Pam here today sharing with you an eBrush project. I bet you are surprised to see me...lol but I am so excited to share with you my Just Saying Hello Card using the eBrush and hope to inspire you to get out your stencils and stamps and make some Fall Cards to send. 


 I began my card by first stamping a leaf from Stampendous Jumbo Leaves Stamp Set using black ink. Using your Craftwell eBrush and Spectrum Aqua Markers... first spray the center of the leaf with Sunflower. Working from the center (Sunflower) of the leaf out to the edge...spray next with Amber and last with Crimson. Color the stem with Spice. 
Along the Spectrum Aqua Markers to dry completely. 
Using Wild Honey Distress Ink and a blending tool go over the top. 
Fussy cut out and set to one side. 


 Lay a Wood Grain Stencil over the top of the card base.
Using Spectrum Aqua Markers...spray the stencil first with Chestnut and  repeat with Desert. 
Clean and dry Wood Grain Stencil and repeat to finish card front.
Allow the Spectrum Aqua Markers to dry completely. 


 Go over the top of the Wood Grain background with Tea Dye and Wild Honey Distress Inks using a blending tool. 


 Spray Gina's Lasercut Barbed Wired Circle using a Black Spectrum Aqua Marker with the eBrush. 


Stamp Just Saying Hello to bottom of card front with black ink.


Adhere Barbed Wire Frame to front of prepared card.


Add your beautiful fall leaf that you prepared using the Craftwell eBrush to the front of the card with pop dots.
Add a fun twine bow to the front. 
I hope you enjoyed my Just Saying Hello Fall Card. 
Hugs Pammejo
Supplies:
Spectrum Aqua Markers: Amber, Sunflower, Crimson, Desert, Chestnut, Black
Gina's Lasercut Barbed Wire Frame
Distress Inks: Wild Honey and Tea Dye
Just Saying Hello Stamp
Memento Tuxedo Black Ink


image


Scrapbook Flair
   Buttons, Buttons, Buttons who has the buttons...well today it is all about Buttons Galore & More with our fabulous Stampendous/Dreamweaver products.
Preview by Yahoo
 

February 18, 2015

Pink & Main Speech Patterns

Ebrush Design Team: Jan Hunter Week 9 Cycle 1

Jan starts off our wonderful time with our sponsor, Pink and Main! I love their adorable stamps and you will too! Please check out their vast collection!


This simple card is so easy especially using the Speech Patterns stamp set from our Sponsor this month, Pink & Main.


You'll need:
Speech Patterns SVG file from Designs on Cloud 9 (You'll want to hurry to get this file as the site is closing soon.)
Cardstock - I used white for all (one piece cut at 5.5 in x 8.5 in for card base and another 6 in square piece for die cuts.
eBrush
Spectrum Noir Markers
Staz-On ink
Versa Mark ink
Black Embossing powder
electronic die cutter
Heat gun
pop dots
adhesive

Create your card base (scoring at 4.25 inches on the long side Fold on the scoring line) Set aside.  Cut the speech bubble in the style design you prefer I cut three for my project.  Stamp the front card base with the sentiment using Versa Mark ink and then emboss using the black embossing powder and set with the heat gun.  Stamp the cut speech bubbles as desired and draw some "stitching lines" around the outside edge of each bubble.


I chose to use blues on this card,  so set up your eBrush and spray lightly as desired on the card.  Carefully spray the edges of each of the bubbles.  Using adhesive place one bubble near the top of the card front; apply two pop up dots to the back of a second bubble and add a little bit of adhesive to the point of the bubble and adhere to the card.  With the third and final bubble, add two layers of pop dots to the back and adhere in place. Finish the inside of the card as desired and celebrate another fun project completion!


Don't forget to check out what the rest of the eBrush DT has been up to... visit the Craftwell Blog for all the details!

See you again soon!


January 31, 2015

Guest Post by Beth Wheeler - Glitter Queen

I am so happy to be able to share this lovely guest post with you! Beth is a prolific eBrush artist and is very active on the eBrush by Craftwell Facebook group. She is very inventive and creative. I hope that you will join and interact with all of our members!

Good day eBrush fans. This is Beth the Glitter Queen with a totally gorgeous Valentine’s card to share with you. I wish you could see it in person as the photo does not do it justice.   Grab a cup of coffee or drink of your choice and join me on a crafting adventure using the eBrush.

Add caption


I had to do some modifying of my original technique to use with the eBrush and when I finished the card I thought why didn’t I eBrush the tissue paper first. I used acrylic floor wax but you can substitute white glue that you have thinned.  I prefer the acrylic floor wax as I get more of a translucent look plus I happen to have a bottle left over from making Christmas ornaments a couple of years ago. I would rather be crafting than waxing floors.

Let’s get started. Supplies you will need. Thin plastic I use plastic from page protectors. An embossing folder. I used a Darice one. I don’t know the name of it. As well as some kind of embossing machine.  Tissue wrapping paper. Acrylic floor wax or white glue which you have thinned with water. Of course your eBrush and markers of your choice. I used Spectrum Noir markers from the  purple set. Ultra fine or fine Glitter is optional. Normally I use just one color but for this card I used several different colors. If you wish to color the embossed plastic then markers which will work on plastic. I used a Sharpie.


First you will run your plastic through your embossing machine. Ebrush your wrapping tissue, Do a larger piece than the size of your embossed plastic as you may need to do some patching. Then decide whether you want to use the embossed side as your front or the debossed side. You will get a slightly different look if you use the debossed side as the front.  Take either your glue or your floor wax and using a sponge brush apply to the back side of the plastic. Place your tissue paper over the plastic and use the sponge brush to adhere it using a pouncing motion.  Don’t panic if you should get a hole. Just tear off a small piece of tissue paper and patch the hole. Once the tissue paper is down tight while it is still wet you will sprinkle glitter if you are going to use it. I like to lightly sprinkle my glitter and do it in layers.  I like to turn the piece over as I work with the glitter to see how it is looking in the front. Another reason for having a larger piece of wrapping tissue as you can turn your plastic panel over to look at it without getting your hands messy. When you are satisfied let dry. trim to size and  then finish your project.

This technique can be used for more than just cards. If you have an embossing machine which will hold larger embossing folders you can use this technique to make an insert for in a glass container and use a battery operated candle. Of course you can also do this technique without embossing the plastic. You can even stamp on the plastic using an ink like Stazon and adhering the tissue paper to the back.

I hope you will try this technique. It is a fun technique and the results are stunning. Thank you for stopping by.

January 22, 2015

Mixed Media Layout!

Ebrush Design Team: Mitsyana Wright Week 7 Cycle 1

Ooops Mitsy did it agaim  she went outside of her comfort zone and discovered new ways to wow us with her eBrush! I am so inspired by all of these wonderful techniques! Step out of your zone with me!


Hello Crafty Friends... For today's project I went waaaay out of my comfort zone and did my very first mixed media layout. I've always wanted to give mixed media a try but was too scared to, but after this I cam honestly say that it wasn't as scary as I thought it was going to be. I learned that any mistakes I thought I made were easily forgiven with more distressing and a lot more color. 


Supplies Used:
eBrush by Craftwell with the Spectrum Noir (SN) & Sharpie (SP) adapter heads
Spectrum Noir Markers (True Black, TN8, PP2)
Sharpie (Gold Metallic)
Tim Holtz Layering Stencils- Splatters & Measured
Sizzix Dies - Jelly Frames & Decorative Accents 
Hero Arts Stamp- Raindrop Background
Moment Ink Pad- Tsukineko (Tuxedo Black)
Gesso 
Mod Podge
Lace
Cheese Cloth
Patterned Paper (Fancy Pants- Fancy Free Collection)
Chipboard
Flat Back Pearls
Assorted Paper Flowers (Prima Marketing Inc.)
Bling (Prima Marketing Inc.)
Homemade Modeling Paste


I started by adhering a piece of patterned paper to a 12"x12" piece of chipboard. This will help prevent warping and keep my work surface flat. I then tore random pieces of coordinating patterned paper and glued and sealed it with Mod Podge onto the page.


Then, I stamped my layout using my Hero Arts' Raindrops Background stamp in Momento ink.


After stamping I created texture with my modeling paste and my Tim Holtz stencils in random areas around my page. Then I ebrushed over those same areas in my Spectrum Noir markers PP2, TN8, and True Black. The absolute best thing about ebrushing color onto my page is that there is virtually no drying time on the ink. So I can move right to the next step! 


I cut 3 frames from my patterned paper with my Sizzix Jelly Frame die and saved the centers on the side. I ebrushed the frames using my Spectrum Noir Marker in TN8 in the Spectrum Noir (SN) adapter.


I used my Sizzix Decorative Accents die and cut this regal shape out of chipboard. I then painted it with gesso then sprayed it with my eBrush with my Sharpie (SP) adapter and Gold Metallic Sharpie and then with my Spectrum Noir True Black marker again in the (SN) adapter around the edges.


I also used my eBrush to spray silhouettes from my Sheena Nature stencil onto the centers of my two of my 3 frames. For this I used my Spectrum Noir marker PP2 in my Spectrum Noir (SN) adapter head. 


I adhered all my frames and their centers onto a sheet of craft paper. Then I cut them all out creating solid pieces.


I also ebrushed my cheese cloth in Spectrum Noir TN8 to give it a mre worn and aged look. Again no drying time!! Yay! 


I adhered lace and cheese cloth to my page with Mod Podge and then added all my finished pieces die cuts over top with more Mod Podge. This ensures a very strong hold. 


Lastly, I added my Prima flowers topped with flat back pearls and bling to the page. 


I hoped you like this project as much as I enjoyed making it!

Thanks for stopping by!!

~ Mitsy


To see more of my crafty project please visit my personal blog at:
upontippytoes.blogspot.com

January 21, 2015

Travel Companion with the eBrush!

Ebrush Design Team: Jan Hunter  Week 6 Cycle 1

I was very happy to share this at CHA with so many passerbys! Everyone loved the image and love the thought of being able to embellish their personal totes as well! Thank you Jan for a great item!

I'm excited to share this project with you.  I've had this plain canvas bag for months just waiting to get a new look.  Crafter's Companion has provided most of the goodies for this eBrush Design Team project!


You'll need:
1 extra large plain canvas bag
Bubble Jet Set
Sheena Liberty stencil
stamps
Staz-On ink
Spectrum Noir Markers (EB3, EB5, EB8, IG3, LY3)
Sharpie (metallic copper)
Additional stencils as desired (includes Tim Holtz Journey Die Cut)
Craftwell's eBrush
painter's tape
Scrap paper for masking
cardboard covered with plastic wrap - or a t-shirt paint board


Prepare your canvas bag for "painting."  I used Bubble Jet Set following the manufacturer's direction to prepare the canvas.  Once the canvas was dried, I ironed it - there are still a few wrinkles here and there, but they added lots of additional texture and weren't hard to work with.

Insert the t-shirt board between the front and back of the canvas.  Secure with large rubber bands if desired for a smoother work surface.

I had a basic idea of how I wanted things to look, so I started by getting my background in place using a large background stamp (from Stampin' Up!)  and the postcard stamp (masking that while I sprayed and used the background stamp across the face of the bag's design area.  Be sure to mask off any areas that are likely to get some minimal overspray. Once that was done, I started using the stencils.  Using painter's tape, I secured the Liberty stencil by Sheena in place and using a grey marker in the eBrush tool, began spraying.   I wanted to add a little more depth, so I added a layer of copper marker on top of the gray.  The lower portion of the stencil is shrubbery and trees, so I used some green there and then added some brush strokes after removing the stencil for a little more depth and dimension.  (my oops, I didn't show the color in picture I used  - JG3, JG5)


I had some stamps I purchased from Oriental Trading several years ago and felt those would be perfect additions for this artsy project.  So I used the postcard and a cancellation stamp using Staz-On ink.  The image still need more, so I added a honeycomb stencil and sprayed a bit more using a couple more markers in browns and adding a spritz of yellow on top.  It was perfect.

Set colors according to the manufacturer's directions using Bubble Jet Rinse.
This is an easy and very adaptable project for any stencils you may have on hand... Sheena's stencils are great and I hear that there will be several more released this coming year!  Can't wait to see them all!
Be sure to stay tuned, there's lots more coming using the eBrush! Feel free to visit my blog for more eBrush ideas!


January 18, 2015

CHA-Learning the eBrush! Fun for all! - Debi Tullier

 Bye Bye CHA 2015


Craftwell had a beautiful booth! We had so many beautiful samples and many visitors!  Everyone was so excited to see such wonderful work from Craftwell's eBrush users!


A sneak peek of the newest addition to the eBrush line. The accessory all are waiting for! The eBrush Siphon! It is coming soon!! For those of you that are considering it for decorating food, it is certified food safe!


I just want to share all of the great things that I saw and learned  at CHA! First I have to admit that I didn't get to walk around much! It wasn't that I was kept for going I just wanted to tell all of the buyers interested in getting the eBrush in their shops how to find that "Sweet Spot". I had a wonderful time and met so many people. Inspiration loomed so large at this event! I shared your love of eBrushing with so many! We had people stop by from Panama, Denmark, Germany, Ecuador, and many other international spots. All wanted to try out the eBrush. The eBrush will soon be all over the world!

I was very honored to teach a class for Crafter's Companion using the Craftwell eBrush. I taught about an hour and forty minutes and it was all filled with techniques and tips! I have a surprise for you coming shortly! You too will be able to download my eBrush technique eBook very soon! I will have video links to all of my techniques! I can't tell you how excited I am and hope that you too will enjoy my book. 

I also forged friendships with fellow team members that will I hope last a lifetime! We all are there to inspire and be inspired! I met people I have only dreamed about. Some were the divas who started much of the industry back in the day! I only wish I could share all with you! 
I also have a tutorial on my salute to Vincent Van Gogh . I did and am continuing to work on a blue jean jacket which I did a rendition of Starry Nights on and will continue to embellish with other versions of his artwork! The eBrush is a wonderful tool for creating. I also thread painted it over the eBrush embellished area! This is just a small preview of it. I love using the eBrush with fabric!


Thank you for listening!  I am so excited! Many new things coming your way! Check out your local craft shop and see what is coming!


Happy New Year!!!
 Debi
'
 
Copyright © 2014 Craftwell Blog. Designed by OddThemes - Published By Gooyaabi Templates