DO NOT MISS
>>Follow our Facebook page for updates! >>Join our Craftwell Design Team: Apply Now!
Showing posts with label project. Show all posts

June 9, 2023

Airbrush Pattern Planter

Happy Friday!!

Katie here with another fun airbrushed planter project. Great project on your own or with kids.

Also could make for a nice gift with a plant.
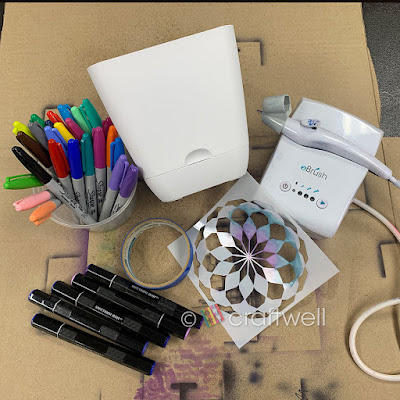


Materials

Craftwell eBrush Airbrush System

Sharpie markers

Spectrum Noir markers

Medium size plastic planter from Target

Pattern stencils from Amazon

Painter's tape

Disposable gloves (optional)


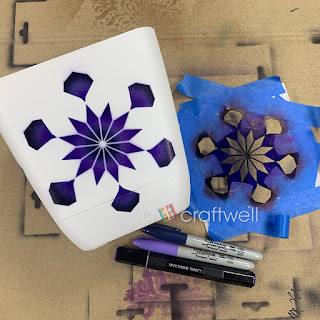
I kept it simple by just using one stencil and keeping the colors in shades of blue and purple.

Very important: always test your colors before using to make sure it's what you want.

Since I didn't want to use the whole pattern design, I use the painter's tape to cover up the parts I didn't want and position however I want. That's the fun part, you can create however you want and wherever on the planter.

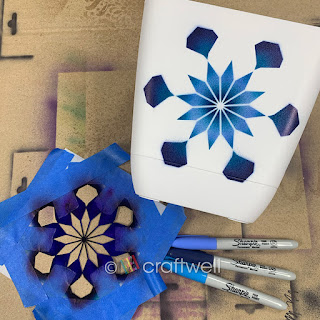
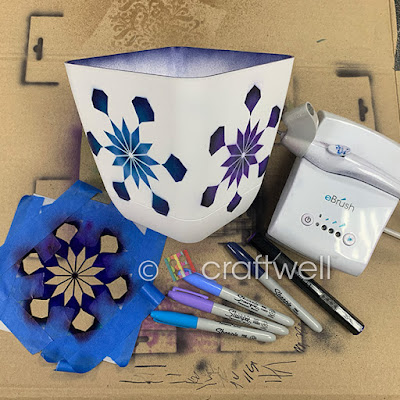
Went with the idea of positioning the pattern differently and making gradients with the colors I chose as well. Below you can see how they came out.


To add a little something, I airbrushed the inside of the planter and you could do the same or even make a pattern there as well.


I hope everyone liked my planter project and got inspired.

Until next time!

- Katie

August 13, 2019

Inspiring Altered Canvas


Greetings crafty dolls and guys from Desiree' of Her Own Fairytale with you!
Happy to be back and sharing my latest project with you all!
An altered canvas inspired by a Quote? A poem? A prayer?
All of the above! All I can say is that it's beautiful and came from an author name Susie Larson. As I recently hit one rough spot in life after another, these words inspired me AND reminded me I AM LOVED.

I started off this project with choosing a paper from the Black Rainbow stack from Michael's and it's an 8x10 canvas. It has all this pretty design and was in my craft stash.


I first flipped my paper over, traced around my canvas and cut it out using my paper trimmer. This will make the decopodging easier.


I put down a coat of white gesso on the canvas and let it dry.
Then I painted the canvas with a coat of white acrylic paint and also let it dry.
After giving them enough time to dry, I adhere my paper to my canvas and again let it dry again with all the decopodging.


I printed out the quote I wanted to use then cut it to bits and glued it down to my canvas. I did this by hand for the most part, clearly. Hehe! #HandmadeNotHallmark am I right?


It was then time to have the Snap machine get to Work!
I die cut some sparkles, a moon and I actually fussy cut out a heart from some other paper collection... from the stash of course.


After the dies are cut, they had to be arranged and adhered, right?
So that is what your girl Did! I used some holographic paper scraps, and even recycled some packaging paper by cutting some of the stars out of it. It was so pretty and hate to waste. Oh, I also had to add some beaded hearts and some sequins!


And this was the final product! I hope you LIKE and get INSPIRED! Most of all I hope you remember IF you are going through a rough time, these beautiful words can remind you too that YOU ARE LOVED! Please come back to visit this blog, be inspired by our other members design templates!

Sending you crafty love always!
      ❤

November 28, 2016

Christmas Calendar For Kids by Sukie Dhillon

Hello, this is Sukie and today I am sharing a fun project for kids.  I created a festive countdown calendar for Christmas.
My project started with an old clipboard that I was getting ready to toss out and then decided to repurpose it.  I used my eBrush, the Siphon adapter and some gorgeous Dixie Bell Chalk paint in Rebel Yellow.  I mixed in the paint with some water in the glass bottle to use with the Siphon adapter.
The end result of my painting was a beautiful, chalky, matte finish with great coverage.  There was no priming required with the Dixie Belle Chalk paint.  I sanded the edges of the clipboard for a vintage appearance.  Next, I used the eBrush to transform my die cuts by shading the edges.
Several of the die cuts and a left over scrap paper were embossed with the Teresa Collins Design Grids embossing folder using my Cut n' Boss.  The added texture from the embossing folder combined with the eBrush shading bring the die cuts to life.
I ran each of the bases for the numbers through my Xyron sticker maker and adhered them to some scrapbooking paper to create my countdown calendar.
Everything was adhered to the clipboard base.  I embellished the clip with a bit of washi tape and a ribbon bow, both with the countdown theme.
Thanks so much for stopping by!  Have a wonderful day!

November 11, 2016

Freebie Friday! Dinner Table Goodies!

Thanksgiving is right around the corner, and this free printable will spruce up your dinner table with very little effort.  Make a big impact in little time!!

Simply download the free printable here.

Once downloaded, the file is already sized for a standard 8.5" x 11" Letter Size printer page.  I used brown kraft paper to add a shabby chic look.

After it has printed, simply trim into three separate panels.


Use an Xacto blade to cut along the top of the design as shown in green on the picture below. Do NOT cut all the way to the edges.  You want to make a pocket.


Once cut, simply insert a napkin and silverware.  Your table will be darling!


November 2, 2016

Pumpkin Thanks by Jan Hunter

2016-10-16 08.54.15 copy

We've put all the jack o lanterns, mummies, ghosts and trappings of Halloween away -- Turning the calendar to November still brings lots of fond memories of crisp leaves, pumpkins, apple cider and most importantly, family gatherings.  Pumpkin puree for pies, bread, cookies and soups and roasted seeds for late afternoon and evening snacking. Our focus word for November this year is Gratitude.  This year, I wanted to share something a little different than what what we have done in the past.  
2016-10-16 08.54.45 copy


A fun project for a simple gift to special friends is this 3-d paper pumpkin.  I love how it turned out with dry embossing and additional addition of color using the eBrush and siphon adapter.  
You'll need:
Paper (AC paper - textured burnt orange, textured dark brown and smooth white)
Electronic die cutting machine and software
SVG file (SVGCuts' Pick a Pumpkin SVG Kit)
Cut-n-boss, embossing folder and appropriate plate for the folder you're using
eBrush and siphon kit
Marker and adpator (Tombow)
Createx Airbrush Paint (orange, green)
adhesive
Hot glue gun and glue stick

Using the electronic cutting machine, cut the paper using the orange for the pumpkin and the panels, white paper for the leaf, flower and centers, brown for the stems.  Set the white paper pieces aside for right now.
2016-10-06 12.53.24 copy


Emboss the orange panels for the pumpkin in the folder you desire.  Let the Cut-n-Boss do the work.  Remove from the folder.
2016-10-06 18.31.55 copy

Using the eBrush and the siphon, spray the edges of each panel lightly with orange.  The Createx paint is pretty close in color to the AC paper. 
2016-10-06 18.39.31 copy
Change the color on the siphon (You  may also want to clean the straw so you have no orange bleed through with your green)  Using the green paint, spray on the fold lines of the pumpkin base. 
2016-10-06 18.05.07 copy
This adds just a bit more depth to the pumpkin, you could choose brown or create a burnt orange that was a little deeper -- even a red.  Most importantly, have fun. 

Once you have the pumpkin and panels sprayed (and cleaned your siphon), switch to the marker adaptor.  I used a couple of yellow markers, a deep brown and a dark yellow green to color the remaining white pieces for the flower and leaf.  Here's the leaf --

2016-10-06 18.09.32 copy


Glue the pumpkin, leaf and flower together as directed in this video.  
Display or gift as you desire.  As part of our gifting this year, we're including a personalize thought and card of gratitude for each person receiving one of these from our "Pumpkin Patch."
2016-10-16 08.54.30 copy
Hope you're enjoying the week of blogging by Craftwell's Creative Design Team!  There's plenty more to see this month!  You won't want to miss a single day.  For more eBrush and Cut-n-Boss projects, please drop by my blog


Jan  :o)
Nurture your creative heart today!

April 14, 2016

Marvelous Mini Notebook by Yolie Burke


Hello and welcome to the Cut N Boss week.  This is Yolie and I am so happy to be sharing my first project as a member of Cut N Boss Team.

I have a little addiction to stationery specifically notebooks.  I have stacks of notebooks I purchase simply because they are so cute!  Raise your hand if you have the same addiction.

I created a mini notebook for a friend.  I used pattern paper from DCWV Quince Blossom, Latina Crafter dies and stamps. 

Using Latina Crafter's 4"x6" journaling dies, I took 4 sheets of copy paper, folded in half and ran it through the Cut N Boss.  I did this several times until I had a decent amount of pages for the notebook.

I then punched the pages with the Cinch binding system.

I finally opened my new Prima doily die.  It's absolutely gorgeous and it cut beautifully.  I also realized I needed another layer for the front cover, so I took a banner die and cut the green pattern paper.


I stamped the library card with Latina Crafter's You stamps set from the Be a Blessing line, die cut the word "amigas" trimmed the 's' and adhered the elements to the front cover.  I glued the buttons and the mini notebook is complete.


Thank you for joining me today.

November 5, 2015

eBrushed Polished Stone and Dreaming Tree

eBrush Design Team: Jan Hunter  Week 1  Cycle 3

Hi everyone.  I've been revisiting some old techniques and discovered that one from a few years ago works especially well with Craftwell's  ebrush.  WAHOO!


 Do you remember the polished stone on glossy stock we were all enamored about and used for lots of fun as backgrounds for stamping?  Well, guess what???? It works! And even better, is that Leo of Dreaming Tree (3DSvg.com) is our sponsor for the month!  Loving these new files!  And I can see so much potential in being adapted for other holidays....  Leo, these would be fun to see in Christmas and Valentine Days options!  ;)
For this technique you'll need:
Glossy photo stock paper (I used 12 x 12 sheets)
Vellum
Markers (Spectrum Noir were used in this project)
eBrush (CraftwellUSA)
Hair spray in a pump bottle (generic brands work well too)
electronic cutting machine
Stingy Jack's Halloween Pumpkin Lantern III  File from Dreaming Tree (3DSvg.com)
Using the basic technique for polished stone and to save some time, ebrush the colors as desired on the 12x12 stock.  TIP:  Be careful not to over wet  as the paper does buckle and there's no way of getting those out without taking off the shine and color -- yeah, don't ask!  LOL 

Take a peek at this quick video on how I used the technique.


Cut your papers using the desired file.  TIP:  I found that since my photo paper was a heavier stock, I had to set my blade deeper than normal and cut using a chipboard setting and a multi-cut of 2 on my die-cutting machine.    (I did use different cut-outs than in the original file - Leo gave his permission to make the alterations).


(yes, I did cut out all of my pieces before coloring -- but having all the coloring done earlier would have saved some time and made for more consistent  flow in the overall pattern of each of the face pieces)  Not shown:  eBrushed Vellum.  Quick and easy using colors as desired.  Have fun and play!


The embellishment shapes were made using basic shapes in the software shape library for my machine and I used the union command to connect them.  There's a lot of potential in that library!  Create a shadow (contour cut) for the bottom layer if desired.

Follow the clear directions found in the assembly video here.  You'll not be disappointed in the outcome.


Thanks for stopping by!  Stay tuned for more eBrush fun tomorrow and next week! You'll find much more on my blog, here. 


'
 
Copyright © 2014 Craftwell Blog. Designed by OddThemes - Published By Gooyaabi Templates