DO NOT MISS
>>Follow our Facebook page for updates! >>Join our Craftwell Design Team: Apply Now!
Showing posts with label gift. Show all posts

June 9, 2023

Airbrush Pattern Planter

Happy Friday!!

Katie here with another fun airbrushed planter project. Great project on your own or with kids.

Also could make for a nice gift with a plant.


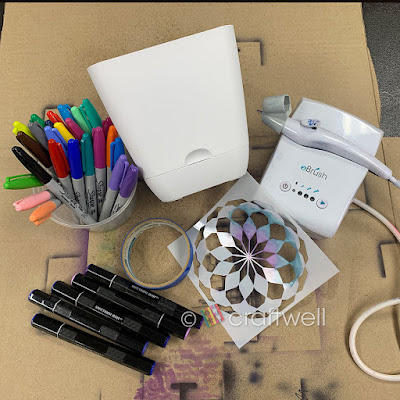
Materials

Craftwell eBrush Airbrush System

Sharpie markers

Spectrum Noir markers

Medium size plastic planter from Target

Pattern stencils from Amazon

Painter's tape

Disposable gloves (optional)


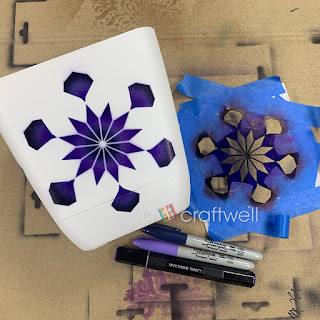
I kept it simple by just using one stencil and keeping the colors in shades of blue and purple.

Very important: always test your colors before using to make sure it's what you want.

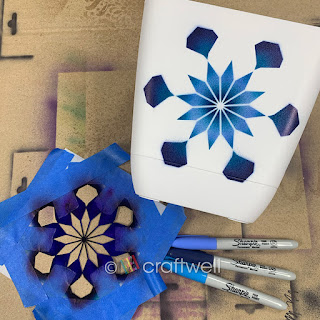
Since I didn't want to use the whole pattern design, I use the painter's tape to cover up the parts I didn't want and position however I want. That's the fun part, you can create however you want and wherever on the planter.

Went with the idea of positioning the pattern differently and making gradients with the colors I chose as well. Below you can see how they came out.

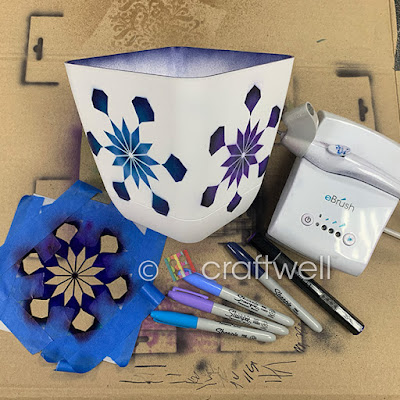
To add a little something, I airbrushed the inside of the planter and you could do the same or even make a pattern there as well.

I hope everyone liked my planter project and got inspired.

Until next time!

- Katie

October 27, 2022

Pumpkin Shaker Magnet

Hi Everyone! 

Katie here with another project and it's perfect for fall or even Halloween.

This was a joint project, I worked together with my sister as she was going on a Disney Cruise with her husband and kids, and they signed up to exchange gifts with other families.

So I suggested the idea of making pumpkin shaker magnets to make it special, festive and inexpensive. Also she needed to make about 10 of them.


Materials

eBrush Airbrush System
Sharpie markers
10 Wood shaped pumpkins (from Michaels)
X-Acto Knife
Orange cardstock
Double-sided adhesive foam tape
Variety sequins pack (from Amazon)
Halloween nail art kit (from Amazon)
Acetate sheet

For those who don't have those fancy electronic cutting machines to cut-out your designs (that's us), the designs were cut-out with a X-Acto knife and be careful! For the acetate sheet, cut shapes similar to the pumpkin (don't worry you can use scissors).

Took the eBrush to airbrush both the wood pumpkins and frames with just using an orange and green shade from Sharpie.

The fun part (at least I think so), assembling the shaker and have fun choosing the inside pieces (my sister had her daughter help).


Here's the finished product:


Hope you guys like this project and get inspired to make your version.
Happy Halloween!! 

Katie

December 18, 2020

Christmas Treats Basket

Hello everyone!! This is Berina here today, with a cute little treat basket, just in time for Christmas treats.


I used the Divinity Designs Bountiful Basket die to die cut the basket out of kraft card stock. It was pretty easy to do. It fit on my snap machine and was a breeze to cut. I needed 2 pieces of each die cut, and it was pretty easy to assemble. I stamped and die cut the Heartfelt Creations Poinsettia and shaped it with embossing tools. I die cut the greens using the Sizzix Mini Holiday Greens die set. I adhered the poinsettia and the greens on the basket and added some Nuvo drops for some berries.

Now, I added some Nuvo drops bottles and Stickles bottles to show you the size of the basket. Now, this is a basket I would love to receive ;)


One more pic, before you leave :)


How did you like this basket today? Please do let me know in the comments below. Thank you for stopping by. Have a great Festive Season and a wonderful New Year!

- Berina

February 14, 2020

Valentine Box

Hello everyone!! This is Berina here today, with a Valentine's box that I made for my daughter. I do have some pictures I took along the way as well. My daughter loved how it turned out - she loves butterflies :)


I started with an empty cereal box. I cut out 3 of the flaps at the top (2 tiny ones and 1 large one).


I measured the width of the box and cut that from one of the sides. My goal was to make a box with a close-able flap, which I planned to use velcro for.


I covered the entire box with a red foil gift wrap, which I got from Dollar Tree.


I die cut some butterflies on gold mirror card stock using the Crafter's Companion - Chic Butterflies set. I die cut my daughter's name - Amelia - on the same gold mirror cardstock, but this time I lined it with double sided tape on the back, to make it easier for adhering. I couldn't find my double sided sheet, so used 3 lines of double sided tape ;) The alphabet dies are from Whimsy Stamps. I adhered some velcro fasteners on the flaps. I loved how it turned out. My daughter loved it - she loved all the sparkle and glimmer and she adores butterflies! I love my Cut N Boss - it has really made me fall in love with die cutting.


Please do let me know what you think. Thanks for stopping by. Have a great day!

-Berina

October 23, 2019

DT: Spooky Halloween Tag/Card


 Dear Scrappers,

This is Veronica, from Vicky's Scrapping Passion sharing my post for Craftwell:
With Halloween around the corner, I made this tag/card for a dear friend of mine, who always sends me cards:


 and this is the backside:


I bought this TH dies a while ago, but haven't done any halloween projects in a while, thus, I decided to give them a try while I was keeping an eye on our AHG troop pumpkin patch:


I'm amazed about how long the SNAP's battery last. I really love that I can take it everywhere I go and can do my crafting projects.

In short:
I cut the wood grain cardstock (HeroArts)  first with the circle die and then, with the owl die I cut the outline. I cut a complementary circle using the orange distress cardstock (TH) and layered the cuts:

Later, I cut the sentiments from the same wood grain cardstock, distressed with a bronze ink (HeroArts), and let them dry. Meanwhile I added some black stickles to the owl's eyes:


When the sentiments die cuts were dried, I passed them through the Xiron to add adhesive, while I distressed the orange background of the tag. I cut the edge strip of the Mischief cardstock:


In short, I used the printed card stock with Belle and the books, which coordinates perfectly with the die, and cut it out using my SNAP for the mini-album project. I used one of those left-over cuts for making this card, by cutting the printed cardstock to fit in my card. I stamped the sentiment using HeroStamps ink and I also stamped the background for the inside of the card, stamping another sentiment in top. For extra spunk, I added rhinestones from Queen & Co and popped up the Belle die cut and the stamped sentiment. Super easy...


For more pictures and a tutorial, please make sure to my post and my blog for further ideas:

September 20, 2019

Back to school cookies for teachers

Hello Everyone,

Swathi here from CookiesCakeandLove. This time around I made some sugar cookies for my son’s teacher and frosted it with white frosting and airbrushed it with eBrush to give a nice color to the cookies.


I made the cookies using the sugar cookie recipe from preppy kitchen blog and iced it with Wilton readymade white royal icing.

I cut out apple and star shapes to make my back to school cookies and airbrushed it after the royal icing dried for half hour and solid to touch.

It made great gifts and everyone loved it. The Craftwell eBrush made my job simpler and looking forward to make many more cookies for gifting this holiday season.


February 14, 2017

Things I Love About You... By Heather Wilson

Valentine's Love Cage of Affirmation!


Instead of using a card, I put together this little project as a way to show my boyfriend I love him this Valentine's Day.  Here's the materials you need:


Cut n' Boss and heart die cuts
decorative paper
Ebrush and markers
Small decorative bird cage
Hot glue
Embellishments (beads, lock, key, fringe, lace, etc.)
Jump rings
A colored pen to write with


Start with a sample piece of your decorative paper to practice on. You'll want to test this out with your Ebrush and see how different colors look on your paper. If you like the results, you can move on to a larger sheet and put all the colors you like on it.


I didn't leave any areas a solid color because I wanted the print on the paper to show. I did just enough to give it a bit of color.


Now you can start cutting out hearts with the Cut n' Boss! Remember to put the die cut flat side down on platform D. Lay your paper on top of that, then layer A, B, then A on top. I started out with about 15 hearts and later it ended up being 20 because I did some coloring with the Ebrush on plain white paper.


Take the color pen of your choice (I used pink!) and begin writing the things you love about your significant other! (You can also do this for family members or friends, but of course what you write would be much different!) I also wrote a couple favorite memories, and included some in-jokes in some of them.


Setting your hearts aside, you can start spicing up your bird cage a bit. I attached a heart shaped lock with a couple jump rings to the clasp of the cage lid.


Next I put a key above the lock by wrapping some wire from the cage around it with my pliers to hold it in place.


The bottom of the cage looked too plain to me, so I found some beaded fringe in one of my crafting stashes (you can never have too many craft stashes!) I attached it by putting a line of hot glue on the bottom of the bars. Tip: glue from top to bottom so the stringy parts can be pulled off easily from the bottom edges).


End your strip by overlapping the end where you started, and hot glue in place.


I hot glued some beads to the ends of the swirly wires on top. It needed some color there to balance out the trim on the bottom.


Now make your tag, either by buying some plain ones or cutting your own with the Cut n' Boss. Then add some color to it with the eBrush. I used a light pink sharpie first, then went around the edges with a slightly darker sharpie.


After writing "Things I love about YOU", attach the tag with two jump rings to the top of the cage.
Now you can add your notes to the cage in a neat pile. I put the sweetest ones on the bottom so the best ones would be saved for last.


Here it is finished! Either set on a table, or hang it up somewhere. If you have a bigger cage, use it as a centerpiece on the table for your loved one to find on Valentine's Day!
Have a great Valentine's everybody!


January 2, 2017

Gift Giving by Sukie Dhillon

Happy New Year!  This is Sukie and today I project to share which can quickly be transformed into an elegant hostess gift.  Now that New Years is over I am able to share this gift giving idea.
I started my project by cutting out a wine bottle tag which I designed in Cricut Design Space.  The bow and sentiment were also cut with my electronic die cutter.  I cut the white banner out with the Fish Tail Banner dies.
The wine bottle tag was embossed below the score line with the Modern Stripe embossing folder. The shimmer paper gives the embossing an elegant look.
Once I created the bow, everything was adhered on the wine bottle tag.  I ran the intricate sentiment through my Xyron sticker maker for easy application.
The wine bottle tag is a super quick and easy way to transform a wine bottle.  The embossing adds the perfect amount of dimension.
Thanks so much for stopping by!  Have a great day!
'
 
Copyright © 2014 Craftwell Blog. Designed by OddThemes - Published By Gooyaabi Templates