DO NOT MISS
>>Follow our Facebook page for updates! >>Join our Craftwell Design Team: Apply Now!
Showing posts with label Pumpkin. Show all posts

November 9, 2016

Pumpkin Whimsy by Jan Hunter

Last week's post featured pumpkins.... I regret to inform you that today's post features more pumpkins!  I hope you'll bear with. I didn't want anything too formal looking, but not quite prim either.  Maybe this leans a bit more on the whimsical side... so here goes!

2016-10-16 11.03.25 copy

We've been shredding a bunch of old paperwork the past several months.  This last batch of shreds didn't make it out for the latest pick-up -- so we decided to put it to good use.

You'll need:
shredded paper (or crumpled paper would work too)
garbage and grocery bags
twine
masking tape
eBrush and siphon adaptor
Createx Airbrush paint
Hammered copper paint (spray can)
Patience ( you have to wait for the paint to dry)
Partially fill the garbage bag and two small grocery bags  (our local markets are still using plastic) with shreds.  loosely shape into a circle and tie the tops into a knot.  The largest and middle bag knots should lie pretty flat.

2016-09-21 07.04.19 copy
Using the twine, shape the pumpkin by wrapping the twine over and under the bag.  Tie off .  Repeat for each "pumpkin."

2016-09-21 07.15.25 copy
Make sure your work space is protected -- I worked in the garage and have lots of cardboard to protect surrounding surfaces from any overspray.  If you're sensitive to fumes and choose to use the copper spray, make sure the area is well ventilated.  TIP:  Allow at least 2 to 3 days for all your paint to dry on the plastic surface of the bags.

Wrap some masking tape around the knot of the smallest pumpkin to create a stem.  Using the eBrush with the siphon adapter, spray the stem and the area where the twine is wrapped.  Just to add a little depth to the colors you'll be spraying on top.  Your paint may pool a bit and will not dry immediately.  This is where the patience comes in.  LET IT DRY completely before going to the next step.

(sorry, the pics for this step and the next did not turn out) 

I wanted a bit of metallic - so I sprayed with some hammered copy spray paint -- since I didn't have any acrylic or enamel metallics for use in the eBrush on hand...  LET IT DRY completely.  We were experiencing some heat and humidity the days I was working on this, so the pumpkins had to sit for a couple of days.....  can you see me pacing and checking to see if the paint was dry yet? 

Once the metallic paint is fully dry, get your eBrush ready with some orange paint and spray to give the copper paint a hint or orange.  Spray more in some areas and lightly in others.  This adds to the look. 

Use some E6000 to secure the pumpkins in a stack.  You can spray with 2 coats of sealer for a little more weather proofing if your pumpkin stack will be directly exposed to the elements and not protected.  Add some foliage, raffia or ribbons to finish.

2016-10-16 11.02.30 copy

If you try this, and put your own spin on it, I would love to see the pictures!  In the meantime, I hope you'll build in some creative time this week and every week!  Nurture your creative soul! 

Don't forget that the rest of the Craftwell team will be blogging for the next two weeks this month.  Don't miss out on any of their creative projects. 
             
 Happy Crafting!  
Jan  :o)
  Nurture your creative heart today!

November 2, 2016

Pumpkin Thanks by Jan Hunter

2016-10-16 08.54.15 copy

We've put all the jack o lanterns, mummies, ghosts and trappings of Halloween away -- Turning the calendar to November still brings lots of fond memories of crisp leaves, pumpkins, apple cider and most importantly, family gatherings.  Pumpkin puree for pies, bread, cookies and soups and roasted seeds for late afternoon and evening snacking. Our focus word for November this year is Gratitude.  This year, I wanted to share something a little different than what what we have done in the past.  
2016-10-16 08.54.45 copy


A fun project for a simple gift to special friends is this 3-d paper pumpkin.  I love how it turned out with dry embossing and additional addition of color using the eBrush and siphon adapter.  
You'll need:
Paper (AC paper - textured burnt orange, textured dark brown and smooth white)
Electronic die cutting machine and software
SVG file (SVGCuts' Pick a Pumpkin SVG Kit)
Cut-n-boss, embossing folder and appropriate plate for the folder you're using
eBrush and siphon kit
Marker and adpator (Tombow)
Createx Airbrush Paint (orange, green)
adhesive
Hot glue gun and glue stick

Using the electronic cutting machine, cut the paper using the orange for the pumpkin and the panels, white paper for the leaf, flower and centers, brown for the stems.  Set the white paper pieces aside for right now.
2016-10-06 12.53.24 copy


Emboss the orange panels for the pumpkin in the folder you desire.  Let the Cut-n-Boss do the work.  Remove from the folder.
2016-10-06 18.31.55 copy

Using the eBrush and the siphon, spray the edges of each panel lightly with orange.  The Createx paint is pretty close in color to the AC paper. 
2016-10-06 18.39.31 copy
Change the color on the siphon (You  may also want to clean the straw so you have no orange bleed through with your green)  Using the green paint, spray on the fold lines of the pumpkin base. 
2016-10-06 18.05.07 copy
This adds just a bit more depth to the pumpkin, you could choose brown or create a burnt orange that was a little deeper -- even a red.  Most importantly, have fun. 

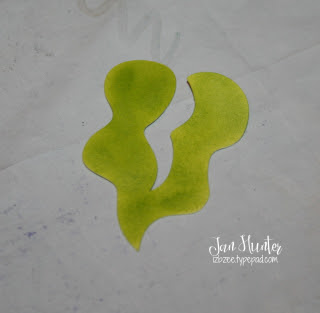
Once you have the pumpkin and panels sprayed (and cleaned your siphon), switch to the marker adaptor.  I used a couple of yellow markers, a deep brown and a dark yellow green to color the remaining white pieces for the flower and leaf.  Here's the leaf --

2016-10-06 18.09.32 copy


Glue the pumpkin, leaf and flower together as directed in this video.  
Display or gift as you desire.  As part of our gifting this year, we're including a personalize thought and card of gratitude for each person receiving one of these from our "Pumpkin Patch."
2016-10-16 08.54.30 copy
Hope you're enjoying the week of blogging by Craftwell's Creative Design Team!  There's plenty more to see this month!  You won't want to miss a single day.  For more eBrush and Cut-n-Boss projects, please drop by my blog. 


Jan  :o)
Nurture your creative heart today!

August 14, 2015

Happy Fall

eBrush Design Team: Yolie Burke Week 9 Cycle 2

Happy Friday this is Yolie sharing a project for Team eBrush.  This month we are sponsored by Kadoodle Bug Designs.  They specialize in SVG files, cutting files for your electronic die cutting machines.

I'm ready for Fall. Yes I am, so looking forward to cooler weather and pumpkin everything.  Speaking of pumpkins, let's get to my card.
I cut all the pieces of the Pumpkin Cupcake on white card stock.   I used the Sharpies pictured and Spectrum Noir T3 and T4.  I used the first setting on the eBrush and because the pieces are small, I used washi tape to hold the pieces in place.


I chose not to use the pieces of that make up the cupcake liner.  Instead I used the cutout as stencil.


Here are all my pieces eBrushed ready to be glued down onto the white background.


I embossed the card base, added a doily and made a slit on the fold to thread the hemp cording.  I used dimensional adhesive to pop the cupcake.


Here's a closer look. I hope my project inspires to use white card stock to create some fun eBrushed color card stock.


Thank you for stopping by today and enjoy your weekend.


GIVEAWAY ALERT! $25.00 Gift Certificate for Kadoodle Bug Designs!  Make sure to comment on this post , ALSO  like FB pages : Craftwell and Kadoodle Bug Designs

October 22, 2014

Trick Or Treat Banner!

Ebrush Design Team: Jan Hunter Week 1 Cycle 1

Wednesday brings us to Jan Hunter!  She has a delightful sense of design.  She has so many more bright and interesting projects to come!


Trick or Treat Banner


Fall has arrived and Halloween is just a few days away!  Need something that works up quickly?  This may fit the bill. 

You'll Need:
2  8.5x11 inch pieces of white cardstock
2  8.5x11 inch pieces of black cardstock
Desired facial designs - I chose this one, Jack Pumpkin
Electronic die cutting machine and associated software
(Or you can cut a large tags out of cardstock)
Adhesive (the Xyron 5" sticker maker was perfect for this)
Checkerboard Stencil (my design)
Embossing folder and embossing machine
Craftwell's eBrush
Sharpie Markers in dark gray, dark brown and orange

If you're using an electronic cutter, using your basic shapes library, resize a tag to 5 x 7 inches. copy and paste it an additional two times on your mat. Add the desired facial features to each tag front. Add the text to each tag as desired.  Make that that all lines are set to cut.  I added a shadow layer the same size as the original tag, hide it while you cut the tags in white paper.  Cut only the shadow with the black cardstock. 


Emboss the lower section of each white tag piece with your choice of embossing folder - leaving the top of the tag unembossed.  With a chackerboard stencil secured in place on the top part of the stencil, spray with the eBrush as desired, making sure that the bottom of the tag is protected from overspray. 

Now, cover the upper portion of the tag while you spray the bottom section of the tags.  Adhere the black backing now.  If desired, you can use the eBrush and the brown sharpie and lightly spray the edges of all the tags for an antiqued or distressed look.


String your banner together.  I used a button to secure the cording to each tag.  Add fibers, netting, beads, buttons or any other embellishments you desire to complete your banner for hanging. 

Thanks for dropping by and hope you'll enjoy some last minute Halloween crafting for your home or as a gift!
Jan

Wonderful Project, Jan! We love Jan's creations and you can learn and share with her by visiting her blog. Also  don't forget to join eBrush by Craftwell Facebook group!


'
 
Copyright © 2014 Craftwell Blog. Designed by OddThemes - Published By Gooyaabi Templates