DO NOT MISS
>>Follow our Facebook page for updates! >>Join our Craftwell Design Team: Apply Now!
Showing posts with label Bic Mark-Its. Show all posts

March 2, 2016

Welcome Spring!

Ebrush Design Team: Jan Hunter Week 10 Cycle 3


Hi Everyone.  Jan here sharing a fun Spring card in a box.  The eBrush made quick work of all the elements in the projects....  so let's get started.


You'll need:
Cardstock (this project started with all white cardstock)
paper trimmer/bone folder
Dies (Teresa Collins - Personally Noted and Thankful Holidays)
Embossing folder (Woodgrain)
eBrush
Markers
Cut-n-Boss
brads, half pearls
adhesive
paper crimper

Basic Box:
Cut a strip of cardstock 9 inches wide by 3 inches high.  Cut another strip 4 inches by 3 inches.  Score the 9 inch strip at 3 and 6 inches.  Score the 4 inch strip at 1/2 inch and again at 3 1/2 inches.  These smaller scores make the tabs to attach to the larger strip.  Set aside.

Cut strips 4 inches by 1/2 inch.  Score each of these at 1/2 and 3 1/2 (these are the inserts that will hold the decorations of your card).

Cut 3 panels for the front and 2 sides of the box at 2 3/4 by 2 3/4 inches.  The full sheet sized woodgrain embossing folder fits all three of these panels with room to spare.  Emboss using the Cut-n-Boss.

Get your markers and eBrush and start coloring.


Put your box together now.  Place the inserts in the box so the top edge of the inserts are flush with the top edge of the box. Fold the box flat as you secure the tabs.  There is room for a 4th insert if you desire....

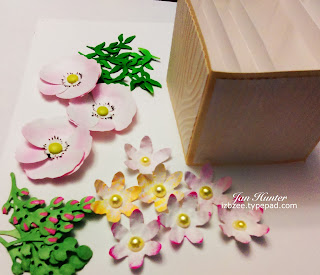
Using the TC dies, cut all of the lettering (Personally Noted, the small flower and greentery (Thankful Holidays).  The poppy die can be found here.


I ran the flowers through the paper crimper a couple of times and using the eBrush, added a bit of color. If you choose to make blooms o the greenery, mask that area and spray the rest of the piece.  Remove the masks and fill in the uncolored area with a marker.  Embellish with brads, pearls or other details as desired.


Place the flowers and greenery as desired attaching to the strips securely.

Tip:  I added a strip of paper to some of the flowers, greenery to a bit more height.  The three poppies are glued together on the overlapping petals in a slight arch.

I tried for a bit of ombre shading on the wording by holding the eBrush close then pulling it away as spray towards the top of the piece.  Glue in place.


Thanks for dropping by and taking a peek today.  Hoping you have some creative time scheduled on your calendar this week.  Have some fun!  It's a great stress reliever!  


September 9, 2015

Bella Blvd Memories Album, part 2

eBrush Design Team: Jan Hunter Week 11 Cycle 2

Hi everyone, it's my turn to share more of the album I debuted here last week.  This week, I'd like to share a glimpse of the inside pages.  Here's the cover again as a refresher.


Remember this photo from last week as well?  Blank pages....

You'll need:
Craftwell eBrush
Markers (I used BIC brand)
Cardstock, white (110lb Neenah was my choice)
Bella Blvd Just Add Color! papers, Trinkets (stickers), B&W, Enamel DooDads (arrows, stars, photo corners and hearts)
die cuts (border, heart flower, letters) I used my electronic cutting machine to accomplish this.
Micron .05 pen, black for doodling if desired
Other embellishments as desired
Adhesive - Xyron was used for this project

Remember all those pieces you cut for the pages, go ahead, center and layer them on the album base pages if you didn't do those last week (dimensions are shared in last week's post).  Add desired words from the Trinkets pages.  I also used some enamel DooDads on the pages with the pictures*.  I've colored them using markers!  Slick!

(*Due to some privacy issues, I'm not able to share the pictures that are included in this album. So I hope you won't mind some blank spaces.)

Below are some pictures  of  some of the pages.


The nice thing about this album is that you're not limited by the number of pages.  You can continue to add as desired if you don't finish off the back cover.  Currently, this album lays relatively flat, so I don't need any "ties" to keep it closed, however, if your thinking you'd like a closure, by all means add one.

Hope you're inspired to capture the spirit of some fun late summer memories or just catch up on an album.  Enjoy some scrapbooking time. We'd love to see what you create too.  So join us over on the FB eBrush page and share! AND dn't miss out on the rest of this week's designs by the eBrush Team...you'll find us all here.  We'll see you in October!


September 2, 2015

Bella Blvd Memories Album, part 1

eBrush Design Team: Jan Hunter Week 10 Cycle 2

It's Wednesday and my turn on the blog to share an easy-peasy project using Bella Blvd Just Add Color! papers and trims!


I was so excited when my package arrived with all the Bella Blvd goodies in it!  I wanted to combine my love of papercrafting and scrapbooking (of which I'm terribly behind!).  This accordion album seemed to be a perfect fit for the start of today's project --- I'll share more of it next week!

You'll need:
Craftwell USA eBrush
Markers (I used BIC brand)
Cardstock, white (110lb Neenah was my choice)
Bella Blvd (Just Add Color! papers,  Trinkets (stickers) B&W, Enamel DooDads (arrows, stars, photo corners, and hearts - I'll be using more of the stickers and DooDads in next week's post, so stay tuned!
die cuts (border, heart, flower, letters)
Micron .05 pen, black
Other embellishments as desired
Adhesive ( I used Xryon for this project for edge to edge coverage!)

 Let's get started:
Cut 4 white card sheets at 10.5 inches by 5 inches.  Score at 5" and again at 10" on the long side.  Repeat for each sheet.  Use the 1/2 inch wide scored section as your gluing tab to create your accordion style book.  Here's what mine looks like before adding any embellishments.


These are the die cuts I made using my electronic cutting machine.  If you have dies or chipboard cuts, those will work as well. 


Now the real fun begins.  Cut your Bella Blvd Just Add Color sheets to 3.75" square.  Enough for your cover and the number of pages you want to add them to.  Also get a few more sheets of your white cardstock and cut as many pieces as you have pages at 4 7/8 inch and set those aside.    Also cut 2 pieces white cardstock at 4" square.  For this particular post, I'm only sharing the front of the album.
Get your eBrush, markers and let's get some coloring done.

Now, that you have all your coloring done, time to get a few things put together.  I chose to use some Xyron adhesive for this project. Run the white 4 7/8" pieces through the machine and apply to each of the album pages.  Add a colored square of Bella Blvd to the center of each page as desired.

For the cover:  I have a roll of burlap and cut a square just a little larger than 5 inches.  I chose to also put that through the Xyron machine for good adhesive coverage and to make sure it would stick!  Added my cover elements as shown below.

I have to admit that since I'm crafting "on the run" this month, this didn't turn out all that bad.  Next week, I'll share some pics of the inside.

As much as I'm loving my current surroundings and being with extended family, I will be grateful to get back home and into my regular crafting space early next month!

Hope you have some crafting time set aside for the week!  If you haven't already, be sure to join us on the eBrush Facebook page!


May 13, 2015

Mini Pallet with Robin

Ebrush Design Team: Jan Hunter Week 3 Cycle 2


I love this beautiful vintage looking piece. So delicate and sweet! Thank you Jan!


Hi, Jan here for a Wednesday project featuring the eBrush.  There are times when I wish I had a pallet or two hanging around this place... however, in this case, some popsicle sticks will suffice.

You'll need:
Craft sticks
markers (Bic Mark-its)stamps (assorted)
inks (assorted)
ebrush
sandpaper (extra fine)
Stencil (Judith Kim for Craftwell)
electronic cutting machine and software


I used some painter's tape to line up the sticks.  One they are secure, get your ebrush, markers and spray a little here and there to create a little color for your background.


At this point, I created a mask for the focal image, the Robin; and using some repositionable glue on the back placed it on the mini pallet.  I inked up a few stamps and began stamping a collage background.
Once you've got your background stamped, remove the mask -- and save it for another project.  Now, you can stencil the robin.  3 easy steps thanks to Judith's wonderful design.  Then to soften the colors just a bit... I sanded the front of the "pallet."


This is just a quick project and has lots of potential.  Mini quotes, more stencils, card fronts, etc.... Tell me what you think.

Thanks for stopping by!  Enjoy your crafting time this week!  And don't forget to check back for the rest of the design team's fabulous projects this week; there's lots of ebrushing afoot!


January 28, 2015

I {HEART} You!

Ebrush Design Team: Jan Hunter Week 8 Cycle 1

Jan Hunter's beautiful Heart creation is so moving. I would love to create one for each of my friends and family members. They are the riches of my heart and Jan has got it covered with this beautiful project! 


These ebrushed framed clay hearts are fun to make -- whether you choose to use air-dry or baked clay, they're lightweight and could be a quick gift for someone you love.

You'll need:
clay (for this group of framed hearts, I used a cornstarch/baking soda clay and air-dried)
Craftwell eBrush and associated adapter for your markers
Markers of choice (I used Bic-Mark-Its in light pink, tan and light yellow)
cardstock
SVG File (this file came from 3DCuts.com and I just used the basic box from the Heart Box file, pieces 1, 5 and 6)
Sharpie (Ultra fine point)
electronic cutting machine and software
glue
soap molds (heart)
glue gun

Prepare/condition clay.  Press into mold which has been generously brushed with cornstarch as a release. Unmold and let dry.  (be aware that too dry of air in your house, may result in cracking - so make a few extra.) Mine took approximately 36 hours to completely dry.


Cut your frame with your cutting machine.  Emboss the bottom insert (piece 6) if desired. Now the real fun begins.....


Choose the color scheme you would like -- then begin ebrushing .  I completed the coloring of the heart before I started on the frame and sealed the heart with modge podge.  You will likely want to color the lid and the insert.  You can leave the bottom of the box plain, if desired.  To embellish the heart, I used an acrylic stamp with some coordinating ink and gently pressed the stamp on the heart.  I didn't want all of the printing especially dark, so a light touch to pressing the stamp was used.  I also made sure there was an area that was fairly light on each of the hearts and doodled a word on the heart that I felt identified my recipient.

After you've finished ebrushing, put the box bottom and lid together by gluing the corners as instructed. 

Glue the insert into the box bottom on the inside.  Using a glue gun, glue the heart to the center of the bottom of the insert or place as desired.  Place the lid on and you're done. 


If you want to personalize the frame/box even more.  On the back of the box bottom, write your sentiment and sign.  These are fun to make and while the molding and drying process takes a bit of time, these are relatively quick gifts for those special people in your life on Valentine's day.

Hope you liked this project. Please come back often for more ebrushing projects and papercrafting galore.

December 17, 2014

All flakes welcome - Snowflakes and Snowmen, that is!

Ebrush Design Team: Jan Hunter Week 5 Cycle 1

Love this sweet Snowman Garland! Jan has the holidays all wrapped up!  Please don't forget to visit her blog! 


Hi Everyone.  It's Jan again with a fun project that can brighten even the bleakest of winter days.
I love snowmen and have quite a collection -- that stays out all year long.  I haven't added anything for a couple of years and having an eBrush sure makes is easy to put something together quickly.


This garland will be gracing the living room window and likely will be "hanging out" all year long!

You'll need:
images for your garland (I used an old papercrafting magazine pattern for the snowman and a snowflake from basic shapes in my electronic diecutting machine and software)
white cardstock
eBrush and AD adapter (use the foam cushion hack)
Markers - BIC Mark-Its (black, red, med blue)
Red Glitter Pen, White gel pen
Wire
Fabric for knots, cut at 1 1/2 in x 9 in
Embellishments as desired
Xyron - permanent adhesive
wire, fibers or other material for stringing
Stencil material (I used an inkjet transparency)

Because my garland is made from from paper, I wanted the images to be fairly sturdy. Trace your image. In the software, ungroup the image and set aside all of the top pieces. Don't delete as they will be used to create your stencil.  I cut the stencil (hat and scarf) and set aside.  Cut the base image for your snowman x 4. Repeat for the snowflakes

Run 2 layers of your images through the Xyron and set aside with one more layer that does not have the adhesive.

It's time to get ready to use the eBrush -


Once all your painting and coloring is completed, run the top image through the Xyron and add to the previous layered pieces.  Do the same with the snowflakes.  Once all your images are completely stacked, using a piercing tool, make a hole on opposite sides of each image and string as desired. Embellish as desired... adding some glitter and gel pen highlights.  Don't forget to spray your fabric pieces as well.  I used a stencil from one I had on file.


Thanks for dropping by.  Please feel free to drop by my blog for additional ideas and projects made using the eBrush. Happy Crafting!

'
 
Copyright © 2014 Craftwell Blog. Designed by OddThemes - Published By Gooyaabi Templates