DO NOT MISS
>>Follow our Facebook page for updates! >>Join our Craftwell Design Team: Apply Now!
Showing posts with label 2016. Show all posts

December 12, 2016

DIY Gilded Birch Tree Centerpiece

The holidays are fast approaching & nothing screams winter wonderland more than birch tree decor!
And thanks to Dixie Belle Chalk Paints & eBrush Siphon, I can make a festive, eye-catching centerpiece with a distressed catch-all dish for mints & such!

For this project, I absolutely fell in LOVE with Dixie Belle chalk paint in Fluff!  It was the right shade of bright white with a gorgeous matte finish that birch tree bark is known for.

 You Will Need:
+ Window & tile cleaner
+ Various twigs from outside
+ Scrap transfer foil
+ Exacto knife
+ Plastic serving plate & dessert plate, black
+ Faerie lights (optional)
+ Hot glue gun
+ Cut'n'Boss (for ornaments)
+ Teresa Collins cutting dies, Thankful Holiday & Girl's Best Friend (for ornaments)


1.  Assemble your twigs in a way that you like.  The arrangement can be in any way possible, but I took some time to make sure the placement looked as natural as possible.  Then hot glue them into place.


2.  Use an Exacto knife to cut hole in the center of the plastic serving plate large enough for the base of the main twig to fit through.  Glue the smaller dessert plate, upside down, underneath the larger plate.  Cut an 'X' into the smaller plate as well, push the twig into the hole and hot glue in place.


3.  Mix (1) part window cleaner & (1) part Dixie Belle chalk paint.  Normally it would be a 1:2 ratio, but I wanted the paint to pool into droplets on the plastic plate.  When the paint dries onto the plate, it will look like distressed ceramic.


4.  Paint the entire tree & plate.  I painted the first layer & waited a few minutes until the paint almost completely dried.  Then I painted another layer, waited again and airbrushed the final layer.  Layering will give you better coverage on the final piece.  If you notice the plate, the pooled paint gives a very nice texture.


5.  To create a gilded birch centerpiece, I used my hot glue to add some dabs of glue on various parts of the branches.  When the glue was still hot, I used scraps of my rose gold transfer foil to add speckles of foil.  Look at some reference for birch trees & birch bark to get an idea of what it should look like.


6.  Lastly, as a optional measure, feed the faerie lights through the bottom of the plates at the base of the birch tree, and twist around the trunk and its branches.  Cut a small notch on the side of the small dessert plate rim to act as a placeholder for the wiring to feed neatly through.  Cut some black cardstock ornaments with the Cut'n'Boss to decorate.


TADA!  Hope you enjoy your holidays this year! ;)

-Judith

November 17, 2016

DIY (Seasonal) Magnetic Memo Board

Sometimes you just need a reminder about certain conference calls or what to pick up from the store after work.  This magnetic memo board  is the PERFECT for all those little notes you need to keep.

Plus, the cute autumn theme can be changed up with different colored leaves; green leaves for spring or summer would be fantastic!  The leaves in multiple colors were painted with the siphon adapter & fabric paint.

YOU WILL NEED:

Dixie Belle Paints - Barn Red, Rebel Yellow, Midnight Blue, Chocolate, Drop Cloth
Picture frame
Paper clips
Craft blade or Exacto
Scrap of faux leather (tan)
Magnetic sheets
Chip brush
Leaf-shaped cutting dies - ProvoCraft Cuttlebug Leaves Dies
Super glue
Hard surface or window cleaner


1. Take (1) magnetic sheet and cut it to the size of the picture frame.


2. Emboss the magnetic sheet with Teresa Collins Woodgrain Cottage in the Cut'n'Boss using the following combination (bottom to top): D, A, Folder + Material, A.  MAKE SURE the magnetic side is FACE DOWN in the folder so that the pattern is DEBOSSED.


3a.  Use leaf-shaped cutting dies to cut out pieces of faux tan leather & magnetic sheet.  When cutting with the faux leather, place the leather side FACE DOWN on the cutting die.  When cutting with the magnetic sheet, place the magnetic/gloss side FACE UP.


3b.  ProvoCraft Cuttlebug dies with a 1/8" profile are quite thick for small metal dies.  The platform combination for these dies is as follows (bottom to top): D, Magnetic Shim, A, Dies, Material, A.


4.  Use an Exacto blade to cut small slits into the magnetic cut-outs.  Make sure that the small inner piece of the paper clip is on the matte/non-magnetic side of the leaf & that the small inner piece of the paper clip does not stick out of the bottom of the leaf.


5.  Use super glue on the magnetic side of the leaves & glue ONLY the large, back portion of the paper clip to the magnetic leaf.  Let dry.


6a.  Mix some Dixie Belle chalkpaints, Chocolate & Midnight Sky, to get the right shade of brown.  Mix 3 parts chalkpaint to 1 part hard surface cleaner or Flow-Aid.  I used the eBrush siphon cup, though you can also use the bottle.  Spray to cover the entire embossed magnetic sheet.


6b.  Once the embossed magnetic sheet was sprayed, use the residual paint to airbrush the sides of the picture frame.  The sides will not be covered by the magnetic sheet, so they were airbrushed.


7.  Use the chip brush to add some texture & bring out the highlights in the embossed magnetic sheet.  I mixed equal parts of Dixie Belle Chocolate, Barn Red, Rebel Yellow & Drop Cloth.


8.  Super glue the top half of the faux leather leaf to the non-magnetic, matte side of the leaf.  It is important to only glue HALF of the leaf to the side of the small inner paper clip.  Super glue the painted, embossed magnetic board to the picture frame.  Let dry.


9.  TADAAAA!  Now you have a mini magnetic memo board!
BONUS: Use fabric paint in the eBrush siphon to add colors to your leaf memo clips!


Hope you enjoyed this little office accessory!  Look forward to seeing what you make for your office!

-Judith

August 13, 2016

INTRODUCING OUR LATEST DEALS: Watch Out For FLASH SALES!

Bet you didn't guess THIS would be our BIGGEST ANNOUNCEMENT!

You amazing crafters have been anxious to see great deals all year 'round.
And since you asked & we listened.

Introducing our latest, one-time deals that will SURPRISE you.

Literally!


Announcing FLASH SALES, the offers that will have new bargains for you each time! 
If you are subscribed to our newsletter, follow our Twitter, Instagram or Facebook page, then you'll be notified of the FLASH SALE for that week until limited supplies last. 

And whenever you participate in the flash sale, show us your craft haul by using #CRAFTWELLHAUL.  We want to see all the latest editions to your craft room!
  

So just keep an eye out for the "FLASH SALE!" emblem over the image we post on Facebook, Twitter and Instagram to get a chance to cash in on the deal! And stay tuned for the OUTRAGEOUS sales coming soon. 


Team Craftwell

July 2, 2016

Welcome This Month's Sponsor: Clearsnap!


Welcome July Sponsor, Clearsnap!

We are so excited to collaborate with Clearsnap this July so stay tuned
this summer for some great craft ideas & DIYs.

And remember: tag '@craftwell' or '#craftwell' to show us your
July 4th Weekend crafts, DIYs & projects using your Craftwell products!
Because we want to see your beautiful, creative and innovative work!


Happy crafting Craftwell crafters!


December 30, 2015

simple and quick....

eBrush Design Team: Jan Hunter Week 5 Cycle 3


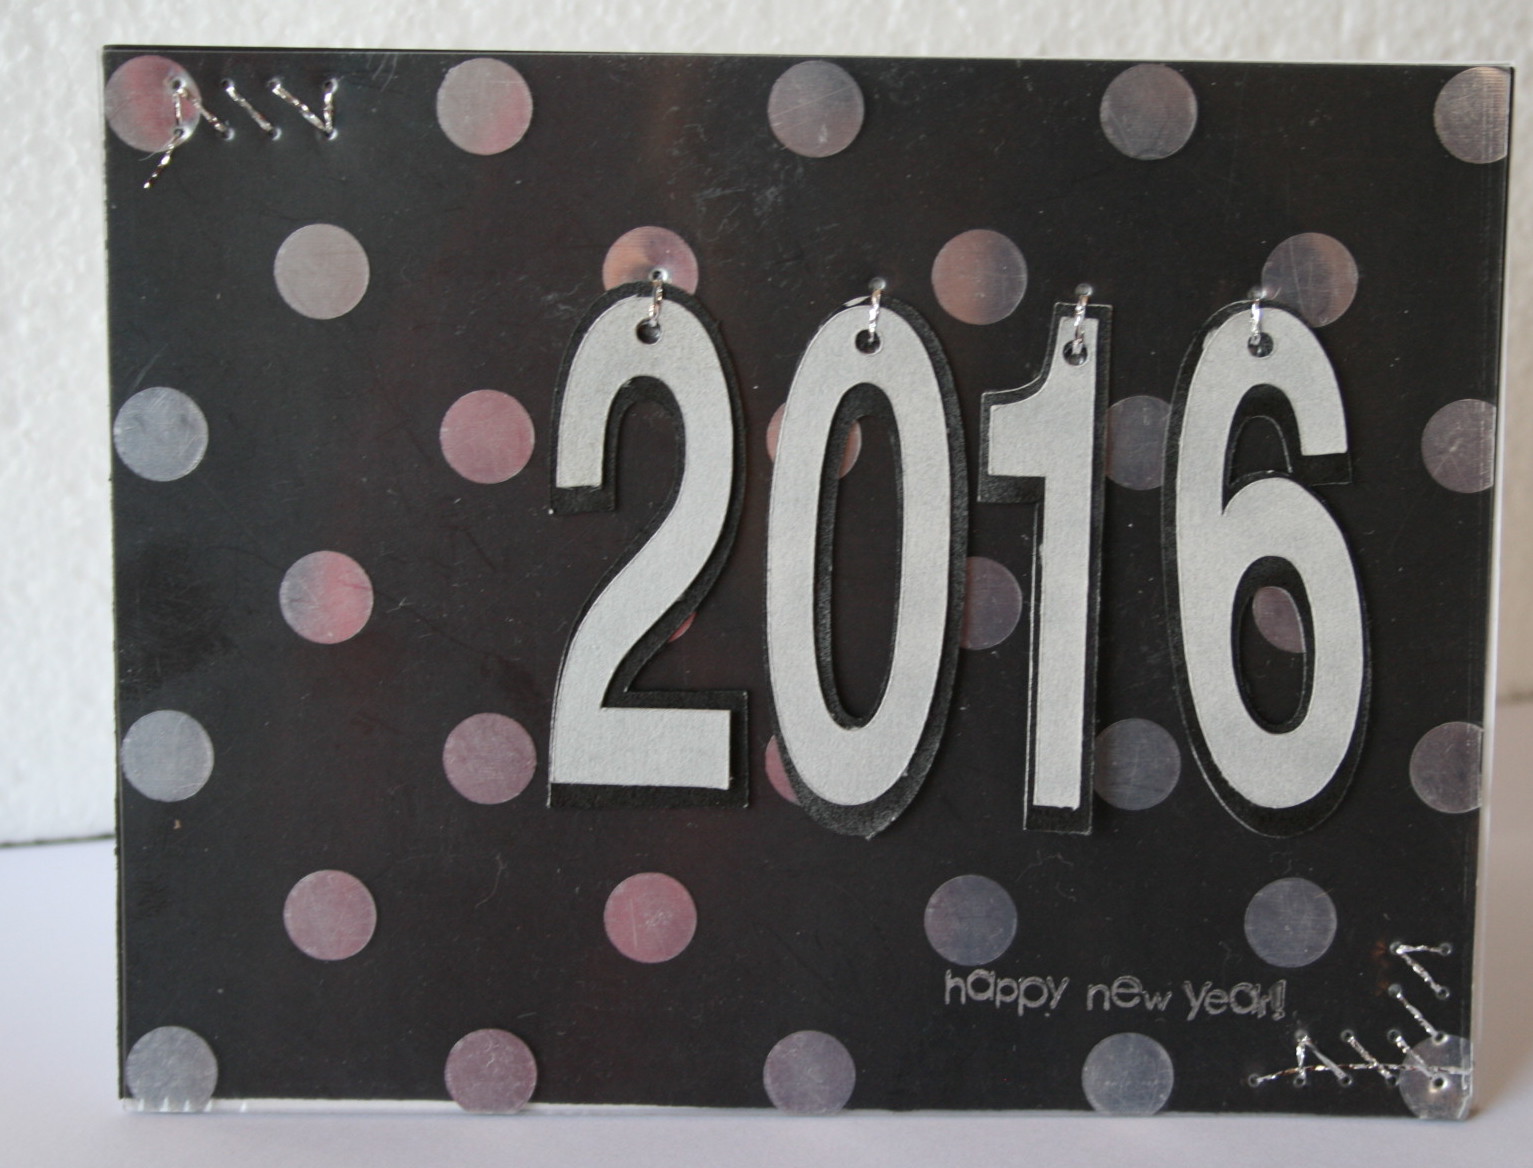
Jan here with a really quick and easy card just in time to Ring in the New Year!
It's just what is needed when you're moving across the country and there's another holiday coming up quickly.
 and this is perfect if you have some scraps you can use too... (most of my papers are still packed away! So grab your eBrush, some markers and let's get started!


You'll need:
Teresa Collins acrylic paper (Wanderlust Gold dots -- I used the silver back side of the paper)
Gray/white/black
card stock (card base and number cut outs)
Electronic die cutting machine - use a font from your library for the numbers
stamp Happy New Year sentiment
metallic thread in silver
paper piercer and guide
eBrush (SN and SP adapters); silver sharpie and black marker


Design and cut your numbers.  I cut the top layer once and a shadow layer 2x.  Stack the shadow layers and adhere together.  Using the ebrush spray black.  Set aside.  Spray the top layer silver and then stack on the top of the shadow layer.  You can adhere with a drop of glue if you'd like.  Set aside.


Cut a piece of the acrylic paper and the black cardstock to 4.25 and 5.50 inches.  With the black on the bottom and silver dots face up, use the paper piercer to create a zig-zag pattern in the upper left and lower right corners.  Using the metallic thread, stitch the two pieces together.  Secure the threads by weaving on the back side of the black paper.  Place the numbers in order on the front of the stitched card and stitch the numbers in place.  The numbers may swing a little if you like or you can secure them with a glue dot or small bit of tape.  Mine or hanging free and move when the card is moved.


Once you've secured the numbers to the card front, secure the front to the card base.  Add the sentiment to the lower front of the card, one on the inside and it's ready for delivery!  

We're so excited to ring in the new year in our new home along the Wasatch Front!  Wishing you the best the new year has to offer and lots of creative time as well.


'
 
Copyright © 2014 Craftwell Blog. Designed by OddThemes - Published By Gooyaabi Templates