Since I have started my first project in my 2D design class, I've been addicted to drawing animals in lots of different designs with sharpies! (You can see a sample of what I've done in class below). Unfortunately, the ones for my class have to be just black and white. So I did a different animal at home to color in with my ebrush!
Materials Needed:
Ebrush
Black regular and fine tipped sharpies
Colorful sharpies
Drawing paper
Tracing paper
The image you want to draw
6B pencil and eraser
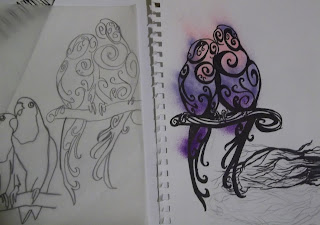
When I started my class project, I couldn't decide between doing a skunk or parrot. So I chose to do the skunk in class and parrots at home. I started the project by printing the image I wanted, then traced over it with my tracing paper.
Now comes the fun part; designing your creature in any way, other than how it looks in real life! I tried a tree pattern at first that didn't work out, as you can see on the bottom right of the paper. I made a fairly simple design I really liked the second time, but I encourage you to do several.
Here I traced off the design I wanted, but before I transferred it to my final piece, I decided to practice with my ebrush on the original.
For your final drawing, you'll transfer the tracing of your design the same way you did before with your printed image. Now you go over it all again with your black sharpies, and when you're finished, erase any pencil lines that may be showing through.
Now you're ready to fill in your design with color, using the ebrush and sharpies! At first I tried to keep the color within the lines by blocking it off with extra paper, but some still got outside the edges. So I went with it and purposefully made more color outside the lines on one side, so it looked like wind blowing the colors away.
Here's a couple more skunks from my class to give you some more design ideas! Don't be surprised if you become addicted...I'm really thinking about making a series of these to hang on my walls in my apartment.


Everyone loves it whenever people get together and share ideas. Great website, stick with it!kissanime
ReplyDeletelove your art work so good with your hands amazing.dissertation help UK
ReplyDelete