DO NOT MISS
>>Follow our Facebook page for updates! >>Join our Craftwell Design Team: Apply Now!
Showing posts with label watercolor. Show all posts

April 25, 2018

Painted Bella Rose Album Cover


Hi there,          

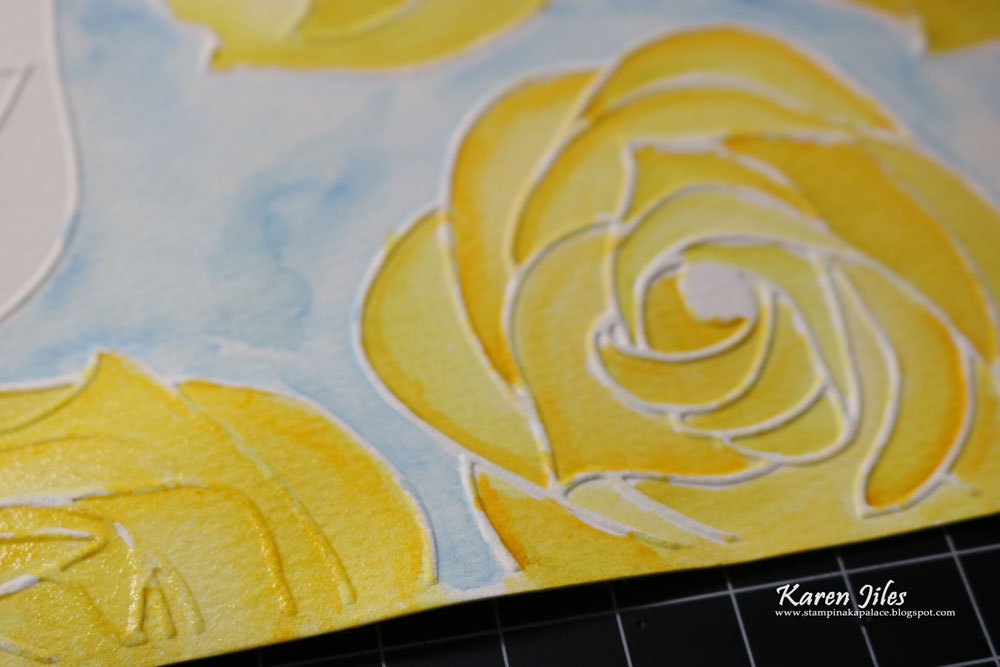
It’s Karen, sharing this little Painted Bella Rose Album Cover created with the Bella Rose Embossing Folder and the Cut N Boss machine. I absolutely loved this project.  Coloring is always therapeutic for me, so when I began this project, I knew that I wanted to dry emboss a full sheet of watercolor paper to work with.  I chose the “Bella Rose” embossing folder because of the full flowers in the pattern. The full flowers are very forgiving when they are painted, and the size of each rose is simply fun. I really loved the end result. I added some crinkled ribbon, scripted words, pearl pins, rose button and gesso. The Painted Bella Rose Album Cover measures 5 ¼ x 6 ½. Take a peek at my tutorial below.


Supplies:
Cut N Boss by Craftwell
Craftwell Embossing Folder and Die Cuts: Bella Rose
Black Album
Watercolor paper (8 ½ x 11)
Gesso
Watercolor Ink
Aqua Painter
Worded Stencil
Pearl Pins
Rose Button
Ribbon
Scissors
Scripted Words

Tutorial: 


Step 1: Emboss full sheet of watercolor paper using the “Bella Rose” embossing folder and Cut N Boss machine.

Step 2: Remove the embossed watercolor paper from the Cut N Boss and the embossing folder.


Step 3: Using an Aqua Painter, paint the embossed roses with choice of watercolor ink colors.


Step 4: Using scissors, cut a section of the painted embossed roses out and add gesso to edges. Set aside.
Step 5: Apply gesso to edges of black album and tap gesso over journal album with a paintbrush.
Step 6: Transfer scripted pattern to gessoed album cover using gesso and stencil. Let dry.
Step 7: Adhere painted watercolor paper to album cover and add ribbon to spine.
Step 8: Add ribbon bow, rose button and pearl pins to album cover.
Step 9: Adhere scripted words to album cover. Continue embellishing as desired.
Thanks so much for stopping by today. I hope that this Painted Bella Rose Album Cover has inspired you to paint your embossed roses and incorporate them into your projects.

Karen

April 3, 2018

Water Color Tag

Hello there! Desiree' here, feeling so blessed to be posting on the Craftwell blog! 💖
I hope you are inspired by today's project.
I had found some water coloring I did forever ago stashed away in my horde of awesomeness.
The colors were pastel and I thought SO Spring-ish, that it became the base the project!
Anyways, onto the details...


Here's a summary of what I used...
Craftwell Cut N' Boss
Craftwell Stars 4.1 x 5.8 embossing folder
Craftwell eBrush airbrush system
Sharpies with the Craftwell Sharpie adapter
Spellbinders Wonderful Locket die
Watercolor Paints
Watercolor Paper
For the flowers I used 65 lb. colored card-stock
McGill Flower Molding kit
Glue gun and hot glue sticks
Foam to give dimension to sentiment
Bling and glitter... for sparkly goodness.

The first thing I did was cut my water-colored paper into a tag shape.
I did not take any pics of that process.
It was easy though, I just used my paper trimmer.
I decided to use some hand made flowers since the tag needed
them. I eBrushed the center of the flower layers to give my roses
some depth. I decided to do a few of the petal edges too.
I spritzed my petals with some water and began to mold them.
Once I had the all molded to my liking I stacked them and
glued each stack together. I also glue a little glitter between stacks
just to give my flowers a little something extra.


Next I embossed, eBrushed the edges of, and sanded my tag.
I love this embossing folder! I love stars and hearts! 
The impression was perfect and I love the texture I got with the
sanding. I also punched a hole to thread my seam binding through.
I arranged my flowers and leaves and glued them into place.


Next I printed my inspirational quote out on some white 
card-stock, then used the Locket die and my Cut N' Boss to
cut the quote out. I cute some of the foam out to place behind
my quote embellishment to give it some depth.
I though it was missing something so I glued on some bling.


Then there it was ALL DONE!!


I hope you liked my project and that I was somehow able to
inspire you! I hope that today and the rest of the week are very blessed! 

                    Sincerely - Desiree'


February 27, 2017

Note Card Lunch Box Sentiments by Sukie Dhillon

Happy Monday! This is Sukie and I have a set of lunch box notes to share today.  I thought these would be a fun project idea to slip into lunch boxes with some happy thoughts for the day.
To create my note cards I simply ran some papers from the DCWV Watercolor Ombre stack through my Cut 'n' Boss using a shaped die.  I stamped the lines onto the die cut to make the writing easier.
Next, I chose to cut some veggies with my electronic die cutter for a fun twist to the lunch box notes.
The eBrush was used to add a shaded effect to each of the die cut pieces.  I used my Sharpies in the eBrush to add the perfect amount of depth and dimension to each piece.
Here is a before and after picture of my die cuts, the transformation is amazing.  Just a bit of shading using the eBrush adds so much character to the die cuts.
Thanks so much for stopping by!  Have a fabulous day!

June 22, 2016

Latina Crafter, Gelatos and the eBrush by Jan Hunter


Jan here with the home decor project I promised.  These would make fun and quick gifts for summer birthdays or even getting a head start on holiday gift giving.  I've enjoyed working with the Pray stamp set from Latina Crafter. It's part of the Be a Blessing Collection and you won't be disappointed when you browse through the selection of sets on their website.

This post is image heavy -- so please be aware of slightly longer loading times.

You'll need:

Gelatos in your favorite colors (I had a hard time deciding!)
water
watercolor paper (140 lb cold press)
eBrush
craft mat
paper towels or napkins

Let's get started!  Please remember that if you click on the photos, a larger image will be in a pop-up or will load on another page depending on your browser settings.


Step 1:  color the craft mat using a space about the size of your watercolor paper.  I chose to use a 4 x 6 inch as my design space.


Step 2:  Spritz water on the gelatos.  You could spray the water on with the eBrush using the siphon adapter if you'd like. I chose not to for this project -- and just use the air flow from the ebrush to move the color as you'll see in the following pictures.


Step 3:  You'll see the water bead up on your mat and the color will begin to dissolve and even spread a little.  Have your eBrush ready!


Step 4:  I used medium speed to start moving the colors.


Step 5:  Continue to move the color.  Spray on more water if you desire.  Remember you can change the direction of the flow and more the color as desired.  Holding the eBrush vertically over the mat creates a different effect.  Try it!  Now you're ready to smoosh your paper into the wet color....


Step 6:  Smoosh your watercolor paper face down into the wet color.  Carefully lift up.  While the color is still wet, you can continue to move it a little with the eBrush or gently wipe with a towel to blend a little more if desired.  For this project, I used watercolor paper.  Glossy stock could also be used with a slightly different result.


This image was made using direct to paper application of the gelatos, following the previous steps (without the craft mat).  I wanted some more intense color.  The watercolor paper provided a deeper intensity using the direct application method.  The stamp is from the Be A Blessings Collection (image set here) Set.  Each of the stamp images in this set would look wonderful on a one of a kind watercolor background as a framed home decor item.  They're also perfect for scrapbook pages, cards and tags.

I mounted my finished image in a 5x7 shadowbox frame resized for a 4x6 image (pattern from Lori Whitlock's shop) cut with the eclips2 and eCal2 software.  The gold spritz is from Fun Stampers Journey available here.

Here's another look at the smooshed finished image.


Thanks for stopping by!  Hoping your crafting time is filled with joy and nourishes your soul!  And I hope you'll stop by again soon.


March 18, 2016

Shadowbox Beauty by Tyra Babington


Happy Fri-yay! I'm back with another quick and easy home decor project - - a shadowbox bouquet!

Supplies: Craftwell Cut 'N' Boss, your favorite flower shaped steel dies, watercolor paint, patterned paper, foam tape and double-sided tape.

 JustTyra Craftwell March Picture Bouquet Process Collage

Steps:
  1. Cut. Use the Cut 'N' Boss to die cut various shapes of flowers. Trim a sheet of patterned paper to use as a background in the shadow box.
  2. Paint. Use watercolor paint, a water brush or a paint brush to decorate flowers in different shades. Try to stick to either a warm (think reds, oranges) or cool (blue, teal) palette.
  3. Adhere. Adhere the finished flowers onto the patterned paper using a combination of double-sided tape and foam adhesive to add dimension and make your design pop!
JustTyra for Craftwell March Paper Bouquet

That's all there is! A quick and easy method to add a little spring to your home! Have a wonderful weekend! Tyra    

February 16, 2016

Dreaming with Craftwell


Cut 'n' Boss Design Team: Suzanna Lee Cycle 12

Hi there Craftwell fans! Suzanna here today popping into share with you another layout. Today's layout features dies from the Craftwell/Teresa Collins Noteworthy pocket collection. I love that I was able to cut all four of these dies at the same time with one pass through my Cut'N Boss. And not manual cranking necessary! Just insert the sandwich into the machine, sit back and relax and let the machine do the hard work for you!


It's not often that one is afforded the opportunity to capture pictures of older kids napping. I was "lucky" to find my youngest on the couch one of our recent snow days. Unfortunately the reason I had this opportunity is she had walked into a door... No concussion but a mighty big headache instead! Needless to say, the frame with the words "dream" were appropriate for these pictures!


I took full advantage of the "time", "place" and "date" dies to be able to document the specifics that added those little details to my story. They make a nice footer along the bottom of the page. Use the usual sandwich for dies and the Cut'N Boss that we've been showing for over a year now. When in doubt, you can always consult the "Platform Combination" manual that can be found online HERE. Not only does this give you the die cut combinations for multiple others as well. Handy tid bit of info to bookmark!


Wanting to incorporate a little added color into the layout, I hand watercolored this awesome background from Bella Blvd with my Peerless watercolors.


I hope you have been enjoying all the projects we have shared lately. Be sure to check out this month's sales from Craftwell. We have tried to incorporate these products into our projects so you have a sense of how to use these wonderful dies and embossing folders in the Cut'N Boss.
Thanks for stopping in today!


Supplies
Craftwell/Tersea Collins Cut'N Boss
Craftwell/Teresa Collins Noteworthy Pocket Dies
Cardstock - Core'dinations
Patterened paper, stickers, acetate, diecuts - Bella Blvd
Watercolors - Peerless

February 9, 2016

Debossed Love-ly Layout

Cut 'n' Boss Design Team: Suzanna Lee Cycle 12


Hi there Craftwell fans! Suzanna here today to share with you a love-ly layout I created using my Craftwell Cut'N Boss and some Craftwell/Teresa Collins goodies!


My son and I went to the Cupid's Ball for 6th grade Cotillion last year and had a lovely time. We were invited to be greeter's in the receiving line for the affair which meant that he and 3 other young people were the "leaders" of the line into the first dance. This picture is of him and 3 other kids.


Debossed white cardstock creates a crisp white background that really showcases the darker picture. The pops of color here and there amongst the debossing are hand colored hearts with Peerless watercolors. The sandwich to run your embossing folder through the Cut'N Boss is above.


I also used a die from the Noteworthy collection on this layout along the bottom for some embellishment. The multi purpose sayings on the dies make them so versatile for any theme layout, card or project you create.


In the above picture you can see one of the watercolored debossed hearts a little better.


Thanks for stopping in today! I hope you have a LOVE-ly day!


February 25, 2015

Pink & Main "Pandamonium"

Ebrush Design Team: Jan Hunter Week 10 Cycle 1

 Oh be still my heart I love Pandas. Jan has the cutest Panda card going! I love her techniques and the wonderful embossing on her card! Thank you so much for this great project!


Hi everyone.  Jan here sharing another fun stamp set from Pink & Main, and some fun with the eBrush from Craftwell.


Pink and Main has an adorable stamp set called Pandemonium.  As soon as I saw this set, I had an idea or two and decided to play a bit.  I stamped the sitting panda with open arms using a black pigment ink (you'll also want to color the back of the right arm (as the panda faces you).  With the same ink, I stamped the fortune cookie.  I colored the fortune cookie with watercolor pencils, using some odorless mineral spirits and a blender stump to smooth the color.

In a recent conversation with a couple of friends we talked about doing some twinchies -- 2 x 2 inch pieces of art... and since these stamps are relatively small, the twinchie was a perfect fit. 


I used Craftwell's eBrush on  some dampened watercolored paper  (4 x 4 in) using Spectrum Noir markers using both the chisel end and the bullet end of the markers.  Spritzing a little more water helped to move the color a bit more too.  Once you have achieved the desired background, set aside to dry completely.

Using a 4 x 5.25 inch piece of white cardstock, emboss this piece as desired.  Adhere to a card base.  From your watercolored piece, cut one 2x2 inch piece and one 2x4 inch piece. Adhere the 2x4 inch piece vertically on your card front.  Add the twinchie just to the left slightly overlapping as shown in the picture.  Adhere the panda to the twinchie and using pop dots add the fortune cookie folding the right arm over the top of the cookie.  Place a piece of a foam pop dot under the middle of the fortune (lucky day) for a little more dimension.  


Hope you enjoyed this quick card and feel inspired to make one or more of your own this week.  Enjoy your crafting time.  I invite you to drop by my blog and see more eBrush inspiration.


'
 
Copyright © 2014 Craftwell Blog. Designed by OddThemes - Published By Gooyaabi Templates