
Hi there,

Craftwell Embossing Folder: Design Grid
Inked Manilla Tag
Oxide Inks
Floral Die Cuts
Word Band
Dyed Ribbon
Gesso
Blending Tool
Paintbrush
Trimmer
Scissors


It’s Karen, sharing a Mixed Media Tag that I created with
the Cut N Boss Machine and the Design Grid Embossing Folder. I love this versatile folder.
It adds just the right amount of texture and the distressed and aged techniques I used created a great vintage effect. I added some book paper to create a fun versatile
layer and I enhanced the overall design by tapping on some gesso using a
paintbrush. Take a peek at the super
easy tutorial below.

Supplies:
Craftwell Embossing Folder: Design Grid
Inked Manilla Tag
Oxide Inks
Floral Die Cuts
Word Band
Dyed Ribbon
Gesso
Blending Tool
Paintbrush
Trimmer
Scissors


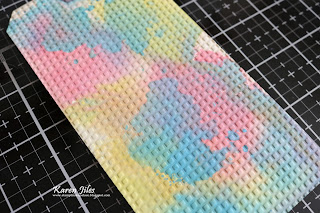
Step 1: Place inked
manila tag in the Design Grid embossing folder and run through the Cut N Boss machine.
Remove embossed tag from the embossing folder.

Step 2: Using a blending
tool, distress the edges of the tag using coordinating oxide inks.

Step 3: Adhere
floral die cuts to the tag.


Step 4: Tear a
piece of book paper, distress the edges and adhere the book paper onto the tag.
Add additional floral die cuts to the tag.

Step 5: Add
ribbon and word band to the tag. Highlight ribbon with gesso. Tap
gesso over tag using a paintbrush.

I hope that this "Dream" Mixed Media Tag has inspired you.
Thanks so much for visiting today!
Karen


 '
'