DO NOT MISS
>>Follow our Facebook page for updates! >>Join our Craftwell Design Team: Apply Now!
Showing posts with label snowflakes. Show all posts

December 26, 2022

Snowflakes For New Year

Hello everyone! Hope you all had a wonderful Christmas weekend! This is Berina here today, with a few New Year cards using some snowflakes in gold on red. 


For the first card, I used the Happy New Year sentiment die cut from Gina Marie Designs. I die cut the sentiment and some snowflakes from gold card stock. I used a bunch of different snowflake dies - Simon Says Stamp - Joy Snowflake, Divinity Designs - Snow Crystals and Spellbinders - Create A Flake 6. 


For the second card, I used the same set of dies, just a different layout. I just die cut a bunch of snowflakes using my SNAP and arranged them on the card base till I liked the layout. 


For the third card, I decided to use the sentiment stamp from Power Poppy - Glistening Paperwhites. Same snowflake dies, just a different orientation and layout. I inked the edges of the red card stock panel with a darker red ink for some variation.

How do you like my Snowflake New Year cards today? Do let me know in the comments below. Thank you for stopping by. Wish you all a very happy New Year!

- Berina


December 12, 2022

Cute Christmas Gift Tags

 Hi All!!

Katie here with my cute Christmas gift tags and I'll have you ready for gifting!


Materials:

Craftwell eBosser

Craftwell Stardust Embossing Folder

Making Friends and Snowball Fight Die & Stamp set from Amazon

Christmas Dies & Stamp set from Michaels (might be from Recollections)

Christmas variety stamp set from Michaels

Craft & white cardstock

Tiny foam snowflakes and stars (Used for nail art)

Prismacolor color pencils

Ink pads from Colorbox

Adhesive foam squares

Twine


I started by die cutting all the tags with the craft paper and embossed them with the Stardust embossing folder then made four smaller plain cut-outs with the white cardstock.

Stamped and cut-out the furry friends onto the white cardstock and shaded them in with my Prismacolor color pencils.

Assembling all the items together, arranging them how I want and came out pretty cute.

Take a look at the results.


These are quite versatile and could be used as little ornaments as well.

I hope everyone enjoyed my project and got inspired.

Happy Holiday!!


From Katie  

December 17, 2021

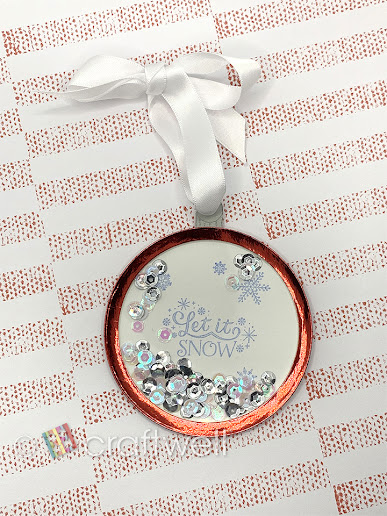
Christmas Ornament

 Hi Everyone!

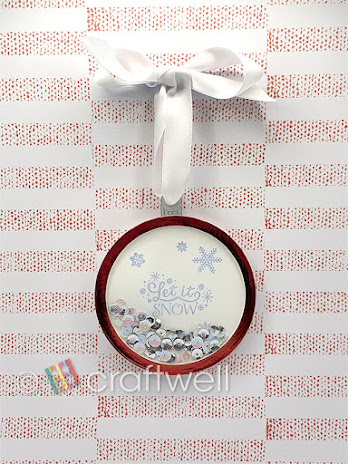
Christmas is closing in and I thought it would be fun to make a shaker ornament to place on your tree.

Or it can be used as a gift tag as well.


MATERIALS:

Craftwell's eBosser

Metallic Red, White and Grey Cardstock from Michaels

Hygloss Overhead Projector Sheets Acetate Transparency Film

Waffle Flower Nesting Basics Dies Bundle from Amazon

Christmas Themed Stamps from Michaels

Sequins from Amazon

ColorBox Assorted Colors Ink Pad

Single Hole Punch

White Ribbon

Clear Glue


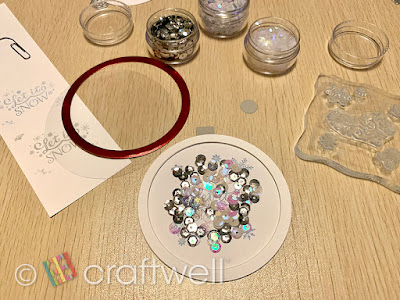
First, I chose one of the large round dies and cut-out a base layer. 
Then took both the previous large die and another round die that was 2 size smaller to cut about 6 layers with the white cardstock, and one layer with the metallic red cardstock. I die-cut a small square and circle with the grey cardstock.

Taking the base layer, I stamped Christmas words and additional decorations together. 

When gluing the layers on the base, on the 3rd layer glue the grey square at the top and then glue circle near the edge of the square. Then continue gluing the remaining layers except the red one.

I added the silver, clear and white sequins and kept them in the center.

Cut and glue a round circle from the acetate film then take the red cut-out layer and also glue on.

While the layers are drying, punch a hole at the small circle then place ribbon through hole and tie a bow.

And there you have a Christmas Ornament thats also a shaker.


Hope you enjoyed my project! 

From Katie


July 6, 2018

Merry Christmas

Hello everyone!! It's Berina here today with a beautiful Christmas in July card!


I used the Geometric Snowflakes die from Whimsy Stamps and die cut it on a light blue cardstock using my Cut N Boss. I adhered it on to white cardstock. I die cut the sentiment using the Your Next Die - Christmas Words. I matted the white card stock with light blue card stock and adhered it on to A2 card base. I added a few rhinestones and a light coating of clear wink of stella pen.

How do you like this card? Please do let me know in the comments below.

Thanks for stopping by. Have a great day!

-Berina
Blog | Facebook | Instagram | Youtube

December 18, 2014

"Peace" winter decor/frame

Ebrush Design Team: Mitsyana Wright  Week 5 Cycle 1

This is such a creative and lovely piece of Home Decor! I love the music notes on the sweet bird!  I would love this in my home! Way to go Mitsyana!


Hello Crafty Friends... I'm back again with some winter home decor made using my eBrush. I chose to incorporate the word "Peace" into my decor because who couldn't use a little more peace in their life?

Supplies I used for this project:
Picture Frame (12"x5")
eBrush with SN adapter head
Spectrum Noir Markers ( TB2, TB5, IG2, IG3, TN7, & TN8)
Teressa Collins Embossing Folder (Woodgrain Cottage)
Sizzix Sparrow Die
Marvy Uchida Jumbo Snowflake Punch
Electric Die cutter
Personal Manual Die Cut Machine
Scissors
Craft Knife
Gesso
Stickles (Crystal)
Chipboard
Patterned Paper/Cardstock
Craft Cardstock
Glue or Adhesive

I first started by taking the mat that came with my frame out. I then used it as a template.

I layed it on my chipboard and used a craft knife to make a shape of the exact shape and size to fit my frame. 
I then adhered my patterned paper to the chip board and again trimmed with with my craft knife. I prepared this as my background and set aside.

Next I cut my bird. For this songbird I used a Sizzix sparrow die and cut out 2 birds, one from a song sheet paper and the other from chipboard. I layered the two and glued together. Then with my Ebrush I airbrushed the bird using the SN adapter head with Spectrum Noir markers in IG2, IG3,TB2, and TB5. Then I drew highlights using my white gel pen.


I freehand cut out a branch from craft paper and then ebrushed it using Spectrum Noir markers in TN7 and TN8. Then I embossed the branch using my Teressa Collins Woodgrain Cottage embossing folder. I also added crystal stickles over brushed on gesso for snow.

I cut out 3 snowflakes using my Marvy Uchida jumbo snowflake punch and highlighted them using my Spectrum Noir marker in TB2.


Using my electric die cut machine I used the free font Buffalo Nickel to cut the word peace out of printed card stock. I then ebrushed it using my Spectrum Noir markers in TB2 and TB5. I also made a shadow for my word it using a charcoal gray paper and adhered both word and shadow together. Then I glued all my individual pieces onto my prepared chipboard background from earlier.

Tah-dah... Beautiful winter decor!

Hope you enjoyed this project!
And, here's wishing you "Peace" for this holiday season!!
~ Mitsy


To see more of my projects visit my blog at

'
 
Copyright © 2014 Craftwell Blog. Designed by OddThemes - Published By Gooyaabi Templates