Hello everyone! This is Berina here with a Mermaid shake birthday card today.
I used the Hero Arts - Reef Border to die cut the top panel. I then colored the panel with Copics. I used a mix of sparkle blends from Doodles Paper Playground for the shaker mix. I then die cut the sentiment using the Brutus Monroe die Happy Birthday on gold color card stock. I then assembled the card using foam tape for the shaker.
How do you like this card? Please do let me know in the comments. Thanks for stopping by. Have a great day!
Hello everyone! Wish you all a very Happy New Year! Hope you all had a great holiday season! This is Berina here today, sharing a beautiful shaker thank you card.
I die cut the frame/window using the Hot Off The Press - Butterfly Window die on white card stock and colored the butterflies and the leaves with copics. I die cut it again with Light Yellow card stock and snipped off the leaves and butterflies to use it just as a frame over the colored panel. The shaker mix is from Doodles Paper Playground. I used the Fancy Thanks die from Altenew for the sentiment.
How do you like this card today? Please do let me know in the comments. Thanks for stopping by. Have a great day!
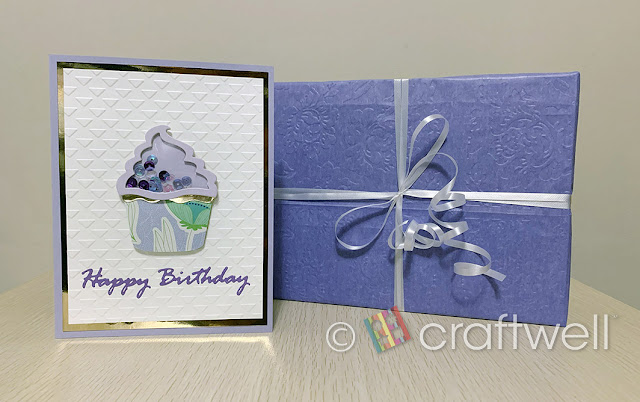
Katie here! It's been a while since my last post so I bring you my first try at making a shaker card and it was for my goddaughter's 1st birthday.
Materials
Craftwell eBosser
Craftwell Embossing Folders: Love Triangles and Cabbage Rose
Cupcake Shaker Kit from Amazon
Hygloss' Acetate Sheets from Amazon
Spellbinders Shapeabilities Words Cutting Dies: Happy Birthday Die
Assorted Colors of Sequins from Amazon
Variety of cardstock
Recollections Foam Adhesive Squares from Michaels
I honestly had no idea how to make one so I went on YouTube for guidance.
For the cupcake shaker, there's different ways you can achieve this part and I chose to make multiple layers from cardstock for the top of the cupcake. I think it took about 6 or 7 layers. Glued all the layers together except for one, poured in 3 different colors of the sequin then glued a cut piece of the acetate sheet and the last layer. Once the top was assembled and dried, I glued the rest of the pieces for the cupcake.
The card, I kept it simple with 3 different colors and embossed one with Craftwell's Love Triangles folder. Die cut the word Happy Birthday from Spellbinders die set.
There you have it! The end result shown in the photo above.
I added another surprise by embossing tissue paper with Craftwell's Cabbage Rose folder and wrapped the gift in it.
I hope everyone enjoyed my post and will give it a try if you've never made one!
For this post, I played with the Get Well Kit from Queen and Co. and created a get well soon card and a clip for my door sign:
This is such a fun kit to use. I really like the other shaker kits as well.
Here is the front side of the card with the matching envelop, I created with a left over strip of paper:
For the inside of the card:
I used the included clear stamps for the sentiments and used CTMH black and cherry inks. I drew the outline of the bandage using the metal die as an stencil and glitter pen.
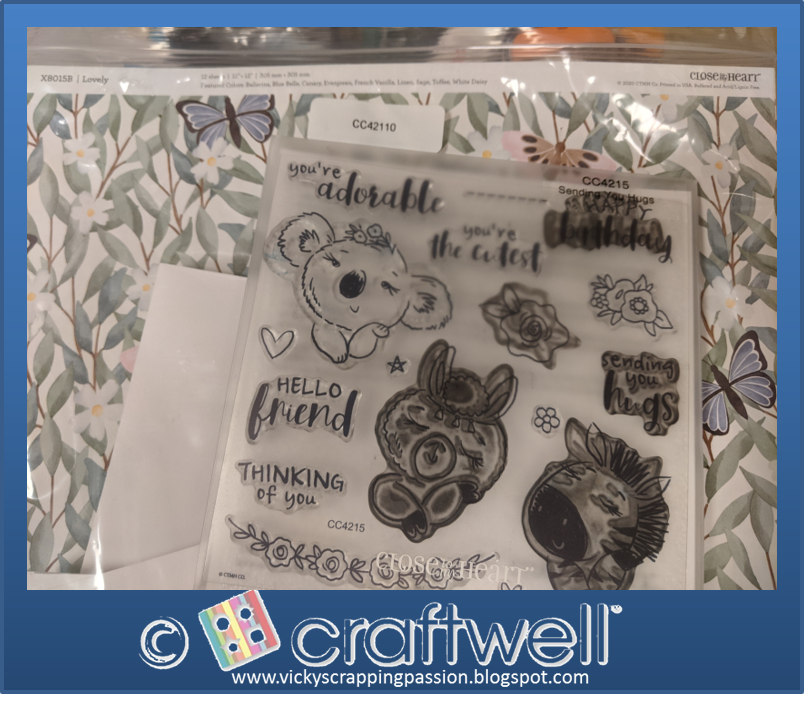
The card base and envelop come from this kit from CTMH:
Here is a closeup of the shaker die cut bandage:
For the door sign clip, I used the same Get Well Kit and just outlined the backing paper using the transparency insert included in the shaker kit. Later I glued the shaker bandage die cut to a Dollar Tree chalk board sign clip:
Here is the inside of the shaker bandage die cut, before adding the transparency and frame:
CTMH Sending you hugs card kit (card base and envelop)
Gel glitter pens
Double sided adhesive roll 1/8 in. Scrapbook.com
I really like to use card kits because it saves a lot of time trying to put together everything you need. I hope you enjoy it and please follow my blog as well: vicky's scrapping passion.
Hello everyone!! This is Berina here today, with a Christmas card with a shaker ornament.
I die cut the Rinea Gold foil with the Hero Arts Snowflakes and Ornament Fancy die. I embossed a piece of Brutus Monroe - Brown Butter cardstock with Craftwell - Woodgrain Cottage and die cut the ornament window on my Cut 'N Boss. I created the shaker window by using foam tape and acetate. I used Doodles Paper Playground - Ruby Sparkle blend for the shaker mix. I adhered the gold foil ornament on the acetate window. I also die cut the letters 'joy' using the die from Whimsy stamps, on gold foil and adhered it in the center.
How do you like this card? Please do let me know in the comments. Thanks for stopping by today. Have a great day!!
Hello everyone!! This is Berina here today, with this shaker card for a baby shower for a baby boy.
I cut a piece of 8 1/2" x 11" card stock to 8 1/2" x 7 1/2" I took the remaining 3 1/2" x 8 1/2" and die cut 3 stars out of it. I used the star dies from Brutus Monroe on my Cut N Boss. I die cut various star frames and some small solid stars from a light blue card stock as well. For the shakers, I used Doodle Paper Playground Precious Boy shaker mix. The sentiment is cut from the Charcoal glitterstock with Brutus Monroe Congratulations die. I lined the card base with a grey card stock and adhered the shaker panel on to it. I adhered the sentiment on to it.
How do you like my shaker card today? Please do let me know in the comments. Thanks for stopping by, have a great day.
Hello everyone!! This is Berina here today, with a cute pink card for a cute baby girl!
For the card front, I decided to go with a shaker rattle in pink. I die cut a circle frame using 2 circle dies and made the shaker part. I die cut a tiny circle for the handle part. I added a tiny bow. I die cut a piece of white card stock with one of the dies from the Winnie & Walter Georgette die set. I adhered it on to an A2 piece of pink card stock. I adhered the rattle on to it and stamped the sentiment Congratulations from the Brutus Monroe - Sharon's Script stamp set. Now when you open the card:
It's a pop-up crib on the inside :) Here's how I made the pop-up crib part - I cut thin strips of Brutus Monroe - Brown Butter card stock in few different lengths. Here's the first one, which is for the horizontal piece.
Here's a bunch of small ones, which are for the vertical rods.
Here's 4 of a little longer ones, which are for the corner pieces. These are double the thickness and scored in the middle, lengthwise.
I started by adhering the corner pieces on to one of the horizontal piece, like this.
Then I adhered the vertical bars to the horizontal frame.
I adhered the other horizontal piece to all the vertical bars.
Here's a closer look at it.
I die cut pieces of patterned paper with the same border die from the Winnie & Walter - Georgette die set and adhered it on to the inside of the crib, to imitate the crib bedding. I adhered pieces of patterned paper on to the inside of the card, to imitate wall paper. I then adhered 2 sides of the crib on to the 2 sides of the inside of the card. To make the mobile, I die cut the flowers and butterflies using the dies from Karen Burniston - Accordion Die set on the Brutus Monroe - Watermelon glitter stock. I used a thread to hang them from the pop-up part at the top. I die cut a 'H' using the Whimsy Stamps - Alphabet dies, for the first letter of the baby's name.
Here's another look at the card front:
How do you like this card? Please do let me know!! Thank you for stopping by! Have a great day!!






 '
