DO NOT MISS
>>Follow our Facebook page for updates! >>Join our Craftwell Design Team: Apply Now!
Showing posts with label pink. Show all posts

June 26, 2020

A Happy Moment (upcycled wood block)


Hello all you Makers! Desiree, here again to share my latest Craftwell make!
This one is very special to me, as the picture which is the star of this project has some of my most precious loved ones in it! They are my precious mom, Lana, my Aunt Linda, and my Aunt Sherry, who sadly gained her angel wings last November.
Anyways, onto the pics of the project and the other details! Just had to share a bit about my loved ones first!

After being inspired by the pic of my mom and aunts, I knew that I wanted to make something featuring it! It must be girly AND it MUST express happiness! I decided to upcycle a recent good will find. A 4in. x 4 in. wood block. I painted it white and after drying, I cover it with some FolkArt Extreme Glitter paint. After the layer was dried I used some Prima Effect Paste in Unicorn from Art Extravagance. Once that dried I sealed it with a clear aerosol sealer. I also used some Precision Craft Glue from Bearly Art!


I had to feature my cute SNAP Machine and the dies she would be cutting for me. Right?! I decided to use the Craftwell Happy die, which has been in my stash in forever and it's a go-to for sure! I also used a die by Anna Griffin, that I found on-line recently and waited to get! It is one of her pretty pocket dies, and I love it! For this project though, once it was cut out I had to mid the die cut a bit. I was happy with the end result.


I used my eBrush by Craftwell, of course! To do some shading to my die cuts. I did some distressing to my background paper, "happy" element, and to the bow.
For the happy banner element, I traced and hand cut an inset background piece from a scrap of paper.


I pieced together and adhered my distressed background piece, and my pocked piece that I modded.
I realized my little distressed bow needed an accent piece, so I got out these adorable dot embellishments I have had FOREVER. Found them in my stash, I remember buying them from Michael's YEARS ago!! Heheheh. I love them! 


I was wanting more for this project! To the stash I went! I found these old school K & Company daisies, and these adorable blinged out hearts that I got from hobby lobby a while back.
These made my heart so happy! I did not use that pink dot however. On the bow was just enough of
those I thought.


Here is the final product. I kind of love the end result! I more than love this precious picture, and the moment of happiness that was caught! I am so very blessed to have such wonderful women in my family! I am so blessed! I hope you find yourself blessed! I also hope you have been inspired!


Please remember to come back, check out what me and my fellow design team members are up to! I hope you have an amazing day!!

           ðŸ’– - Desiree'

July 3, 2018

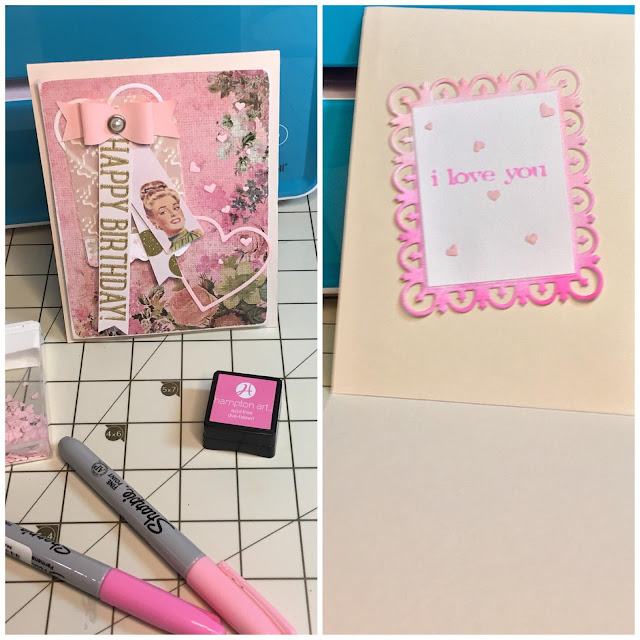
Girly Happy Birthday Card


Hiya! Desiree' here to share my latest project for the Craftwell blog! 💗 I of course hit my craft stash AGAIN and decided to put some of my beloved horde to good use.

Tools and such used:
Craftwell Snap die cutting and embossing machine
Craftwell eBrush
From the Teresa Collins collection, by Craftwell, the Preppy Hounds Tooth, A6 embossing folder.
Tim Holtz Stamping Platform
Tim Holtz sentiment stamp {sorry does not have a title?}
The WRMK, Tag Punch Board
Heart die by Craftwell
Frame die and heart confetti die,
{from the stash stored on a magnet storage sheet and have lost the packaging for them, sorry.}
The papers used are from the DCWV Confetti stack, the Country Road stack by the Paper Studio.
Pink 65 lb. card stock,  vellum from my scraps, and the card stock stickers are a real throw back by
Melissa Frances, from the C'est La Vie, collection!

Whew! Now on to the project details! 
The first step was to figure out what I was going to use. As always. 😉 I decided I needed a tag, so I made one using the tag punch board. Next it was embossing time! 
My darling Snap machine made it delightfully easy to get a great impression!
I decided not to emboss the bottom of the tag. I wanted to leave room for the super-cute scalloped edge sticker I was going to use.


Die cutting needed to be done next. I cut the frame die out for the sentiment inside of the card. 
I wanted the sentiment to pop! So I used the eBrush and my two fave pink Sharpies to add some 
color around the edges of the die cut. Love that gradient effect so much!


My card base is 5.50x4.25 inches, I cut my patterned paper for the card front to 5x4 inches. I distressed the edges, adhered some of the dies cuts and popped it up on some pop dots for dimension.
I cut *Happy Birthday* from one of the confetti stack papers, cut another strip from the gold polka dot paper in the stack. Cut out a dove-tail shape at the bottom of them both. I stacked them together and added one of the pretty card stock stickers. I staggered them and then adhered them all together. I took a  bow I had made a while ago and decided to place them on my little embossed tag. 
I think it turned out to be such a cute embellishment! 


I wanted a clean line inside of the frame for the sentiment. I decided to cut out a rectangle to place inside the frame. After that I stamped the *I love you* sentiment onto the white rectangle. I glued some little clusters around the sentiment. I also like to write a personal message in every card I give to a loved one. So I placed the sentiment up on the top of panel of the card, when it is opened. That way there is plenty of space to let a special person know how much they mean to me! Once everything was dry, it was time to completely assemble my card!


Here it is. All assembled, so girly, and so pink! A bit vintage-esque. I LOVE how this turned out! I sincerely hope you do too! 


Feel free to leave me a comment, I love getting those! I hope that you were inspired by today's project, always do. 
I also hope you will come visit again soon! Until my next post sending you warm wishes and crafty love always!
                                  
💖 - Desiree'


February 14, 2017

Things I Love About You... By Heather Wilson

Valentine's Love Cage of Affirmation!


Instead of using a card, I put together this little project as a way to show my boyfriend I love him this Valentine's Day.  Here's the materials you need:


Cut n' Boss and heart die cuts
decorative paper
Ebrush and markers
Small decorative bird cage
Hot glue
Embellishments (beads, lock, key, fringe, lace, etc.)
Jump rings
A colored pen to write with


Start with a sample piece of your decorative paper to practice on. You'll want to test this out with your Ebrush and see how different colors look on your paper. If you like the results, you can move on to a larger sheet and put all the colors you like on it.


I didn't leave any areas a solid color because I wanted the print on the paper to show. I did just enough to give it a bit of color.


Now you can start cutting out hearts with the Cut n' Boss! Remember to put the die cut flat side down on platform D. Lay your paper on top of that, then layer A, B, then A on top. I started out with about 15 hearts and later it ended up being 20 because I did some coloring with the Ebrush on plain white paper.


Take the color pen of your choice (I used pink!) and begin writing the things you love about your significant other! (You can also do this for family members or friends, but of course what you write would be much different!) I also wrote a couple favorite memories, and included some in-jokes in some of them.


Setting your hearts aside, you can start spicing up your bird cage a bit. I attached a heart shaped lock with a couple jump rings to the clasp of the cage lid.


Next I put a key above the lock by wrapping some wire from the cage around it with my pliers to hold it in place.


The bottom of the cage looked too plain to me, so I found some beaded fringe in one of my crafting stashes (you can never have too many craft stashes!) I attached it by putting a line of hot glue on the bottom of the bars. Tip: glue from top to bottom so the stringy parts can be pulled off easily from the bottom edges).


End your strip by overlapping the end where you started, and hot glue in place.


I hot glued some beads to the ends of the swirly wires on top. It needed some color there to balance out the trim on the bottom.


Now make your tag, either by buying some plain ones or cutting your own with the Cut n' Boss. Then add some color to it with the eBrush. I used a light pink sharpie first, then went around the edges with a slightly darker sharpie.


After writing "Things I love about YOU", attach the tag with two jump rings to the top of the cage.
Now you can add your notes to the cage in a neat pile. I put the sweetest ones on the bottom so the best ones would be saved for last.


Here it is finished! Either set on a table, or hang it up somewhere. If you have a bigger cage, use it as a centerpiece on the table for your loved one to find on Valentine's Day!
Have a great Valentine's everybody!


'
 
Copyright © 2014 Craftwell Blog. Designed by OddThemes - Published By Gooyaabi Templates