DO NOT MISS
>>Follow our Facebook page for updates! >>Join our Craftwell Design Team: Apply Now!
Showing posts with label mini album. Show all posts

August 17, 2022

DT: Hello NYC, My Favorite Place Mini-Album


Hi, 

This is Veronica from vicky's scrapping passion, sharing with you my next post for Craftwell. 

For this project, I used my last month SCT (Scrapbook and Cards Today Magazine) sampler kit. I love all the travel themed papers included and soft pastel color scheme as well as the included die cuts, with a touch of gold foil to make this summer project special:


I'm planning to put a little picture of us in the heart opening...

I specially love the taxis printed paper. It goes so well with NYC, even with the Uber trend.

I only needed to make the binding with my Krockadile and cut the corners of the paper with my Krumper (I think that is how it is called). For the binding, I made loops of green elastic cord and tied several coordinated ribbons to them:


For the title, I diecut the sentiment: "Hello" using two lovely colorful papers from the kit:


Working with kits from the same company makes it easier to combine papers, and embellishments without worrying about matching them.

Craftwell Tools: 

SNAP die cut machine

Other Companies:


SCT April Sampler
Dies: Hello part of the sampler, SCT July kit
SCT July kit printed papers, and die cuts
Double sided tape
Foam tape
3 Girl Jam Ribbons
unknown green elastic cord

 I hope you enjoy it this fun project and please follow my blog as well: vicky's scrapping passion.


Vicky Tovar


April 27, 2022

DT: Love Browny - Minialbum


Hi, 

This is Veronica from vicky's scrapping passion, sharing with you my next post for Craftwell. 

I have been accumulating the Graphic 45 monthly kits since their beginning, thus, I finally decided to reminiscence on my paw-baby in doggie heaven and used the 2021 Vol. 9 Well Groomed kit.
I changed some of the suggested papers from the kit with background papers from the complementary Graphic 45 paper pad.

In short:

First, I created several shaker elements as embellishments using the Dog's Life kit.
I tried to recreated my boy as best as I could using the elements from the kit and some PowerPuff chalks:


No too bad comparing him with the original Browny:


Then, I followed the instructions from the Well Groomed kit, just changing some of the papers with the background papers without flowers (which are also cute but not what I wanted to portrait for our dear 16 year old male dog).

Then, I used tacky glue to glue the papers to the thick black cardboard sheets. And decorated the title page using the shaker elements that I had died cut previously.

For some pages, I used the TC Beautiful Words embossing folder to emboss the dark mats before attaching them to the pages:


I'm still working on decorating the inside pages with the G45 ephemera/post cards elements and stickers as well as more shaker die cuts I made. I really like the ribbon suggested binding of the book and might do it, attaching my Browny's rabies shot tag as dangle. Once I finish the album, I'll post it to.

Here are some close ups from the title page shaker elements.


Finally, I die cut the letters to spell "Browny" using two different G45 papers and glued them to the "love" shaker to finish the album title page.


I used the BoBunny alpha die for the "B" and the TH alpha dies for the rest.

Comparing both albums:
 Suggested Graphic 45’s album:
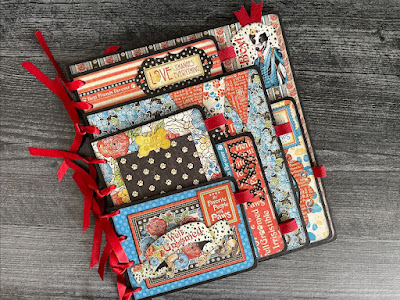
From the Grapic 45 blog

And mine uncompleted one:


As I mentioned previously, I ended up changing the background paper of all the pages, but one (the multi-colored paw printed page)...

Craftwell Tools: 

SNAP die cut machine
Beautiful Words embossing folder, Teresa Collins, Craftwell


Other Companies:


Dies: Sizzix TH alpha, Bob Bunny alpha and Dog's Life shaker kit, Queen & Co 
PowderPuff Mango Mai Tai ink
Dutch Blue, distressing ink, CTMH
CrockAdile
2021 Vol. 9 Well Groomed kit, Graphic 45
Well Groomed Background paper, Graphic 45
Tacky Glue
Foam Squares


 I hope you enjoy it this fun project and please follow my blog as well: vicky's scrapping passion.


Happy Fiesta 

Vicky Tovar


November 26, 2019

DT: Pumpkin Patch Time

 Dear Scrappers,

This is Veronica, from Vicky's Scrapping Passion sharing my post for Craftwell:
For this project, I decided to finally finish decorating a shaker album kit from ClearScraps to house some pictures from last year's pumpkin patch at the Atonement Academy (part of the AHG troop #TX0814 fundraiser):


I started this album following Clear Scraps instructions about staining the wooden pieces and adding the papers, as well as assembling the shaker cover. Then, I diverted by adding other elements and modifying the included stickers from Carta Bella to spell out Patch in my banner, which I hanged from a vine ribbon. The ribbon, pearl  cabochons, and metal leaves are part of a 3D embellishments box (in the top middle of the collage picture).

Materials (stickers are part of the Clear Scraps kit):

I used my SNAP to die cut some pumpkins as embellishments and to trim the pictures using some banners  and pumpkins dies:

Here some close up pictures of the cover: 


and an example of the inside pages (more pages to come yet):

The shaped pictures don't need extra mats and the colorful Carta Bella papers are a perfect background: 


For further pictures, please make sure to visit my post, follow me, and to post a comment for a chance of winning a stamp set and ink pad from CTMH. Also browse my blog for further ideas:

October 1, 2019

DT: Belle card


 Dear Scrappers,

This is Veronica, from Vicky's Scrapping Passion sharing my post for Craftwell:
I made a Disney card to go with my latest mini-album: 


 and this is the inside:


I bought this Disney Princess dies, sentiment stamps, and coordinated background cardstock bundle a while ago from Create and Craft. They are perfect to make any quick and easy card for a little (big) girl.

In short, I used the printed card stock with Belle and the books, which coordinates perfectly with the die, and cut it out using my SNAP for the mini-album project. I used one of those left-over cuts for making this card, by cutting the printed cardstock to fit in my card. I stamped the sentiment using HeroStamps ink and I also stamped the background for the inside of the card, stamping another sentiment in top. For extra spunk, I added rhinestones from Queen & Co and popped up the Belle die cut and the stamped sentiment. Super easy...


Here is a picture of the completed mini-album: 


For more pictures and a tutorial, please make sure to my post and my blog for further ideas:

'
 
Copyright © 2014 Craftwell Blog. Designed by OddThemes - Published By Gooyaabi Templates