DO NOT MISS
>>Follow our Facebook page for updates! >>Join our Craftwell Design Team: Apply Now!
Showing posts with label love. Show all posts

February 14, 2023

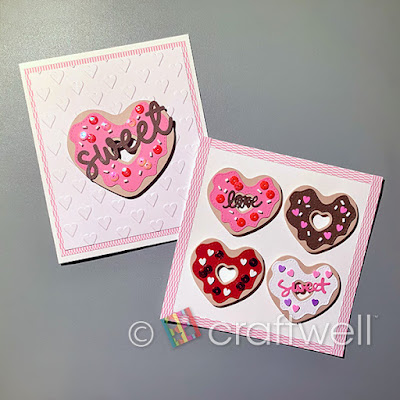
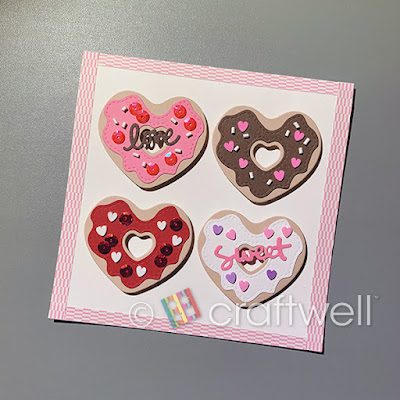
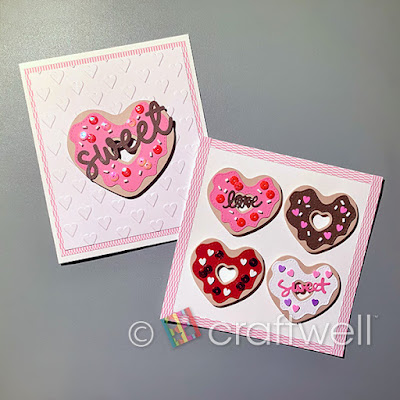
Love Donuts

 Hi everyone! Happy Valentine's Day 💕

I made some sweet treats just for the occasion. Who doesn't love donuts shaped as hearts?


Materials

Craftwell eBosser

KSCraft Heart Shape Donuts Cutting Dies

Cardstocks from Michaels

Variety of confetti and shapes from Amazon

Foam adhesives

Elmer's glue stick


Taking selected cardstocks to cut out shapes using KSCraft heart shape donuts cutting dies and taking So In Love embossing folder to emboss on a plain cardstock. 

I assembled all the pieces to how I liked it and below is the finished cards. 

I couldn't resist making two cards.


I hope everyone enjoyed my project and got inspired!
Until next time.

From Katie

March 10, 2020

Love and Luck Tag

Greetings my fellow crafty makers! It is that time of the year again!
You know when the shamrocks and clovers, and luck are in all of our
dancing in our heads! Oh wait. Holiday mixup! My bad! LOL
Anyways... todays project is inspired by St. Patricks Day!
It is simple, but I hope inspiring!


I used my believed eBrush for mist of the project actually!
So I started out with a die cut of a four leaf clover.
Next covered the back of this cut with some Zig 2 Way glue, and let it dry.
Once the two Way Glue dried 'i had a piece 'i could unstick and stick again.
Here's is what the glue looks like before it dried. Once dried it is clear.


After the back of the cut dried, I placed it on my tag and did some eBrushing around the clover.
I wanted to pull attention to it, and I think I accomplished after that.
Next I wanted to do a gradient of sorts, so I eBrushed some deep and lighter green all over the tag.
After that I took off my prepositional clover and hand wrote a sentiment,
I also punched out some tag enforcers? Anyways I punched those out in gold.


Something was missing I felt, so I took the negative part of my die cut and randomly eBrushed
it onto the tag. I liked the effect. Hope you all do too! AND because I love glitter!
I added some chunky star shaped glitter!


The next thing I did was add a few sequins! Because? GOLD! It needed more gold! 


The next pic is the final project! I even used my eBrush and Sharpies to color my white seam binding
green! I made a lil' bow on top and was done! I hope you all enjoyed seeing what I made!
As always I hope you all were inspired! I hope St. Patricks day is amazing for you and that this month is full of blessings!
As always! Much crafty love!!!

                      💖 -Desiree'

February 12, 2020

LOVE Banner

Greetings Craftwell lovers! It's Desiree' of Her OwnFairytale, here to share my make with
you today! The day of love is fast aproaching and I ADORE that day!
February 14th is one of my fave holidays! Oh yeah, and it IS my oldest son's b-day too!
So maybe I am a bit partial?! 💘 Today I am sharing the LOVE banner I made.
Keep reading for details and pics!

I began this project by going to my stash of awesomeness! I chose some dies and some pretty
papers, the papers are from a discontinued paper kit by The Paper Studio named Cosmopolitan.
I LOVE the colors of this kit! I also used some 110 white card stock by Recollections, and a piece of
Rose-Gold foil paper by them too. Once the papers were chosen the brainstorming really began!
I decided since I was making a banner I would use my We R Memory Keepers banner punch board!
It was so easy to make banners with this tool!


Once my banner panels were all punched out, next came die cutting! I cut out three really pretty 3D  bow die cuts, and three cute stitch hearts using my SNAP machine of course! This is my baby!!
Here are some pics of the cutest little die cut turned faux cotton candy hearts!


I know what you are thinking! Cotton Candy us NOT white!! I know!
So next I knew I had to use my darling eBrush!! Oh yeah. AND a PINK Sharpie too!
I made these adorable cotton candy embellishes by covering my hearts in some cotton balls I
fluffed out and shaped over my die cut hearts! Next is a pic of what the eBrush did to these
little darlings. Well one of them anyways! Heheh


Too cute!! Right?!! I think so! Since this is going to be a "LOVE" banner I needed some letters!
I do not own ANY letter dies! To my electronic cutting machine I went!!
I cut out my letters and shadow layer from the white cardstock and my rose gold paper.
Once that was done I wanted something extra! Texture maybe? YES!! I used one of my faves
from WRMK, it's the "Quilted" 3D embossing folder. I love the results!! Look at that E!


I also used my electronic cutter to cut out a heart border for the top of my banner.
I embellish my 3D bows with some flat back pearls and cut some stringed faux pearls for some
extra, extra on my banner! I adhered my textured and stacked alphas, to my banner panels.
Strung my banner panels with some white seam binding. Then between my alphas I alternated 
my bows and cotton candy hearts. This was the end results!


I seriously LOVE making banners and this one might have been time consuming but was WAY fun
to make!! I hope you like what I made and I really hope you were inspired! 
I hope you Valentines Day is filled with love!! 
Please come back often and be inspired by the rest of the Craftwell Design Team! 
I always am inspired by what they come up with!
      
                                     Sincerely - Desiree;



February 13, 2019

Be Mine Tag


Hello! It's Desiree'! I'm so glad to be back on the Craftwell blog!
Today In honor of the holiday, one of my faves btw!! ❤
{It’s also my oldest son’s b-day!! So I am bit partial! Heheh}
I am sharing a tag I created.
Before I even started I already knew what dies I wanted to use.
I cut them out using my Snap machine.
Starting off for this project I die cut a tag die, twice.
First my patterned paper, this paper is pretty BUT on the thin side, SO to reinforce my tag I took some old packaging and cut the tag out again.
I decided to do a little eBrushing for a little extra something! Love the eBrush!


Next, I made up my mind to do a few things I have not did enough of!  Stamping! Water coloring! Heat embossing AND fussing cutting! Oh my! LOL
I snapped a couple of pics of the stamp, and my water coloring before the fussy cutting went down.
The image stamped and embossed amazingly. 
I had to use this stamp FINALLY! I love it.


Next, I began to assemble my tag. I took all my die cut elements {doilies & hearts} and began to arrange, stack, and adhere them to the tag.
I also cut out a shadow heart for my fussy cut stamped image.
After cutting my doilies down a bit, I stacked them adhered them and gave them a nice finish by cutting a thin strip of the red foil paper I used for my red hearts.
I added a tiny bit of gold trim ribbon that I adore too.


For my gear heart and shadow I want a little dimension. So I got out my pop dots, then on the tag it went!
After all that fun I decided a sentiment was missing!
This was an easy fix! Looking through my stash I found a cute one on a cut apart page! I glued it down and put a lil' curve into it.
Since I have a bit of a bling addiction I HAD to add at least a tiny bit! Heheh So I added these tiny acrylic hearts.
I also added a few trims and a tiny die cut reinforcement for the tag hole.


And there you have it! My completed tag! Fussy cuts and all!!


I hope you liked my project share, I hope in some way you were inspired! 
I also really hope you have a Valentine's Day over-flowing with love! 
Please don't be a stranger come back and visit this blog often for more Craftwell awesomeness!


P.S.
Some of the materials used in this project...

March 21, 2017

Easy to Make Cake Toppers by Heather Wilson

I made a banana cream cheesecake for a special friend's birthday. This was my first time making cheesecake! Only problem is, you can't exactly use frosting to write "Happy Birthday" on a cheesecake (yuk!) So I put together a fast, easy alternative with my Cut n' Boss.
Materials:
Decorative Paper
Cut n' Boss and die cuts
Scissors
Gluestick
Black Sharpie and Pencil
Toothpicks
Tape
 For the background, I chose a light colored patterned paper. You don't need to use a dark or busy background, otherwise, the words we put on later won't show up well.
 For the words to be facing right, put the die cut right on top of the patterned side. You don't want to deal with the frustration of ending up with backward words!
 Place the die cut on platform A, flat side down. Put your paper on top of this (the back side should be facing up). Remember with die cuts: D is on the bottom, then A (die cut on top of it), B, then A.
 Now stick it all through the slot of your Cut n' Boss and watch it do its magic!
 Here it is cut. I didn't need all that blank space on top, so I folded it before cutting so it would be straighter. However, you can use a ruler if you want to make it perfect...
 Now you need a second (solid)colored sheet of paper for the background. Then use a glue stick and stick it down. Let dry for a bit before cutting it out.
 Prepare to use your best penmanship to do the rest of the words. This is easier and turns out better when starting lightly with a pencil. Get all the spacing and centering worked out with pencil, then go over with a black sharpie.
 Lastly, tape the end of a toothpick(s) onto the back of the paper. You may need two for longer words.

And there you go: a quick, simple, and inexpensive way to spice up someone's birthday dessert!
 
P.S. The cheesecake was delicious!

February 14, 2017

Things I Love About You... By Heather Wilson

Valentine's Love Cage of Affirmation!


Instead of using a card, I put together this little project as a way to show my boyfriend I love him this Valentine's Day.  Here's the materials you need:


Cut n' Boss and heart die cuts
decorative paper
Ebrush and markers
Small decorative bird cage
Hot glue
Embellishments (beads, lock, key, fringe, lace, etc.)
Jump rings
A colored pen to write with


Start with a sample piece of your decorative paper to practice on. You'll want to test this out with your Ebrush and see how different colors look on your paper. If you like the results, you can move on to a larger sheet and put all the colors you like on it.


I didn't leave any areas a solid color because I wanted the print on the paper to show. I did just enough to give it a bit of color.


Now you can start cutting out hearts with the Cut n' Boss! Remember to put the die cut flat side down on platform D. Lay your paper on top of that, then layer A, B, then A on top. I started out with about 15 hearts and later it ended up being 20 because I did some coloring with the Ebrush on plain white paper.


Take the color pen of your choice (I used pink!) and begin writing the things you love about your significant other! (You can also do this for family members or friends, but of course what you write would be much different!) I also wrote a couple favorite memories, and included some in-jokes in some of them.


Setting your hearts aside, you can start spicing up your bird cage a bit. I attached a heart shaped lock with a couple jump rings to the clasp of the cage lid.


Next I put a key above the lock by wrapping some wire from the cage around it with my pliers to hold it in place.


The bottom of the cage looked too plain to me, so I found some beaded fringe in one of my crafting stashes (you can never have too many craft stashes!) I attached it by putting a line of hot glue on the bottom of the bars. Tip: glue from top to bottom so the stringy parts can be pulled off easily from the bottom edges).


End your strip by overlapping the end where you started, and hot glue in place.


I hot glued some beads to the ends of the swirly wires on top. It needed some color there to balance out the trim on the bottom.


Now make your tag, either by buying some plain ones or cutting your own with the Cut n' Boss. Then add some color to it with the eBrush. I used a light pink sharpie first, then went around the edges with a slightly darker sharpie.


After writing "Things I love about YOU", attach the tag with two jump rings to the top of the cage.
Now you can add your notes to the cage in a neat pile. I put the sweetest ones on the bottom so the best ones would be saved for last.


Here it is finished! Either set on a table, or hang it up somewhere. If you have a bigger cage, use it as a centerpiece on the table for your loved one to find on Valentine's Day!
Have a great Valentine's everybody!


February 5, 2016

Valentine's Day gift box


Ebrush Design Team: Yolie Burke Week 8 Cycle 3


Happy Friday, it's Yolie with Team eBrush sharing a quick Valentine's Day gift box.


I used my electronic die cutter to cut the box and to design my own stencil.  This is a simple box, you can easily create your own out one sheet of 12"x12" paper.  To create the stencil use heart die or a paper punch.


I'm a messy crafter so to protect my table top, I use a large poster board.  I used a couple of pink markers to eBrush the white box and cut the word "love" on the Cut N Boss.  The word "love" is a die cut by Pink and Main.


Here is a close up of the box.  After I took the photos I realized, I should have include the word "love" on all four sides and so I will.  That font is gorgeous and the metal die cuts like butter on the Cut N Boss.


I hope you enjoyed my project today.  Thank you for stopping by today and enjoy your weekend.
'
 
Copyright © 2014 Craftwell Blog. Designed by OddThemes - Published By Gooyaabi Templates