DO NOT MISS
>>Follow our Facebook page for updates! >>Join our Craftwell Design Team: Apply Now!
Showing posts with label hazel&ruby. Show all posts

February 13, 2015

Map Paper Lampshade Makeover!

Cut 'n' Boss Design Team: Joy Dickson Cycle 10

We end our Hazel & Ruby project weeks, with a gorgeous makeover by Joy Dickson! See her impressive project below!

Hi Friends! It's Joy from Joy's Life.com here today with a fun home decor project!
Map Paper Lamp Shade Makeover #ModPodge #DIY #lampshade
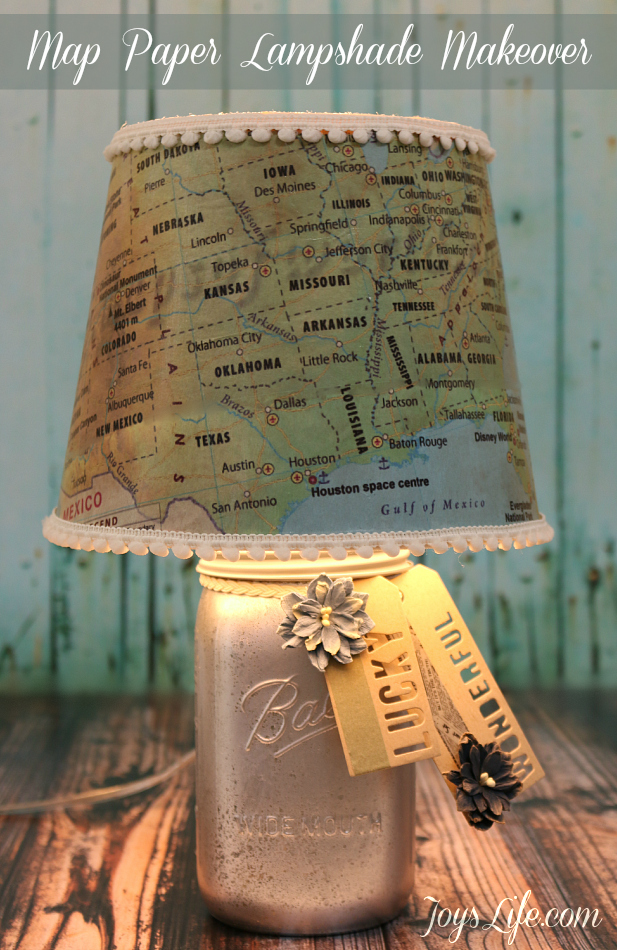
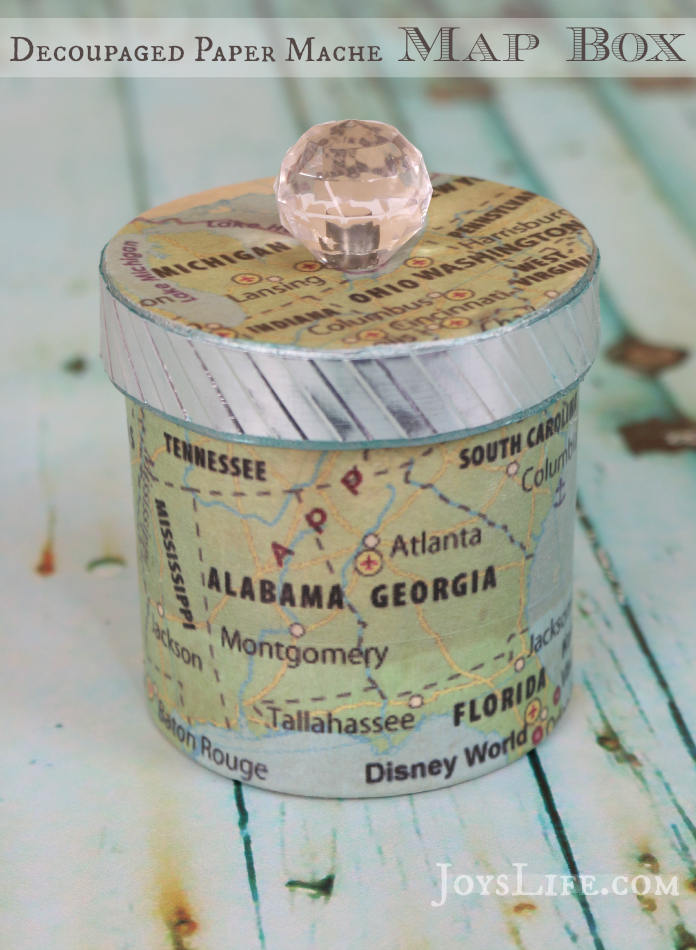
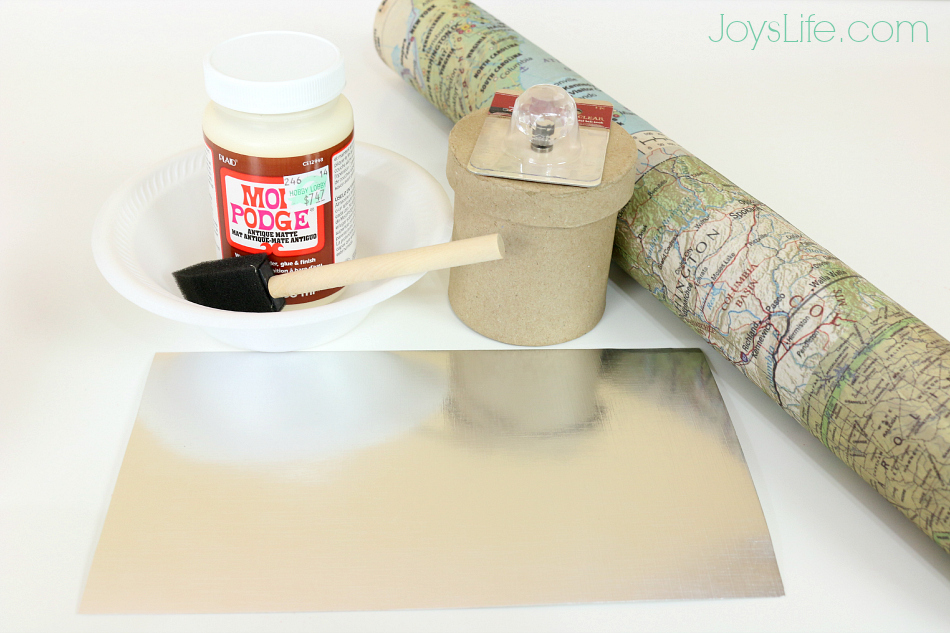
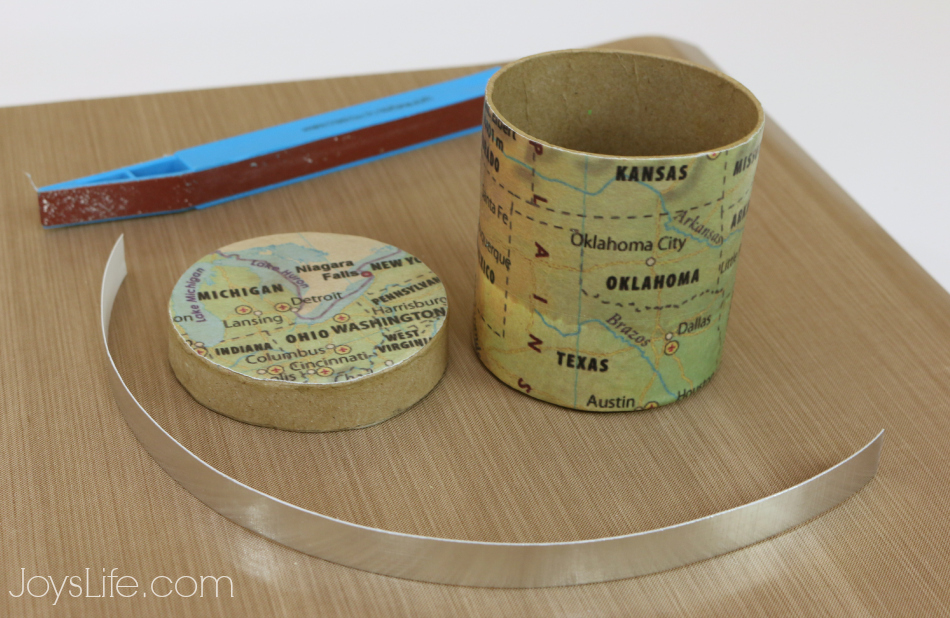
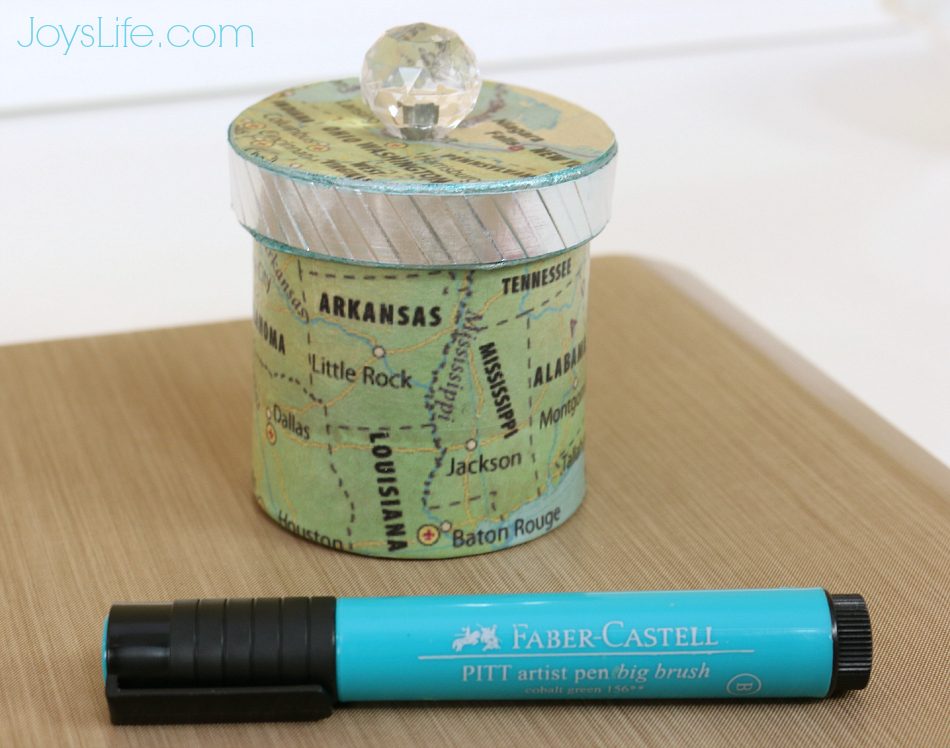
I just love the Maps of the World paper by Hazel & Ruby so much! Just last week I used it to make this with it. I decided that it would be perfect for making over the very plain lampshade on my craftroom lamp.
Map Paper Lamp Shade Makeover #ModPodge #DIY #lampshade
First, I painted the lampshade.
Map Paper Lamp Shade Makeover #ModPodge #DIY #lampshade
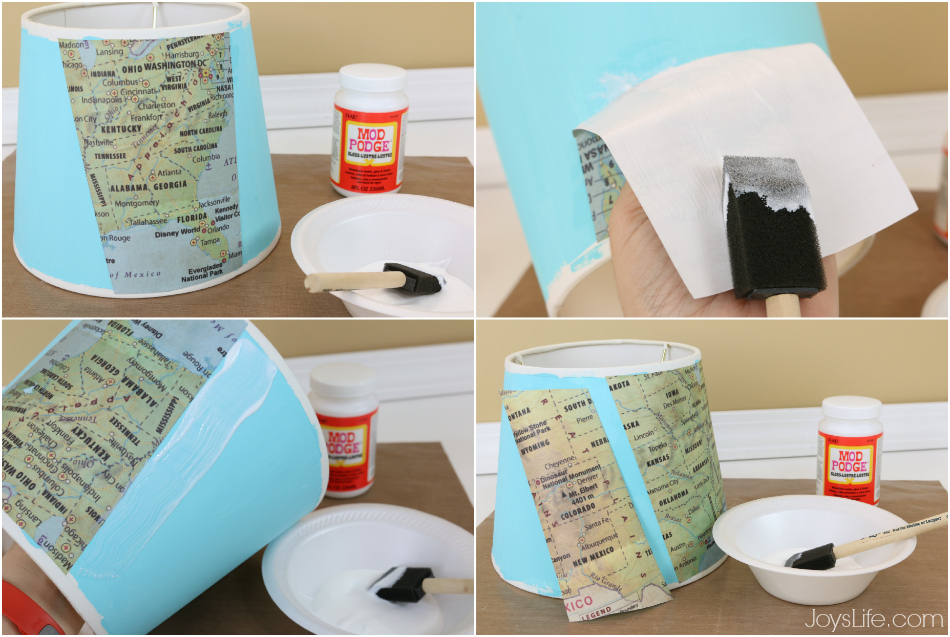
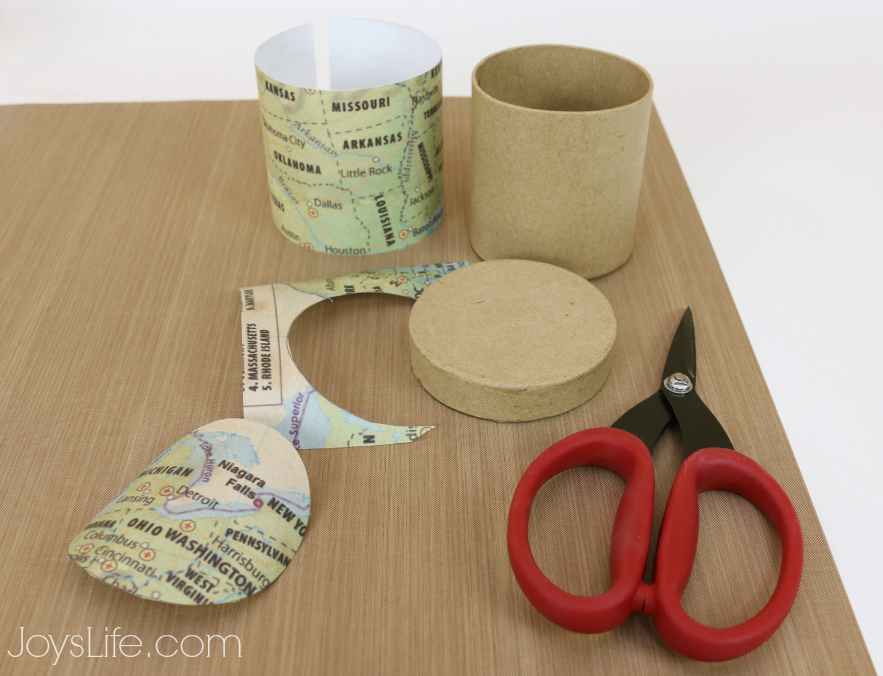
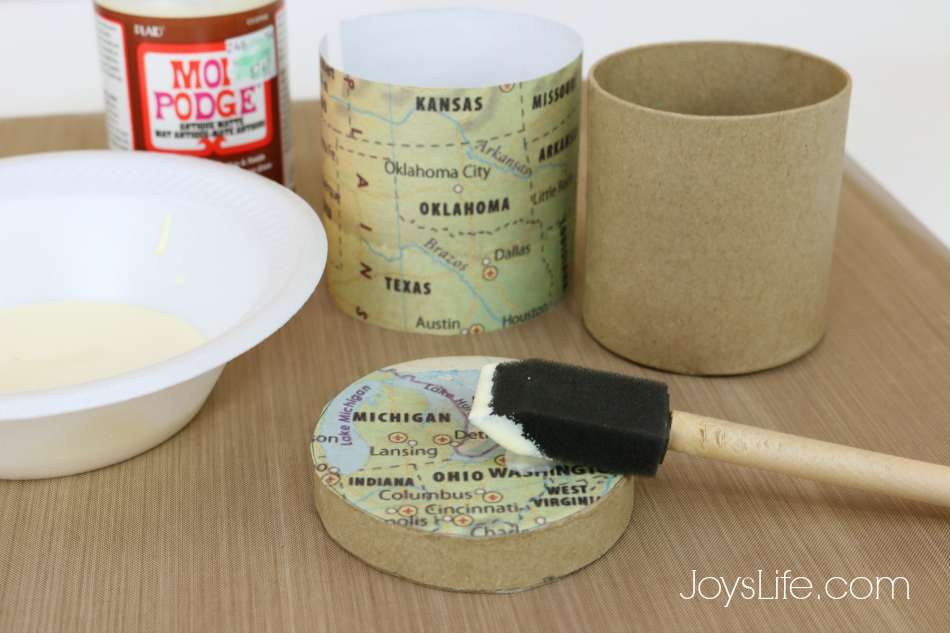
After the paint dried I cut the map paper in strips and applied them to the shade using Mod Podge. I both painted Mod Podge directly onto the shade and applied the paper and also applied the Mod Podge to the paper and then applied it to the shade. I found that putting it directly on the shade worked best because it dried super fast on the paper and I needed time to position it. After it was dry, I added pom pom ribbon to the top and bottom edges.
Map Paper Lamp Shade Makeover #ModPodge #DIY #lampshade
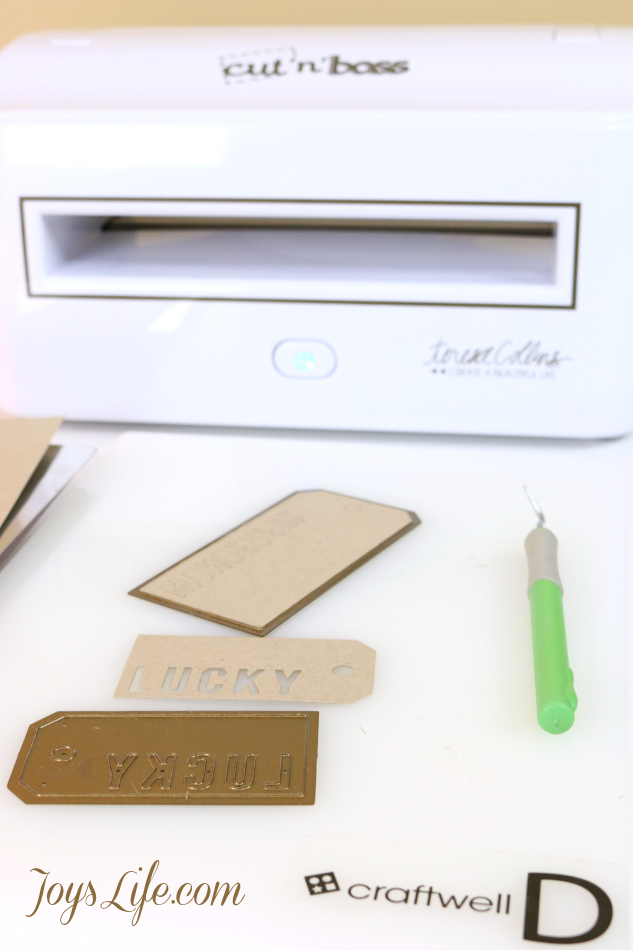
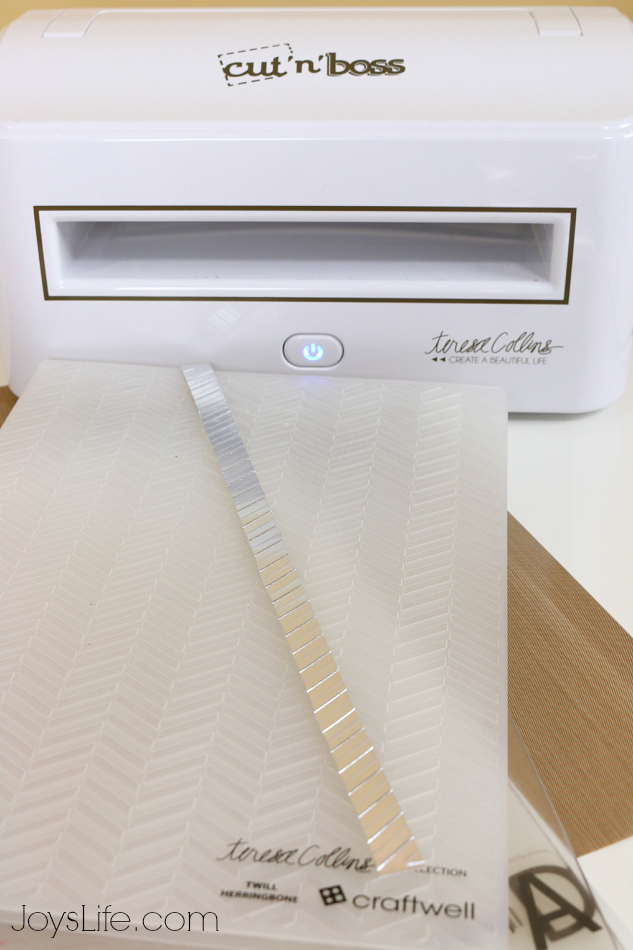
I added a few tags from Teresa Collins' Pocket Dies Lifestyle collection using my Cut'N'Boss machine. Here are other projects I've made with my Cut'N'Boss. I think it's a great machine!
Map Paper Lamp Shade Makeover #ModPodge #DIY #lampshade
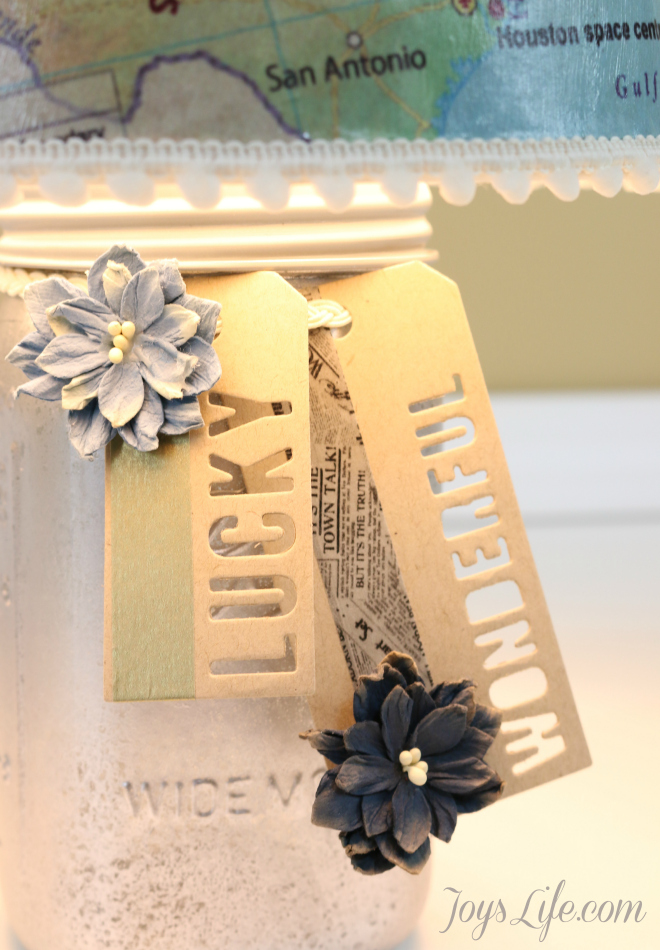
I added some washi tape and a few Petaloo flowers to the tags.
Map Paper Lamp Shade Makeover #ModPodge #DIY #lampshade

I hope you enjoy my project! I had a great time making it!
When I'm not here you can find me at Joy's Life.com!


Thank you Joy! What a gorgeous transformation! 

And big thanks to Hazel & Ruby for sponsoring these past two weeks! Be sure to check them out here!

February 12, 2015

'I Love You' Cards

Cut 'n' Boss Design Team: Alexia Misso Cycle 10

Alexia Misso is super talented, and just loves a good challenge! So, when it came to using masks for cards, she knew just what to do! See her gorgeous projects below! 

Happy Thursday everyone! It's Craftwell and Hazel & Ruby project week two here and today I want to share two cards I created using amazing products from both companies! Since Valentine's day is approaching, I created this "I Love You" card to celebrate this occasion.


 Here is how I make the card:

Step 1: Trim a 4 x 5 1/4" card, trace a heart shape on the card and arrange masks within the heart shape.


Step 2: Water-color the card


Step 3: Before peeling the masks off, coat the surface of the card with Wink of Stella glitter pen. Let dry then peel masks.


Step 4: Run cardstock through Cut 'n' Boss to use as card base (using Teresa Collins A4- size embossing folder).


Step 5: Embellish card with sequins and wood veneers. And here is the card!


I also made this simple card for one of my friends, who's always being so supportive and caring for me. She is my sunshine! I use the map paper from Hazel & Ruby as the card mat and the masks for airbrushing. Then I die cut the bird die using Cut 'n' Boss and use it as embellishment.


Products Used:

And that's it for today, I hope you like the cards! Have a wonderful day and Happy Valentine!

- Alexia


Thank you Alexia! 

Which card is your favorite?! We are loving all of the details! 


February 11, 2015

'Love' Tag

Cut 'n' Boss Design Team: Pam Bray Cycle 10

Pam Bray has created a gorgeous tag, just in time for Valentines Day! See how she used Hazel & Ruby's products to create an old world feel! 


Hi it is Pam here today sharing with my Love Tag using Hazel and Ruby Wrap It Up - Maps of the World Paper and Craftwell Cut N Boss Machine.


 I began by first covering a premade tag with the Maps of the World Paper...
 and then inked the edges using both Wild Honey and Barn Red Distress Ink. 
I painted some of the Maps of the World Paper using DecoArt Quinacridone Red and Quinacridone Gold Paint.
Cut out a small heart from the Maps of the World Paper once it is dry and set to one side.
Using your Cut N Boss die cut one of the Honeycomb using white paper that has been distressed with Wild Honey Ink.


Add Honeycomb to the top of tag...
Place small metal frame to front of tag, add letters to the inside. Add ribbons to the bottom of tag along with flowers and ribbon bow. 
The lacy flower is made from a piece of stained ribbon...using a thread and needle do a running stitch at the top of the ribbon, pull tight to form a circle, and secure with a knot...add a button to the center. The rosette is a circle that has been cut using a 3" circle die, Maps of the World Paper and Cut N Boss,  torn to form a spiral, using tweezers....start from the out side of the circle spiral roll up and then allow it to release itself a bit, glue to center of spiral to form rosette. Place both to the front of the tag. 


Add wood chip arrows to the top of the tag that have been stained, add heart that you set aside to top of one of the wood chip arrows. I hope you enjoyed my Love Tag and make sure to check out other inspiring projects on the Craftwell Blog as well as our other products offered in the store. 

Supplies:
Craftwell Cut N Boss
Craftwell Pocket Die Memory Collection Die Set
Craftwell Lifestyle Collection Die Set
Hazel & Ruby Wrap It Up - Maps of the World
DecoArt Quinacridone Red and Quinacridone Gold Paint
Wild Honey and Barn Red Distress Ink
Barn Red Stain
Eyelet Lace
Ribbon
Wood Chip Arrows
Random Frame
Letters 


Thank you Pam! 

WOW! How beutiful are these non traditional colors for Valentines?  Are you loving how she used orange and yellows?

February 10, 2015

Butterfly Valentine Box

Cut 'n' Boss Design Team: Suzanna Lee Cycle 10

Working with Hazel & Ruby has proven to be a treat for our design team! See today's creative project by Suzanna Lee!

Hi there! Suzanna here again to share with you another project combining the Craftwell Cut'N'Boss, embossing folders and dies with some Hazel and Ruby product. I try and let my kids know through out the year that they are loved, not just on Valentine's day, and leaving them beautifully wrapped surprises in their rooms to discover after coming home from school is one of the many ways I do that. Today's project is a gift box of love for my daughter.


To begin with you will have to use a gift box template cut from your electronic die cut machine or a WRMK punch board (I used the later).

Build your sandwich as follows, putting the precut box cardstock into the embossing folder and run it through your Craftwell Cut'N'Boss.


Using some Hazel & Ruby Wrap it Up, created a box wrap for the box. As the paper is lightweight and I wanted less opacity, I folded the paper in thirds to the center. I then wrapped the length of the wrap around the box and secured with adhesive.

Wrap twine over the box wrap and tie a bow for additional dimension and visual interest.

Using the following dies, run the appropriate sandwich and patterned papers through your Cut'N'Boss to created the label and decorations around the label.


Assemble as shown and voila! A lovely gift box for your beloved Valentine!


Supplies
Craftwell Cut N'Boss
Craftwell Teresa Collins Thankful Holiday and Memory Pocket Dies
Craftwell Teresa Collins Sophisticated Embossing Folder
Cardstock and Patterned Paper: Core'dinations
Wrap it Up: Hazel & Ruby
Twine: The Twinery
Gift Box Punch Board: We R Memory Keepers
Bling: Imaginisce
Letter Stickers: Studio Calico

Suzanna

Thank you Suzanna! 

We are absolutelely smitten with today's project! They would make wonderful gift boxes for a party or a wedding! 

What would you used them for?


February 9, 2015

Valentine's Day Doily Scrapbook Layout

Cut 'n' Boss Design Team: Debbie Sherman Cycle 10

Debbie Sherman is totally giving us some great ideas with today's layout! See how she used doilies to create a beautiful centerpiece to her scrapbook page!

Hi everyone!!  Sharing today a layout created with Hazel and Ruby and  some fun Cut n Boss die cutting!  With  Valentine's Day right around the corner I thought I'd share a fun layout with my sweet granddaughter and husband.  


I started this layout by laying the large die cut background and doily.
Next I added an embossed large circle and die cut Valentine Doilies that I cut from Hazel and Ruby
tissue paper.

I added the photos and embellished with flowers and fussy cut patterned paper.
The leaves are cut from the Cut n Boss and Teresa Collins Special Bundle that includes a woodgrain embossing folder and several heart shaped dies.

thanks for stopping by the Craftwell Blog today!
Thanks to Hazel and Ruby for the fun products and Cross Promotion!

Debbie


Thank you Debbie! 

Are you liking the use of doilies in today's project? what do you think of this layout?

February 6, 2015

Map Box

Cut 'n' Boss Design Team: Joy Dickson Cycle 10

Wow! We've had amazing projects all week! Today, is no exception as we bring you, Joy Dickson's clever take using Halel & Ruby products! 

See her project below!

Hi Friends! It's Joy from Joy's Life.com here today making more crafty things using the Cut'n'Boss!
Decoupaged Paper Mache Map Box with Mod Podge
Today I'm using "Maps of the World" lightweight paper by Hazel & Ruby to help me create this useful (and road trip travel inducing) map box. I LOVE this map paper. I chose to focus on the South as much as possible (with some Northern spots on top) because I'm a Southern girl.
Decoupaged Paper Mache Map Box Supplies
I'm also using antique Mod Podge, a round paper mache box, 7Gypsies clear crystal ball knob and American Crafts silver foil cardstock, to start.
Decoupaged Paper Mache Map Box Supplies
I traced the box lid onto the map paper, measured the rest of the box and cut the pieces out.
Using Mod Podge to Create a Map Box
I added Mod Podge to the top of the lid, added the paper and then added more Mod Podge.
Embossing Foil Cardstock for a Decorative touch to this Mod Podge  Map Box
I cut a strip of the foil cardstock so it would fit around the top of the box. Now to emboss it!
Embossing Foil Cardstock with the CutNBoss
I ran the foil cardstock through the Cut'N'Boss using the Teresa Collins Twill Herringbone folder. It turned out great! This is one of those times that I'm extra grateful to have those huge embossing folders. The foil fit just fine!
Using Faber Castell Big Brush Pen Over FolkArt Metallic Paint
I painted the edges of the box lid with FolkArt Silver Metallic Paint. Next, I punched a hole in the center of the lid and added the 7Gypsies clear crystal ball knob. I glued on the embossed foil cardstock and gave a touch of blue to the silver metallic painted edges using a cobalt green Big Brush pen by Faber Castell.
Decoupaged Paper Mache Map Box with Mod Podge
This cute box inspires me to get on the road and go somewhere! I hope you liked my project!
When I'm not here you can find me at Joy's Life.com!


Thank you Joy! 

Be sure to stop by Joy's blog for all things crafty! 

February 5, 2015

Home is Where the Heart Is!

Cut 'n' Boss Design Team: Alexia Misso Cycle 10

We are just loving all the project created using Hazel & Ruby mixed media products! Today, we have a stunner of a project by Alexia Misso! See the tutorial below!

It's me Alexia with you today to celebrate Craftwell and Hazel&Ruby week! I was very excited to learnt that Craftwell is teaming up with Hazel and Ruby, love their reusable alphabets masks and the decorative papers. I made this project using both Craftwell and Hazel&Ruby products - a mixed media home decor piece. I seriously didn't think I could pull this one off as I seldom get my hands on mixed media projects but the result was satisfying.

Here is the project I did for this week:


This is how I make it:

Step 1: Trim a 11x11 piece from the white tissue paper and map paper from Hazel and Ruby. Run the 11x11 map paper through the cameo to cut the heart shape in the center. Cut a heart shape and sentiment pieces from red card stock.


Step 2: Using Tim Holtz distress markers, air-brush the white tissue paper with purple, green and red color (airbrush the area so it's big enough to cover the area of the heart shape on the map paper). 

Step 3: Adhere white tissue paper from Step 2 to the back of the map paper. Adhere the heart shape onto the map paper (right on the heart shape on the map).

Step 4: Stick the letter stencil/mask "HOME" and "the" (place this in the heart shape) on the map paper. Apply modeling paste from Teresa Collins over the wordings and around the page. Let dry.


Step 5: Using daubers, ink and sponge all around the page. I used purple, blue and orange dew drops from Momento.


Step 6: Make a few tear around page to create a distressed look. Trim another 11x11 map paper and adhere it to the back. 


Step 7: Using paint brush and white acrylic paint, gently tap paint brush to create random paint drops around pages. (Sorry! I took this photo after the project is done)


Step 8: Cut embellishments using Cut 'n' Boss and Teresa Collins' cutting dies, and embossing.


Dry embossing using Darice's embossing folder


Cut a heart shape out


Heat emboss the heart in gold embossing powder


Step 9: Decorate page with paper flowers and cut-out embellishments. 


Step 10: Choose a 12x12 background paper, I used a 12x12 teal burlap paper from DCWV. Adhere result from step 8 to the burlap paper. Frame it and you are done!


Products Used:

I hope you enjoy this project that I'm sharing today, and have fun making your own version of mixed media home decor! Happy Creating! 


Stunning right?! 

Thanks you Alexia! 

How gorgous is today's project? Be sure to leave Alexia a comment!


'
 
Copyright © 2014 Craftwell Blog. Designed by OddThemes - Published By Gooyaabi Templates