DO NOT MISS
>>Follow our Facebook page for updates! >>Join our Craftwell Design Team: Apply Now!
Showing posts with label handmade. Show all posts

February 23, 2022

Airbrushed Crown

 Hello team,

Today I'm here with a handmade edible crown colored using Craftwell eBrush

I made a princess theme cake with edible gold crown on top.  I made a crown using gum-paste with the silicon mould and air dried. Then added gold edible color in siphon kit and airbrushed over on the crown using Craftwell eBrush.

Attaching the pictures for reference:


Thank you

Lavanya 

August 20, 2019

Thank You Flowers!

Hello everyone!! This is Berina here today, with this simple and elegant floral thank you card.


I embossed a piece of white cardstock with this beautiful flourish embossing folder. I die cut a few flowers in pink and leaves in green using Karen Burniston die. The butterfly die is from Crafter's Companion - Chic Butterflies set. I cut the sentiment using the Creative Expressions die. I then adhered them all down on to an A2 card base.


Then I made a  matching envelope with pink card stock and embossed it with a border embossing folder of the same set as the flourish embossing folder. How do you like this card and envelope? Please do let me know in the comments below. Thank you for stopping by. Have a great day.

-Berina

July 10, 2019

More Than Unicorns (B-day Card)


Hello! Desiree here to share a simple Unicorn themed,
B-day card. I am totally #TeamUnicorn SO making this card was over due.

Tools used:

Craftwell SNAP machine
Craftwell eBrush
Misc. metal dies from my stash
CTMH Unicorn Dreams (retired stamp set)
Crystal Katana

Materials used:

Black 65lb. cardstock
White 65lb. cardstock
The Paper Studio Stargazer box of cards
Palette hybrid ink in black
Blue and purple Sharpies
Unicorn Party glitter from Target


I started off this card by stamping on my card base, I took
the largest unicorn stamp and got an excellent image stamped! Love that!


Next I took my white paper and cut out a couple of layer pieces. I also stamped a sentiment from the unicorn stamp set on the front cloud.


I thought my clouds could use a little color and so, a lil' eBrush action was called for. I chose a purple and blue sharpie to match my card base. Then I just added a touch of color to the cloud edges. I added some mounting tape to the back of my clouds to add some dimension.
I liked how the unicorn looked against the background of my card. I used my Snap machine and my star and sparkle die set to cut out some stars and sparkles using my black 65 lb. cardstock. I then will arrange and adhere them to my card base.


I used another stamp from my stash to place a Happy Birthday, sentiment on the inside of the card.
I used the Unicorn Party, glitter to adorn the sentiment.


After adhering my stars and sparkles die cuts, I also added some of the glitter to the front of the card too!
Once I was happy with how it looked, I knew the card was complete. 


Well, that is my project share for today! I kind of love it!
I hope you do too. I also hope as always, that you were inspired! Best wishes and much crafty love to all of you!
Make sure to visit often to see more inspiring projects from other Craftwell Design Team members!

           ðŸ’œ- Desiree`

July 3, 2018

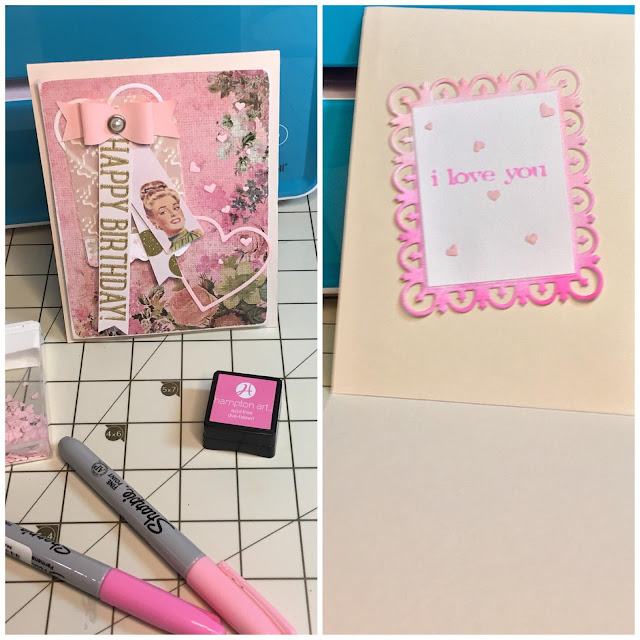
Girly Happy Birthday Card


Hiya! Desiree' here to share my latest project for the Craftwell blog! 💗 I of course hit my craft stash AGAIN and decided to put some of my beloved horde to good use.

Tools and such used:
Craftwell Snap die cutting and embossing machine
Craftwell eBrush
From the Teresa Collins collection, by Craftwell, the Preppy Hounds Tooth, A6 embossing folder.
Tim Holtz Stamping Platform
Tim Holtz sentiment stamp {sorry does not have a title?}
The WRMK, Tag Punch Board
Heart die by Craftwell
Frame die and heart confetti die,
{from the stash stored on a magnet storage sheet and have lost the packaging for them, sorry.}
The papers used are from the DCWV Confetti stack, the Country Road stack by the Paper Studio.
Pink 65 lb. card stock,  vellum from my scraps, and the card stock stickers are a real throw back by
Melissa Frances, from the C'est La Vie, collection!

Whew! Now on to the project details! 
The first step was to figure out what I was going to use. As always. 😉 I decided I needed a tag, so I made one using the tag punch board. Next it was embossing time! 
My darling Snap machine made it delightfully easy to get a great impression!
I decided not to emboss the bottom of the tag. I wanted to leave room for the super-cute scalloped edge sticker I was going to use.


Die cutting needed to be done next. I cut the frame die out for the sentiment inside of the card. 
I wanted the sentiment to pop! So I used the eBrush and my two fave pink Sharpies to add some 
color around the edges of the die cut. Love that gradient effect so much!


My card base is 5.50x4.25 inches, I cut my patterned paper for the card front to 5x4 inches. I distressed the edges, adhered some of the dies cuts and popped it up on some pop dots for dimension.
I cut *Happy Birthday* from one of the confetti stack papers, cut another strip from the gold polka dot paper in the stack. Cut out a dove-tail shape at the bottom of them both. I stacked them together and added one of the pretty card stock stickers. I staggered them and then adhered them all together. I took a  bow I had made a while ago and decided to place them on my little embossed tag. 
I think it turned out to be such a cute embellishment! 


I wanted a clean line inside of the frame for the sentiment. I decided to cut out a rectangle to place inside the frame. After that I stamped the *I love you* sentiment onto the white rectangle. I glued some little clusters around the sentiment. I also like to write a personal message in every card I give to a loved one. So I placed the sentiment up on the top of panel of the card, when it is opened. That way there is plenty of space to let a special person know how much they mean to me! Once everything was dry, it was time to completely assemble my card!


Here it is. All assembled, so girly, and so pink! A bit vintage-esque. I LOVE how this turned out! I sincerely hope you do too! 


Feel free to leave me a comment, I love getting those! I hope that you were inspired by today's project, always do. 
I also hope you will come visit again soon! Until my next post sending you warm wishes and crafty love always!
                                  
💖 - Desiree'


February 23, 2015

Just Because.....

Ebrush Design Team: Peggy Oliver Week 10 Cycle 1

I love this sweet card from Peggy Oliver! I know that her daughter will love it! Thank you for sharing Peggy!

Hello! Peggy here to show you how I used my eBrush and Pink & Main Stamps to create a children's card.
Todays supplies used are:

 I started by creating a background with my eBrush and Spectrum Noir Markers BT7, BT9 and BT5 on regular cardstock (White). With the lighter of the colors at the bottom and darker color as I went up. 
 I used the stars in my background from this set from Pink & Main. 
 I stamped the images I wanted to color in Memento Black Ink so when I colored them with alcohol markers the black would not bleed.  I stamped more than one image so I could also use the extra images as a mask. I placed the masks on top of the image and used my eBrush to color the large areas and I colored the rest by hand using BP6 , GB5, PL5 and TB8 Spectrum Noir Markers. The bottom of the spaceship is colored with BT9 and layered on top of the original image. 

 For the moon and stars I used Stazon Inks on my background.  After my images were colored I created a sentiment from the same stamp set, which happens to be my daughters favorite saying when she goes to bed. I kept the spellbinders die attached while I sprayed GB5 SN creating a boarder around the sentiment.
 I decided after stamping the moon in Black I would use Stazon white on top of the moon. Below are my images all colored and ready to be assembled. I used a complimentary color of yellow for the card base. 
Here it is all assembled. I used double sided tape to attach the background and foam dimensional tape to raise the sentiment . I added a ribbon bow on the bottom  of the sentiment and lastly I used stickles on the stars and liquid pearls on the spaceship. 


I hope you enjoyed my tutorial as much as my daughter is going to enjoy her card.
I love my eBrush by Craftwell USA it is just too much fun not to share!!
Have a great day, 
Warmly, Peggy 


'
 
Copyright © 2014 Craftwell Blog. Designed by OddThemes - Published By Gooyaabi Templates