DO NOT MISS
>>Follow our Facebook page for updates! >>Join our Craftwell Design Team: Apply Now!
Showing posts with label gesso. Show all posts

April 25, 2018

Painted Bella Rose Album Cover


Hi there,          

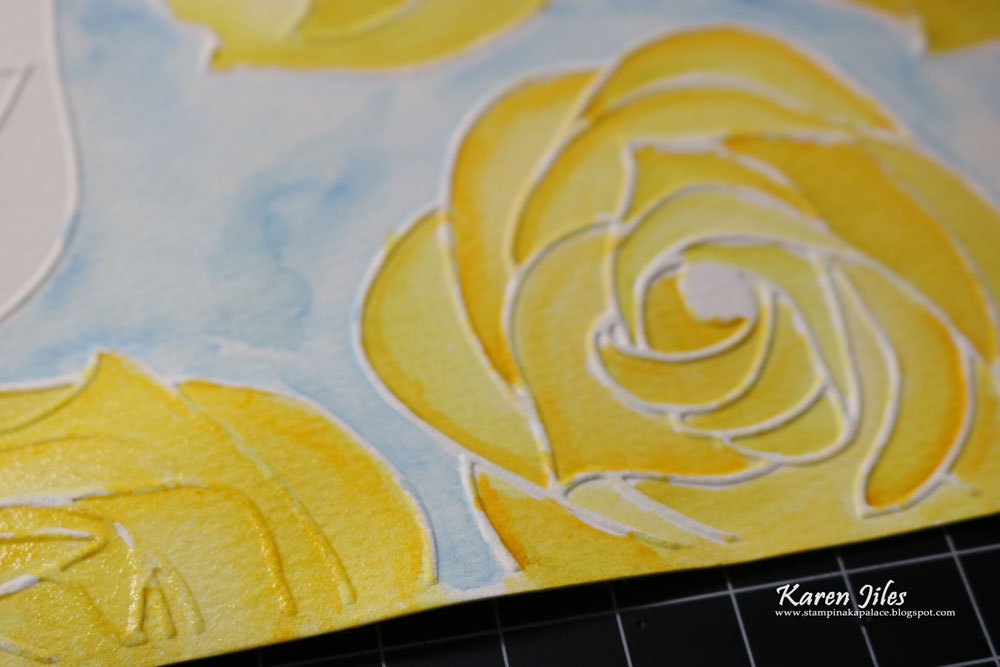
It’s Karen, sharing this little Painted Bella Rose Album Cover created with the Bella Rose Embossing Folder and the Cut N Boss machine. I absolutely loved this project.  Coloring is always therapeutic for me, so when I began this project, I knew that I wanted to dry emboss a full sheet of watercolor paper to work with.  I chose the “Bella Rose” embossing folder because of the full flowers in the pattern. The full flowers are very forgiving when they are painted, and the size of each rose is simply fun. I really loved the end result. I added some crinkled ribbon, scripted words, pearl pins, rose button and gesso. The Painted Bella Rose Album Cover measures 5 ¼ x 6 ½. Take a peek at my tutorial below.


Supplies:
Cut N Boss by Craftwell
Craftwell Embossing Folder and Die Cuts: Bella Rose
Black Album
Watercolor paper (8 ½ x 11)
Gesso
Watercolor Ink
Aqua Painter
Worded Stencil
Pearl Pins
Rose Button
Ribbon
Scissors
Scripted Words

Tutorial: 


Step 1: Emboss full sheet of watercolor paper using the “Bella Rose” embossing folder and Cut N Boss machine.

Step 2: Remove the embossed watercolor paper from the Cut N Boss and the embossing folder.


Step 3: Using an Aqua Painter, paint the embossed roses with choice of watercolor ink colors.


Step 4: Using scissors, cut a section of the painted embossed roses out and add gesso to edges. Set aside.
Step 5: Apply gesso to edges of black album and tap gesso over journal album with a paintbrush.
Step 6: Transfer scripted pattern to gessoed album cover using gesso and stencil. Let dry.
Step 7: Adhere painted watercolor paper to album cover and add ribbon to spine.
Step 8: Add ribbon bow, rose button and pearl pins to album cover.
Step 9: Adhere scripted words to album cover. Continue embellishing as desired.
Thanks so much for stopping by today. I hope that this Painted Bella Rose Album Cover has inspired you to paint your embossed roses and incorporate them into your projects.

Karen

March 13, 2018

"Dreamroad" Tag by Karen Jiles


Hi there,
I’m Karen, one of the new Craftwell Design Team Members, sharing  this “Dreamroad” tag created with the Cabbage Rose embossing folder. I love the deep impressions of this pattern.  It provides just the right depth of texture for this project. I coordinated the Cabbage Rose embossing folder with some vibrant inks, flowers, pearls and dyed ribbon. I’m adding a tutorial below:

Supplies:

White Cardstock
Chipboard
Gesso
Ink Sprays
Flowers
Crocheted Doily
Pearls
Ribbon
Dreamroad Sign
Cropadile
Trimmer
Glue Gun
Mini Attacher


Tutorial:

 
Step 1: Spray inks onto 8 ½ x 11 sheet of white cardstock. Let dry.


Step 2: Place full sheet of inked cardstock into Cabbage Rose embossing folder. Close the folder and insert into Cut N Boss by Craftwell machine.
 
Step 3: Remove the embossed paper from the machine and the embossing folder. Notice the deep impression. The ink combo helps accent the detail in the embossed pattern well.
 
Step 4: Trim the embossed paper down to desired tag size.  I chose 3 ¼ x 6 ¾ as the size that I wanted to work with.


Step 5: Distress the embossed tag with vintage photo ink and layer the tag onto chipboard.
 
Step 6: Punch hole in the top center of tag using a Cropadile and attach ½ of a crocheted doily using a mini attacher.
 
Step 7: Adhere resin frame and flowers to tag.
 
Step 8: Add pearls, Dreamroad sign, butterfly, additional flowers and dyed ribbon.
 
Step 9: Tap gesso over the tag with a paintbrush and highlight the flowers and ribbon with gesso. Continue embellishing as desired.
 
Thanks so much for stopping by today and I hope that this tag has inspired you!

March 8, 2017

Lucky Me!


This week's craftiness was lots of fun and is a quick project over all.  So let's get started!
You'll need:
Heart Plaque (heart and back from Thoughts in Vinyl)
Modeling Paste
Gesso
palette knife
eBrush, siphon adapter and Marker adapter
White acrylic paint
Markers
electronic die cutting machine (Sizzix eclips) and software
Cardstock
glue (wood glue)
Hammered Copper Paint (Krylon)
Tack cloth
Prep your wood.  Make sure that all sawdust is removed and you have a prepped surface.  Apply a thin coat of Gesso to both pieces of wood.  Let dry.
2017-03-04 11.30.55 copy
Using the spray paint, spray the heart.  Let dry according to the manufacturer's directions.
Using the siphon adapter and the eBrush, fill a cup or bottle with the acrylic paint.  You may need to thin is just a little for easy flow.  Spray a coat on the board.  I liked the speckled look so I did a light coat.  Let it dry and added another light coat.  Let dry.
2017-03-04 12.40.51 copy
Create a stencil using the shamrock in the shapes library.  I resized to about 1/2 inch and then used the copy and paste command to fill and manipulate for my stencil.  Cut.  You can also create your Lucky me title using one of your favorite script fonts.  Some of the areas of my cut are pretty thin, so be careful as you lift it off the mat and or get ready to color and apply to the wood.
2017-03-04 15.17.02 copy
Using the stencil and a knife, apply some of the modeling paste.  Lift the stencil and let the paste dry.
2017-03-04 15.37.25 copy
Using the eBrush, marker adapter and markers, place the stencil back down over the shamrocks and spray.  I decided to use 2 tones  of green and used the gray lightly in some areas around the edges of the shamrock to add a little bit more of a dimensional look.
2017-03-04 15.51.19 copy
2017-03-04 16.46.15 copy


Glue the heart to the base, glue the title to the heart.
2017-03-04 16.48.41 copy
2017-03-04 16.48.56 copy
Hoping you've scheduled some time in your crafting space this week!  Let's celebrate National Crafting Month in a big way!
Teambadgespring2016

October 20, 2015

'Boo' Banner with Brayered Embossing

Cut 'n' Boss Design Team: Suzanna Lee Cycle 12

Hi there Craftwell fans! Suzanna here today to share with you a cool technique I used to create this Halloween "Boo" banner!


The middle three pennants of the banner are all embossed cardstock. The middle banner piece, for the first letter O, I did something a little bit different. I debossed the cardstock with an embossing folder that I brayered gesso over so that the white web is visible on the black cardstock!

Here's how it's done;

Prepare your brayer with gesso


Roll the gesso'd brayer over the raised part of the embossing folder. 
Carefully place your cardstock on top and without shifting the paper, close the folder. 
Insert into appropriate sandwich for the Cut'N Boss and run through the machine to deboss the cardstock.
Voila!


Allow the gesso to dry before decorating.

I precut the pennant pieces (with a die in my Cut'N Boss) before running them through the Cut'N Boss to emboss! That's a mouth full of a sentence! Here is the sandwich I used for the die cutting;


Here is another close up of the layers for the letters. A little gauze, some stamping, some punching!


Thanks for stopping in today!

Suzanna 

Visit my blog for more project photos: 


Supplies
Craftwell/Teresa Collins Cut'N Boss
Craftwell/Teresa Collins embossing folders; Love Triangles, Beautiful Brocade
Die: Pebbles Inc
Cardstock: Core'dinations
Patterned paper: Crate Paper, American Crafts
Letter Stickers: American Crafts
Twine: The Twinery
Punches: EK Success

May 18, 2015

My eBrush and Things From Home

Ebrush Design Team: Peggy Oliver Week 4 Cycle 2

The eBrush can be used to facilitate so many great grounds for projects. I love how Peggy showed how to make this great canvas. 


Hello! Peggy here to show you my 10 x 10 Canvas made with the help of my eBrush by Craftwell!


Supplies used today are:
10 x 10 Canvas
Things from home theme nuts , bolts , you name it ..
frame
E 6000
Gesso
Spectrum Noir Markers
Sharpie Pens

I glued all pieces down with E6000 in vertical and horizontal only. 

After completely drying I applied white gesso to everything. 

I sprayed with finepoint Sharpie Markers aqua green and light blue with my eBrush.
 I painted over with some white gesso for another added layer.
 Then I sprayed over that with more Alcohol Markers. Spectrum Noir Markers used were TB8,BT9,BT4,BT5 Here is my result! and some close ups. 


 My frame is ready for a picture.. I'm thinking ocean! What do you think?

Have yourself a wonderful Monday!
Peggy 

'
 
Copyright © 2014 Craftwell Blog. Designed by OddThemes - Published By Gooyaabi Templates