DO NOT MISS
>>Follow our Facebook page for updates! >>Join our Craftwell Design Team: Apply Now!
Showing posts with label diecutting. Show all posts

December 17, 2021

Christmas Ornament

 Hi Everyone!

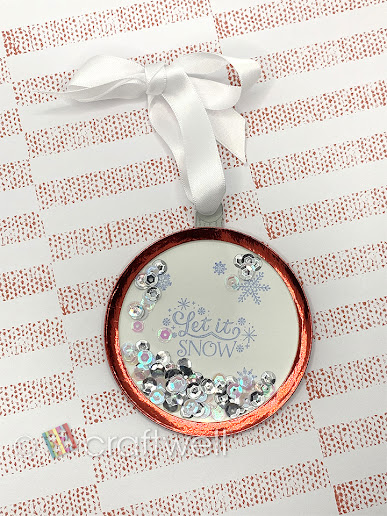
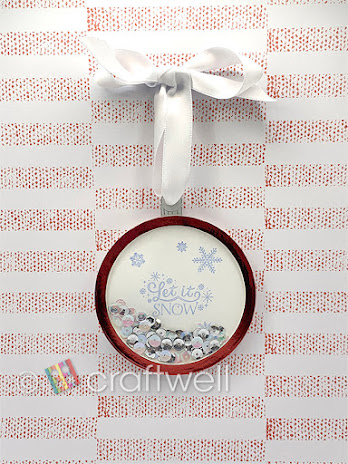
Christmas is closing in and I thought it would be fun to make a shaker ornament to place on your tree.

Or it can be used as a gift tag as well.


MATERIALS:

Craftwell's eBosser

Metallic Red, White and Grey Cardstock from Michaels

Hygloss Overhead Projector Sheets Acetate Transparency Film

Waffle Flower Nesting Basics Dies Bundle from Amazon

Christmas Themed Stamps from Michaels

Sequins from Amazon

ColorBox Assorted Colors Ink Pad

Single Hole Punch

White Ribbon

Clear Glue


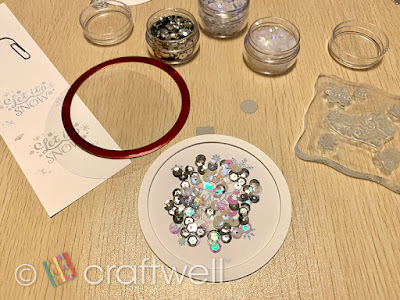
First, I chose one of the large round dies and cut-out a base layer. 
Then took both the previous large die and another round die that was 2 size smaller to cut about 6 layers with the white cardstock, and one layer with the metallic red cardstock. I die-cut a small square and circle with the grey cardstock.

Taking the base layer, I stamped Christmas words and additional decorations together. 

When gluing the layers on the base, on the 3rd layer glue the grey square at the top and then glue circle near the edge of the square. Then continue gluing the remaining layers except the red one.

I added the silver, clear and white sequins and kept them in the center.

Cut and glue a round circle from the acetate film then take the red cut-out layer and also glue on.

While the layers are drying, punch a hole at the small circle then place ribbon through hole and tie a bow.

And there you have a Christmas Ornament thats also a shaker.


Hope you enjoyed my project! 

From Katie


February 2, 2017

DIY Shrink Plastic Accessories: Use for Super Bowl LI or Valentine's!


'Ello everyone!

This month is all about the Super Bowl & Valentine's Day!  I wanted to make some fun, cute & easy accessories using themes inspired by both concepts.  One with pennants can be used as name tags or food decor and another inspired by the yummy candies that come with Valentine's (chocolates, sweethearts, more chocolates...).

Even though these accessories are geared toward February events, you can apply this to anything!  Halloween, Christmas, birthdays or celebrations in general!  The best part is that these are really about making a statement piece perfect for any #OOTD post without having to buy the designer brand accessories at designer brand prices.

YOU WILL NEED:
+ Fine point Sharpies, any color
+ paint markers (optional)
+ Sharpie Marker Adapter
+ Cut'n'Boss
+ pennant shaped cutting die, at least 4" in length (Super Bowl LI)
+ heart shaped cutting die, at least 4" in width (Valentine's Day)
+ white or frosted shrink plastic film
+ 200~400 grit sandpaper
+ embossing heat gun or pre-heated oven
+ clear varnish or clear acrylic sealer
+ hole punch, for keychains & charms
+ jump rings, for keychains & charms
+ pin backs, for brooches
+ super glue or E6000, for brooches


PROCESS:

1.  Prep your stuff!

I know, it's a weird step, but this way you can move through all
the proceeding steps with ease!

Sand your shrink film on only ONE side with your sandpaper and have a setup for your eBrush.

Make sure the area you are working in has paper put down & there is good ventilation; airbrushing & sanding projects need ventilation!


2.  Use your Cut'n'Boss to cut the out the heart shapes from the shrink plastic film to make as many
accessories as you would like!  The platform combination to use is the same as the one in the manual (top to bottom):

Platform A
Platform B
Platform A
Shrink Film
Heart Cutting Die/Pennant Cutting Die
Platform D

The cutting die has to be at least 4" wide in order for the accessories to turn out just under 2".  Any smaller, the details may be too difficult to read from a distance.


3A.  Color & decorate your hearts on the SMOOTH side of the die cuts!

I chose to use the pastel colors from Sharpie's many assorted colors.  The trick is to make the colors 50% lighter than what comes out.  If you have used shrink film before, then you'll recall that the plastic shrinks along with the color intensifying..!

To prevent a pastel pink from turning red or a green from turning dark green, I used one color Sharpie at a time to spray from a distance of about 6" or more from the surface & get an even mist on however many hearts/pennants I want.  Let the pieces dry.


3B.  Now if you're doing conversation hearts for Valentine's, you can use the red Sharpie to write your personal saying or a classic conversation heart saying.  My favorite is "FAX ME".  For the Super Bowl LI charms, you can personalize drink tags with people's name in the style of old university sports' teams.

For the conversation hearts, I also took a Sharpie color a shade darker than the heart to make an outline.  Let dry again.


4.  Now you can choose whether or not to make these hearts a charm or a pin.

To make a keychain or charm, grab your hole punch & strategically punch a hole into the heart.  To make a pin, just skip to the next step.  (:


5.  The fun part: it's time to shrink the hearts!  Use your oven or a heat gun as per instruction.

If you're using a heat gun like me, then even distribution of heat is key!  I quickly press down on the finished piece to make sure it will cool flat.


6.  Use your bottle of varnish to make a nice protective coat over your work.  You can do both sides, but just the front is fine.  Let dry for a few hours or overnight.


7.  Attach your pieces to jump rings or use super glue to attach the pin back to the piece.

TADA!  Your very own unique & handmade accessories, perfect to impress your party, significant other or just to impress yourself!  (:  Here is an example of using paint markers & clear shrink film:


Hope you enjoyed this tutorial!  Have a fun February~

-Judith

January 2, 2017

Gift Giving by Sukie Dhillon

Happy New Year!  This is Sukie and today I project to share which can quickly be transformed into an elegant hostess gift.  Now that New Years is over I am able to share this gift giving idea.
I started my project by cutting out a wine bottle tag which I designed in Cricut Design Space.  The bow and sentiment were also cut with my electronic die cutter.  I cut the white banner out with the Fish Tail Banner dies.
The wine bottle tag was embossed below the score line with the Modern Stripe embossing folder. The shimmer paper gives the embossing an elegant look.
Once I created the bow, everything was adhered on the wine bottle tag.  I ran the intricate sentiment through my Xyron sticker maker for easy application.
The wine bottle tag is a super quick and easy way to transform a wine bottle.  The embossing adds the perfect amount of dimension.
Thanks so much for stopping by!  Have a great day!

April 14, 2016

Marvelous Mini Notebook by Yolie Burke


Hello and welcome to the Cut N Boss week.  This is Yolie and I am so happy to be sharing my first project as a member of Cut N Boss Team.

I have a little addiction to stationery specifically notebooks.  I have stacks of notebooks I purchase simply because they are so cute!  Raise your hand if you have the same addiction.

I created a mini notebook for a friend.  I used pattern paper from DCWV Quince Blossom, Latina Crafter dies and stamps. 

Using Latina Crafter's 4"x6" journaling dies, I took 4 sheets of copy paper, folded in half and ran it through the Cut N Boss.  I did this several times until I had a decent amount of pages for the notebook.

I then punched the pages with the Cinch binding system.

I finally opened my new Prima doily die.  It's absolutely gorgeous and it cut beautifully.  I also realized I needed another layer for the front cover, so I took a banner die and cut the green pattern paper.


I stamped the library card with Latina Crafter's You stamps set from the Be a Blessing line, die cut the word "amigas" trimmed the 's' and adhered the elements to the front cover.  I glued the buttons and the mini notebook is complete.


Thank you for joining me today.

September 25, 2015

Gold Beauty!

Cut 'n' Boss Design Team: Tyra Babington Cycle 11

Happy Friday! We end the week with a gorgeous card by Tyra Babington featuring more of Teresa Collins Glam Factor and Project Pink lines! 

See the card below!

Happy Friday! This is the second week of the collaboration between Craftwell and Teresa Collins featuring acetate and gold accented Glam Factor, Collectors Edition and Project Pink. This time I decided to create an acetate card! Supplies: Craftwell Cut 'n' Boss, Teresa Collins Lifestyle Collection Die Set, Teresa Collins: Collections Edition and Glam Factor. Paper Trimmer, Inkssentials Glossy Accents, foam tape and Xyron adhesives. Sparkle_Card_JustTyra_for_Craftwell_TeresaCollins_1 Cutting and scoring the acetate is no different from using card stock! Also, I used one of the awesome 3 x 4 journaling cards as a sentiment to use on the inside of the card. Sparkle_Card_Inside_JustTyra_for_Craftwell_TeresaCollins_1 Have a wonderful weekend and thanks so much for stopping by! 

Tyra  


Thank you Tyra! 

Be sure to follow Tyra on her personal blog http://justtyra.com

May 29, 2015

Die-Namites + Craftwell Blog Hop: Elegant Card Ideas

Cut 'n' Boss Design Team: Tyra Babington Cycle 11


Today is the last day to enter the Die-Namites + Craftwell GIVEAWAY!


Want to enter to win a $25 dls giftcard to Die-Namite Dies & the new mini embossing folders by Teresa Collins? 


Follow the instructions below, and check out Tyra's gorgeous card ideas! 


Inspiration and a chance to win?! Yes, please!


Cut 'n' Boss and Die-Namities Giveaway Week!
To Enter:
1. Follow both Craftwell and Die-Namities blog
2. Leave a comment here and over on Die-Namities blog!
3. A Winner will chosen on EACH blog! More chances to win! Winner announced on Monday! (6/1)

Hi It's Tyra and I'm back to share a few fun lovelies created with the Teresa Collins Cut'n' Boss featuring Die-Namites Spring Splendor Die! Let's get to the cards, shall we? Craftwell  DieNamities Spring Splendor Thanks Card Tyra Babington 
 I created this card simply by cutting out two pieces of patterned paper from the same sheet. I sized one sheet to 4 x 5 inches and added it to my white card base as a panel. I flipped over my second piece of pattern paper to the neutral side, creating a die cut with the Spring-Splendor die. I adhered the die cut flower to the card base with foam tape and stamped a sentiment.   The inking I used on this second card made the flower the star of the show! Craftwell  DieNamities Spring Splendor Loved Card Tyra Babington I cut card stock to 5 x 4 inches and blended together three inks. I cut the blended ink paper with a die, and adhered it to a simple white card base with foam tape. Last, I added a simple sentiment and this card was done! In addition to card stock, Die-amities dies can cut foam, thin chipboard, felt, fabric acetate and wood veneer paper. Together the Cut 'n' Boss and Die-Namities make for the perfect combo! Thank you so much for stopping by the blog! 

Tyra!

Be sure to leave a comment below to enter this giveaway! After you're done, head over to the Die-Namites blog to see their amazing project, and leave a comment for an extra chance to win!


February 18, 2015

Pink & Main Speech Patterns

Ebrush Design Team: Jan Hunter Week 9 Cycle 1

Jan starts off our wonderful time with our sponsor, Pink and Main! I love their adorable stamps and you will too! Please check out their vast collection!


This simple card is so easy especially using the Speech Patterns stamp set from our Sponsor this month, Pink & Main.


You'll need:
Speech Patterns SVG file from Designs on Cloud 9 (You'll want to hurry to get this file as the site is closing soon.)
Cardstock - I used white for all (one piece cut at 5.5 in x 8.5 in for card base and another 6 in square piece for die cuts.
eBrush
Spectrum Noir Markers
Staz-On ink
Versa Mark ink
Black Embossing powder
electronic die cutter
Heat gun
pop dots
adhesive

Create your card base (scoring at 4.25 inches on the long side Fold on the scoring line) Set aside.  Cut the speech bubble in the style design you prefer I cut three for my project.  Stamp the front card base with the sentiment using Versa Mark ink and then emboss using the black embossing powder and set with the heat gun.  Stamp the cut speech bubbles as desired and draw some "stitching lines" around the outside edge of each bubble.


I chose to use blues on this card,  so set up your eBrush and spray lightly as desired on the card.  Carefully spray the edges of each of the bubbles.  Using adhesive place one bubble near the top of the card front; apply two pop up dots to the back of a second bubble and add a little bit of adhesive to the point of the bubble and adhere to the card.  With the third and final bubble, add two layers of pop dots to the back and adhere in place. Finish the inside of the card as desired and celebrate another fun project completion!


Don't forget to check out what the rest of the eBrush DT has been up to... visit the Craftwell Blog for all the details!

See you again soon!


'
 
Copyright © 2014 Craftwell Blog. Designed by OddThemes - Published By Gooyaabi Templates