DO NOT MISS
>>Follow our Facebook page for updates! >>Join our Craftwell Design Team: Apply Now!
Showing posts with label cardideas. Show all posts

February 12, 2016

Bold and Gold Valentine's

Cut 'n' Boss Design Team: Tyra Babington Cycle 12

Happy Friday! It's Tyra here with a shabby chic style bold and gold valentine's day card to share with you! Let's get to the card first and then I'll share all of the deets: JustTyra_Craftwell_20150204_Valentine_Card2   Supplies: White card stock, foil card stock Craftwell, eBrush and Cut 'N' Boss, alcohol ink markers, Teresa Collins Noteworthy Pocket Dies, various ephemera. TyraBaibngton_Craftwell_20160204_Valentine_Card_CloseUpSteps:
  1. Using a 8.5 x 11 inch piece of card stock and your favorite paper trimmer to cut a card base sized to 4.25 x 11 inches. Score and fold in half for a card base sized to 4.25 by 5.5 inches. Cut a card panel sized to 4 x 5 inches.
  2. Use the eBrush, the 4 x 5 inch card panel and alcohol ink markers in two shades of pink or rose to create an ombre effect on the card panel, spraying the lighter shade near the top of the card base and the darker shade towards the bottom of the card base.
  3. Use Teresa Collins "Be Golden" steel die to cut the sentiment twice from two different colors of foil card stock. Adhere the sentiment from one die cut to the circle portion of the second die cut. Adhere to card base and add ephemera to your taste.
  4. Adhere panel to card base!
Creating this card was a little outside my comfort zone, but once again, the eBrush and Cut 'N' Boss transformed plain card stock into something truly one-of-a-kind! I hope I have inspired you today. Thank you so much for stopping by the blog!

-Tyra 

December 17, 2015

A Very Starry Christmas Card!

Cut 'n' Boss Design Team: Alexia Misso Cycle 12

Time for another Christmas card today I made this clean and simple card using Cut 'n' Boss and metal dies. With Christmas around the corner I know there will be a lot of preparation to make so a quick and easy card always first comes to mind.


To create the background, color the background with some water-based markers on watercolor paper. I used blue and purple Sparkle Pens from Crafter's Companion. Add water with brush to well combine both colors. Let dry.


Using star metal dies from Craftwell, create negative shapes on paper. Prepare the landscape embellishments too using the tree line die. 


Adhere embellishments to card, including star wood veneers. This card is now ready to go in the mail!


I hope you like the project I share today, more quick card ideas on my blog! 


July 20, 2015

'Rose' Card

Cut 'n' Boss Design Team: Mitsyana Wright Cycle 11

Mitsyana Wright creates a gorgeous rose card using the Cut 'n' Boss & the eBrush! See her gorgeous 3D creating below!

Hello Crafty Friends... I have a lovely project for those of you who know someone who could use a few words of encouragement. Sometimes just taking the time out to tell someone that everything will be ok makes a world of a difference. Remind them to stand tall and keep their head up, and that they can make it through anything with the right attitude.


Supplies Used
Teresa Collins Pocket Dies (Doily- Lover's Lane, Leaf- Thankful, Flowers- Girls Best Friend))
Spectrum Noir Markers (FS8, CR3)
Sharpie Markers (lt. green, green, orange)
Leaf die (My Favorite Things- Blueprints 14)
Sheet Music
Cardstock (white, green, aqua)
Patterned Paper (My Minds Eye)
Hot Glue Gun and glue sticks
stamens
Double-sided Adhesive
Ek Success 2 way Glue Pen
8mm and 12mm stylus


First  I ran my Teresa Collins pocket dies through my Cut'n'boss machine. Because it has an extra large platform I can cut several dies at once.

For metal dies I use the following platform combo(from bottom to top):
D Plate
B Plate
A Plate 
Die
Paper
A Plate


To make my card I cut out 1 doily, 4 large flowers, 2 medium flowers, 2 small flowers, and 2 leaves from my Teresa Collins Pocket dies. Pictured is 3 leaves but later I changed my mind and only used 2. I also cut out 7 stemmed leaves with my MFT things die (not shown).


Next I airbrushed the edges of my flowers using my ebrush and Spectrum Noir Markers in FS8 and CR3.


Using a rubber/foam mouse pad and a stylus I added dimension to my flowers by rubbing my stylus in a circular motion around the edges of each petal. For less strain on your hand , try rubbing you paper with waxed paper. This allows the stylus to glide across the paper easier.

I then hot glued each bowl of flowers together, gluing the smaller ones inside the larger ones. I also hot gued some stamens inside the smallest flower.


I then airbrushed my leaves using my ebrush and sharpie markers first in light green, the regulat green, and then lastly orange.


Here is what the leaves looked like after adding each color. First leaf is just the light green. The second leaf is light green with regular green around the edges. And the third is with all three colors.


I then glued my leaves onto some olive green cardstock and cut them out.


For my stemmed leaves I ebrushed them with the same colors as the leaves above except I added brown onto the stems.


I then stamped my sentiment onto my doily using a stamp from Virginia Turtle's beYou stamp set and Versafine Onyx Black inkpad.

Finally I assembled and adhered my pieces onto my card front. I adhered the doily using double-side adhesive. All the rest of my elements were adhered in place with hot glue.

And here is my finished card!


And a close up of my flower...
I hope you enjoyed today's tutorial! 

For more amazing projects please visit my personal blog at:

~ Mitsy


June 29, 2015

Instant Cards!

Cut 'n' Boss Design Team:Mitsyana Wright Cycle 11

Mitsyana Wright is loving all things Bella Blvd! Today, she shows you how to create easy cards in no time with the eBrush & Cut 'n' Boss!

Hello Crafty friends!! We are kick starting our second week with our fabulous friends at Bella Blvd. I am so privileged to get to work with 2 amazing companies!.Their products work so well together that it makes creating breeze.  Today I have a card that I made in mere minutes... how did I do that? Easy...


Bella Blvd has these awesome 12"x12"  papers that are filled with awesome sentiments and illustrations. I literally can cut up the whole page and make several cards at once!!


 Accent my paper 
panels with my awesome craftwell dies and... 


Tah-dah!!! Instant cards!!

Like this cutie down below.


Here are other cards I made using those panels! Die cut accents are just icing on the cake!! SWEET!!


These two card (above and below) used the same background panel but I airbrushed the one on the bottom with my eBrush for a pop of color!


The color gives an entirely different look!

Supplies Used

Cut'n'Boss by Craftwell
Teresa Collins Pocket Dies
Bella Blvd Papers and embellishments (Color Chaos and Tiny Tots Collections)
eBrush by Craftwell
Spectrum Noir Markers ( PP2, PP4, OR2, GB4, CG3, CG4, TB8)
EK Success 3D Dots
Colored cardstock (black, red, green)
Grosgrain Ribbon
Scissors
Double-sided Adhesive

PLAY with the panels on your paper... You'll be surprised how fun and easy it is!

~ Mitsy


For more fun and inspiring projects visit me at upontippytoes.com

Thanks Misty! 

Aren't these cards gorgeous?! And the Bella Blvd papers are a MUST! 

What do you think?

June 1, 2015

Flower Anniversary Card

Cut 'n' Boss Design Team: Mitsyana Wright Cycle 11

Mitsyana Wright is back with more Die-namite card ideas! See her gorgeous project below!

Hello again Crafty Friends... I hope you all are ready for another awesome project featuring amazing dies from Team Cut'n'Boss' wonderful sponsor, Die-Namites!!

Recently My In-laws celebrated their wedding anniversary... this was whopping #51 for them. Wow, how amazing is that??!!

And I felt a store bought card just would not do. They needed something special. So I made them this lovely card in honor of their wedding anniversary.


And... "life is good"! It has been good enough to bring them together and keep them together!!


Supplies and Tools Used
Teresa Collins Pocket Dies- doily, small 6point flower, life is good (Craftwell)
Xyron 5" Create-a-Sticker
Spectrum Noir Markers (GB4, CG4, TN4)
Cardstock (craft, lt blue/white polkadot, lt green, lt yellow, shimmery white, metallic silver)
Glossy Accents (Ranger)
Embossing Stylus
Foam/ Rubber Mouse Pad


I first start of by cutting my pieces out with my dies and cut'n'boss machine. Because the cut'n'boss has an extra large platform I can cut all my dies at one time... and because it has an extra strong motor I can also cut out several layers at a time. I needed a few of each die except my doily and sentiment so  I needed to make a couple passes... and for this instance I cut my dies cut out 3 layers at a time. This means I only had to cut my flowers again the second time. Yay!! I'm so glad I didn't have to run each die through multiple times... that would be exhausting!


The sandwich I used to cut my dies were as followed...

From bottom to top:
D Plate
A Plate
Magnet Plate
Die
Paper
Metal Plate
A Plate

And TAH-DAH!! It cut like butter!! Man, I love this machine!!


Next I ebrushed my pieces... This is my prefered way of shading all my pieces... with virtually NO DRYING time. 


1.I first eBrushed my Small Ivy( Die-Namites) leaves with my Spectrum Noir CG4.
2. Then layered Spectrum Noir TN4. 
3. In a circular motion rubbed my stylus on the back of my leaves to create dimension.
4. This is what the before and after of my leaves looked like.

Doesn't look like the same piece, does it?!

Now for the flowers...


1. I ebrushed a small amount of GB4 in the center of each flower.
2. Snipped about 1/4" toward the center of each flower.
3. Applied pressure to the center of flower using my stylus, making sure to put my mouse pad underneath.

I also ebrushed GB4 around the edges of my doily.

I wanted my card to be really strong and I didn't want pieces to fall off ... so, I quickly ran my card mat and doily through my Xyron 5" Create-a-Sticker


Then I adhered all my pieces onto my card. I used Glossy Accents to adhere my leaves, flowers, and sentiment pieces to the card front.

My final result... simple but elegant. Just perfect for my Mother and Father-in -law!!


I hope you enjoyed this quick tutorial!! 

Special THANKS goes to Die-Namites for their generosity of such BEAUTIFUL dies!!

~ Mitsy


To see more of my projects please visit my personal blog at upontippytoes.com

Thank you Mitsy!

Be sure to follow Mitsy on her personal blog & leave her a comment!

May 29, 2015

Die-Namites + Craftwell Blog Hop: Elegant Card Ideas

Cut 'n' Boss Design Team: Tyra Babington Cycle 11


Today is the last day to enter the Die-Namites + Craftwell GIVEAWAY!


Want to enter to win a $25 dls giftcard to Die-Namite Dies & the new mini embossing folders by Teresa Collins? 


Follow the instructions below, and check out Tyra's gorgeous card ideas! 


Inspiration and a chance to win?! Yes, please!


Cut 'n' Boss and Die-Namities Giveaway Week!
To Enter:
1. Follow both Craftwell and Die-Namities blog
2. Leave a comment here and over on Die-Namities blog!
3. A Winner will chosen on EACH blog! More chances to win! Winner announced on Monday! (6/1)

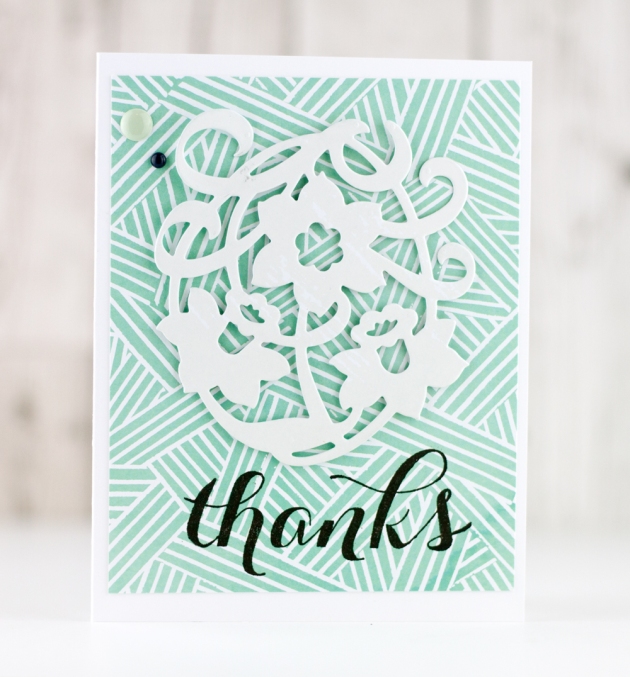
Hi It's Tyra and I'm back to share a few fun lovelies created with the Teresa Collins Cut'n' Boss featuring Die-Namites Spring Splendor Die! Let's get to the cards, shall we? Craftwell  DieNamities Spring Splendor Thanks Card Tyra Babington 
 I created this card simply by cutting out two pieces of patterned paper from the same sheet. I sized one sheet to 4 x 5 inches and added it to my white card base as a panel. I flipped over my second piece of pattern paper to the neutral side, creating a die cut with the Spring-Splendor die. I adhered the die cut flower to the card base with foam tape and stamped a sentiment.   The inking I used on this second card made the flower the star of the show! Craftwell  DieNamities Spring Splendor Loved Card Tyra Babington I cut card stock to 5 x 4 inches and blended together three inks. I cut the blended ink paper with a die, and adhered it to a simple white card base with foam tape. Last, I added a simple sentiment and this card was done! In addition to card stock, Die-amities dies can cut foam, thin chipboard, felt, fabric acetate and wood veneer paper. Together the Cut 'n' Boss and Die-Namities make for the perfect combo! Thank you so much for stopping by the blog! 

Tyra!

Be sure to leave a comment below to enter this giveaway! After you're done, head over to the Die-Namites blog to see their amazing project, and leave a comment for an extra chance to win!


May 28, 2015

Die-Namites & Craftwell Week: 'Thanks' Card Making Ideas

Cut 'n' Boss Design Team: Alexia Misso Cycle 11

It's day 4 of the Die-Namites + Craftwell blog hop! 
Today, Alexia Misso gives us two gorgeous card ideas to recreate!

Follow along, and enter our giveaway!

All week long we are featuring projects created with the amazing Die-Namite dies and giving you an opportunity to enter for a chance to win a $25 dollar gift card so you can snatch yourself some fancy dies! We are also adding some Craftwell mini embossing folders to make the pot even sweeter!

To enter:

 1.Follow our team's blog posts and leave a comment. 
2. Head over to the Die-Namites blog and leave a comment on their blog post featuring our product.
3. A Winner will be picked at random on Friday, and announced on Monday.

*Brownie points for 'liking' Die-Namites on FB!

Hi! Alexia here and I want to share an idea on creating custom envelope, die-cut and embossed! I made a thank you card and a matching theme envelope using both Craftwell and Die-namites' products. Great combination of products to work with, I'm convinced to stock up Die-namites cutting dies!  ***Grin***


Here is the close-up shot for the beautiful embossed background, love that texture!


Here is how I create this custom envelope using my Cut 'n' Boss and Die-namites' die.

Step 1: Score vertically 1" from left and from the right. Turn around horizontally and score 4" from the left and followed by another 4" right after. 


Step 2: This step I use different card stock but you will need the same one from Step 1. Place cutting die on desirable area on the middle row then place the cutting mat about 1/2 inch below the scored line (as shown in picture). Run it through Cut 'n' Boss machine.


Step above should result the following


Step 3: This step is to create the embossed background for the front of the envelope. Trim a piece of card stock size 4" x 6.5" and I used the THANKFUL embossing folder from Teresa Collins. At the same time, make a cut-out in pink color using same flower die and trim off the leaves with scissor. Glue the embossed card stock to the back of card stock in Step 2. Adhere all flaps to form an envelope, except the top opening. Glue the pink flower cut-out to the flower on the front of envelope. 


Now you have a complete custom envelope! I also created a card using a different Die-namite's die, isn't the die so beautiful?!


Thank you for checking in, I hope you like the envelope and the card!

-Alexia Misso

Now head over to the die-namites blog for more inspiration, and for another chance to enter this giveaway!

Products Used: 


'
 
Copyright © 2014 Craftwell Blog. Designed by OddThemes - Published By Gooyaabi Templates