DO NOT MISS
>>Follow our Facebook page for updates! >>Join our Craftwell Design Team: Apply Now!
Showing posts with label Valentine's Day. Show all posts

February 14, 2023

Love Donuts

 Hi everyone! Happy Valentine's Day 💕

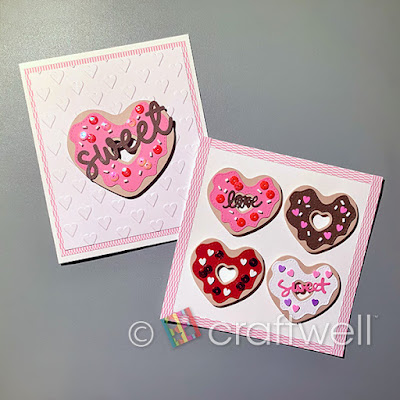
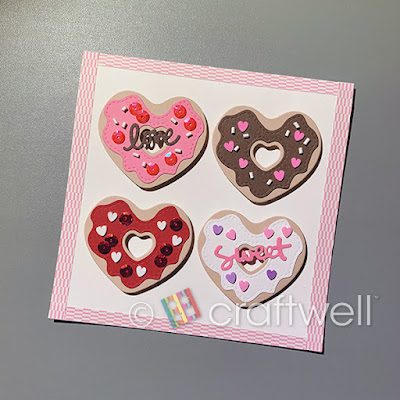
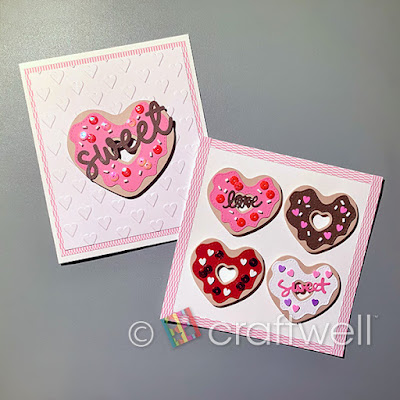
I made some sweet treats just for the occasion. Who doesn't love donuts shaped as hearts?


Materials

Craftwell eBosser

KSCraft Heart Shape Donuts Cutting Dies

Cardstocks from Michaels

Variety of confetti and shapes from Amazon

Foam adhesives

Elmer's glue stick


Taking selected cardstocks to cut out shapes using KSCraft heart shape donuts cutting dies and taking So In Love embossing folder to emboss on a plain cardstock. 

I assembled all the pieces to how I liked it and below is the finished cards. 

I couldn't resist making two cards.


I hope everyone enjoyed my project and got inspired!
Until next time.

From Katie

February 23, 2021

DT: Lip Balm Holders for St. Valentine's Day


 Dear Scrappers,


This is Veronica, from Vicky's Scrapping Passion sharing my post for Craftwell:
For this post, I made a lip balm holders as gifts for my children's teachers for St. Valentine's day:


I used the following materials and dies:


First, I die cut all the holders using the Sizzix dies and used another die set from Sizzix for the embellishments and bookmark.

In short: I stamped the delicate mandala shapes using the CTMH stamps. Then, I laminated the delicate mandalas after stamping a sentiment in the back using the "We are good together" stamp set (I used the "You are Loved" stamp). Later I cut them out using their thin cut dies. I did the same with the tags and "smile" sentiment (I stamped my children's name in the back of the tag) for the other end of the bookmark:


I attached both sides with a foot of ribbon and tied them with knots:


I used my SNAP and Cut'n'Boss to cut everything.

I hope you enjoyed my quick and easy project and please make sure to visit my blog for more inspiration and to follow me.

Enjoy the freezing days


My kiddos playing in the backyard this morning. A total "normal" February morning in Texas...

and stay safe from this pandemic.

February 14, 2020

Valentine Box

Hello everyone!! This is Berina here today, with a Valentine's box that I made for my daughter. I do have some pictures I took along the way as well. My daughter loved how it turned out - she loves butterflies :)


I started with an empty cereal box. I cut out 3 of the flaps at the top (2 tiny ones and 1 large one).


I measured the width of the box and cut that from one of the sides. My goal was to make a box with a close-able flap, which I planned to use velcro for.


I covered the entire box with a red foil gift wrap, which I got from Dollar Tree.


I die cut some butterflies on gold mirror card stock using the Crafter's Companion - Chic Butterflies set. I die cut my daughter's name - Amelia - on the same gold mirror cardstock, but this time I lined it with double sided tape on the back, to make it easier for adhering. I couldn't find my double sided sheet, so used 3 lines of double sided tape ;) The alphabet dies are from Whimsy Stamps. I adhered some velcro fasteners on the flaps. I loved how it turned out. My daughter loved it - she loved all the sparkle and glimmer and she adores butterflies! I love my Cut N Boss - it has really made me fall in love with die cutting.


Please do let me know what you think. Thanks for stopping by. Have a great day!

-Berina

February 27, 2019

DT-St. Valentine Goodies

Dear Scrappers,

This is Veronica, from Vicky's Scrapping Passion sharing my post for Craftwell:
We are back and ready to entertain you with new ideas and our favorite tricks.  
For this month's post, I made the goodie bags for my children' teachers and aids.


I used some Sizzix dies for the bookmarks and die cut several combinations using the SNAP machine:


I added a bookmark to each of the goodie bags:


In total I made 60 goodie bags, which made it a breeze by using the SNAP.


Steps:

1. I laminated one side of different printed cardstock from CTMH.


Here you can see one side is glossy (laminated) and the other is matte, ideal for stamping with regular inks: 


2. I was able to die cut the bookmarks in my car during my lunch breaks by using the SNAP, which can be recharged and the battery is super long lasting:


The SNAP made die cutting the laminated cardstock a breeze. The only drawback was that the one side only lamination makes the bookmark curl a little, Which can be corrected by putting the bookmark inside heavy books ;-)


3. Then, I stamped the back of the bookmarks using stamps from CTMH and inks from FSJ:


I also stamped my children names (CTMH, personalized stamp)


I also stamped plain dollar store goodie bags:


I hope you enjoyed this very simple and super easy to make gift for the teachers and visit my blog for further ideas:


February 13, 2019

Be Mine Tag


Hello! It's Desiree'! I'm so glad to be back on the Craftwell blog!
Today In honor of the holiday, one of my faves btw!! ❤
{It’s also my oldest son’s b-day!! So I am bit partial! Heheh}
I am sharing a tag I created.
Before I even started I already knew what dies I wanted to use.
I cut them out using my Snap machine.
Starting off for this project I die cut a tag die, twice.
First my patterned paper, this paper is pretty BUT on the thin side, SO to reinforce my tag I took some old packaging and cut the tag out again.
I decided to do a little eBrushing for a little extra something! Love the eBrush!


Next, I made up my mind to do a few things I have not did enough of!  Stamping! Water coloring! Heat embossing AND fussing cutting! Oh my! LOL
I snapped a couple of pics of the stamp, and my water coloring before the fussy cutting went down.
The image stamped and embossed amazingly. 
I had to use this stamp FINALLY! I love it.


Next, I began to assemble my tag. I took all my die cut elements {doilies & hearts} and began to arrange, stack, and adhere them to the tag.
I also cut out a shadow heart for my fussy cut stamped image.
After cutting my doilies down a bit, I stacked them adhered them and gave them a nice finish by cutting a thin strip of the red foil paper I used for my red hearts.
I added a tiny bit of gold trim ribbon that I adore too.


For my gear heart and shadow I want a little dimension. So I got out my pop dots, then on the tag it went!
After all that fun I decided a sentiment was missing!
This was an easy fix! Looking through my stash I found a cute one on a cut apart page! I glued it down and put a lil' curve into it.
Since I have a bit of a bling addiction I HAD to add at least a tiny bit! Heheh So I added these tiny acrylic hearts.
I also added a few trims and a tiny die cut reinforcement for the tag hole.


And there you have it! My completed tag! Fussy cuts and all!!


I hope you liked my project share, I hope in some way you were inspired! 
I also really hope you have a Valentine's Day over-flowing with love! 
Please don't be a stranger come back and visit this blog often for more Craftwell awesomeness!


P.S.
Some of the materials used in this project...

February 14, 2017

Things I Love About You... By Heather Wilson

Valentine's Love Cage of Affirmation!


Instead of using a card, I put together this little project as a way to show my boyfriend I love him this Valentine's Day.  Here's the materials you need:


Cut n' Boss and heart die cuts
decorative paper
Ebrush and markers
Small decorative bird cage
Hot glue
Embellishments (beads, lock, key, fringe, lace, etc.)
Jump rings
A colored pen to write with


Start with a sample piece of your decorative paper to practice on. You'll want to test this out with your Ebrush and see how different colors look on your paper. If you like the results, you can move on to a larger sheet and put all the colors you like on it.


I didn't leave any areas a solid color because I wanted the print on the paper to show. I did just enough to give it a bit of color.


Now you can start cutting out hearts with the Cut n' Boss! Remember to put the die cut flat side down on platform D. Lay your paper on top of that, then layer A, B, then A on top. I started out with about 15 hearts and later it ended up being 20 because I did some coloring with the Ebrush on plain white paper.


Take the color pen of your choice (I used pink!) and begin writing the things you love about your significant other! (You can also do this for family members or friends, but of course what you write would be much different!) I also wrote a couple favorite memories, and included some in-jokes in some of them.


Setting your hearts aside, you can start spicing up your bird cage a bit. I attached a heart shaped lock with a couple jump rings to the clasp of the cage lid.


Next I put a key above the lock by wrapping some wire from the cage around it with my pliers to hold it in place.


The bottom of the cage looked too plain to me, so I found some beaded fringe in one of my crafting stashes (you can never have too many craft stashes!) I attached it by putting a line of hot glue on the bottom of the bars. Tip: glue from top to bottom so the stringy parts can be pulled off easily from the bottom edges).


End your strip by overlapping the end where you started, and hot glue in place.


I hot glued some beads to the ends of the swirly wires on top. It needed some color there to balance out the trim on the bottom.


Now make your tag, either by buying some plain ones or cutting your own with the Cut n' Boss. Then add some color to it with the eBrush. I used a light pink sharpie first, then went around the edges with a slightly darker sharpie.


After writing "Things I love about YOU", attach the tag with two jump rings to the top of the cage.
Now you can add your notes to the cage in a neat pile. I put the sweetest ones on the bottom so the best ones would be saved for last.


Here it is finished! Either set on a table, or hang it up somewhere. If you have a bigger cage, use it as a centerpiece on the table for your loved one to find on Valentine's Day!
Have a great Valentine's everybody!


'
 
Copyright © 2014 Craftwell Blog. Designed by OddThemes - Published By Gooyaabi Templates