DO NOT MISS
>>Follow our Facebook page for updates! >>Join our Craftwell Design Team: Apply Now!
Showing posts with label Gifts. Show all posts

February 23, 2021

DT: Lip Balm Holders for St. Valentine's Day


 Dear Scrappers,


This is Veronica, from Vicky's Scrapping Passion sharing my post for Craftwell:
For this post, I made a lip balm holders as gifts for my children's teachers for St. Valentine's day:


I used the following materials and dies:


First, I die cut all the holders using the Sizzix dies and used another die set from Sizzix for the embellishments and bookmark.

In short: I stamped the delicate mandala shapes using the CTMH stamps. Then, I laminated the delicate mandalas after stamping a sentiment in the back using the "We are good together" stamp set (I used the "You are Loved" stamp). Later I cut them out using their thin cut dies. I did the same with the tags and "smile" sentiment (I stamped my children's name in the back of the tag) for the other end of the bookmark:


I attached both sides with a foot of ribbon and tied them with knots:


I used my SNAP and Cut'n'Boss to cut everything.

I hope you enjoyed my quick and easy project and please make sure to visit my blog for more inspiration and to follow me.

Enjoy the freezing days


My kiddos playing in the backyard this morning. A total "normal" February morning in Texas...

and stay safe from this pandemic.

December 15, 2015

Christmas Gift Box

Cut 'n' Boss Design Team: Suzanna Lee Cycle 12

Hi there Craftwell fans! Suzanna here today to share with a quick and easy yet elegant box for gift giving for the upcoming Christmas season. I love having things like this pre-made so all I have to do once that special something has been found is place it in it's box/bag/packaging, sign a card and it's good to go!


The box pieces were cut using my Silhouette Cameo. I could have used a We R Memory Keepers board too. I then created the following sandwich;


and ran the sandwich through my Cut'N Boss.


This is what the embossed box pieces looked like before assembly;


Xyron double sided tape works wonders for holding the box top and box together without worry about it falling apart.

The bow was cut with my Cut'N Boss and the dies from the Craftwell/Teresa Collins "A Girl's Best Friend" set and some Simple Stories patterned paper;


Assemble and add ribbon and viola! Pretty packaging for your Christmas gift giving!


How is are your preparations going? Have you begun any of your gift gathering? I hope it's all going smoothly!

Thanks for stopping in today!
Suzanna


Supplies
Craftwell/Teresa Collins Cut'N Boss
Craftwell/Teresa Collins embossing folder - Sophisticated
Craftwell/Teresa Collins Pocket Dies - A Girl's Best Friend
Patterned paper - Simple Stories
Ribbon - May Arts
Adhesive - Xyron

August 7, 2015

Hostess Gift Set

Ebrush Design Team: Yolie Burke Week 8 Cycle 2


Happy Friday this is Yolie from Team eBrush.  New month, new sponsor.  This month we are sponsored by Kadoodle Bug Designs.  They specialize in SVG files, cutting files for your electronic die cutting machines. GIVEAWAY ALERT! $25.00 Gift Certificate for Kadoodle Bug Designs!  Make sure to comment on this post , ALSO  like FB pages : Craftwell and Kadoodle Bug Designs


I used the coffee cup from the Cafe Coffee Girls to decorated the gift box that holds four KCups.  It's the perfect hostess gift.   I gathered up some fun older paper from my stash and used Sharpies; brown, green and not pictured grey, to alter my project.


When I eBrushed the bottom of the box, I wanted to mute the green color, so I first used the green Sharpie followed by the brown along the edges.  For the top, I only used the brown Sharpie to eBrush the edges and then sprayed the center and sides on the low setting. keeping the wand approximately 4 inches away from the paper to slightly mute the cream color.
{Please note the box is not included in the Cafe Coffee Girls collection.}


I used pop dots to add dimension and also popped up the "cafe" and added jute for a bit organic feel.


Here's a closer look of the hostess coffee gift set.
I hope my project inspires to alter the look of your projects with the help of the eBrush.  Bring out the stash of paper and start altering, give it a different vibe.

Thank you for stopping by today and enjoy your weekend.

December 25, 2014

eBrushed Hawaiian gift bag & tag

Ebrush Design Team: Mitsyana Wright Week 6 Cycle 1

Dreams of far away exotic places come with this great project from Mitsy! I am just in love!


Merry Christmas eBrush fans!! Today I have a beautiful ebrushed gift set to share with you all. I wanted to do something that is a reflection of my heritage. Although I was not born in Hawaii, I did grow up in Hawaii and spent most of my life there. So, I wanted to do a little something special that is a reflection of my heritage. 


Supplies you will need:
eBrush with Sharpie (SP) adapter
Metallic Gift Bag
Dreamweaver Stencils ( LL482, LS27, & LM204)
Background stencil (for more info click here)
Painter's tape
Oval Die
Tag Die
Metallic Paper
Sharpies (red, orange, yellow, light green, & green)

With a few item I turned this dollar store bag into a trendy upscaled gift.

With painter's tape I taped a down a border around my stencil onto my dollar store bag. This helps keep the stencil from moving and gives me a clean line around my bag. I put a cut out of an oval under my background stencil to mask off an area for my other stencil image to be set into.


I airbrushed the background onto my bag using my eBrush machine with the Sharpie adapter and a red Sharpie. Then I removed the stencil and oval mask.


In then revealed masked oval area I centered my  Dreamweaver pineapple stencil (LS27) and masked it with more painters tape. I then ebrushed the pineapple using my sharpies starting with my yellow, then orange for the base of my pineapple, and then light green and green for the leaves. 

I masked off my Dreamweaver's Season's Aloha (LM204) stencil above the red stenciled area and ebrushed my sentiment. 

Here is the image of the finished bag . 

I also removed the metallic "rope" that came with the bag and replaced it with burlap ribbon. This gave it a more luxurious look of that of an upscale boutique store.


Using my tag die I cut a tag out of metallic paper to match the bag. I repeated the pineapple motif my ebrushing a bigger Dreamweaver pineapple stencil (LL482). Again, using yellow, orange, light green, and green sharpies. Instead of ebrushing the same red background I opted for just a simple red border.  I did want them to coordinate but I  didn't want it to be too "matchy-matchy".

 The results were just stunning!!

We are a family that supports local artisans so I paired my gift bag and tag with a wine bought from our local winery.

I hope this inspires you to turn your dollar store finds into something luxurious too!

And as we say in Hawaii...
Mele Kalikimaka
( Merry Christmas)
& 
Hau'oli Makahiki Hou
(Happy New Year)

Thanks for stopping by!
For more crafty projects visit my blog:

~DT Mitsy

December 23, 2014

Christmas Mitten Ornament

Ebrush Design Team: Lisa Somerville Week 6 Cycle 1

I love this sweet Mitten! How clever and what a cool use of our Sponsor's product Evolon "plastic" paper! Lisa shows us another great way to use it with our eBrushes!


Hi, and welcome to the Craftwell Blog, Lisa here today, sharing Christmas Mitten Ornament/Gift Card Holder the eBrush.  This month, we are sponsored by Atlantic Paper and I've used their fabulous Evolon Paper to create my mitten. I love this paper, and it cut wonderfully using my electronic die cutting machine.


Supplies:
eBrush with Spectrum Noir and Sharpie Adapter
Evolon Paper
Stencil - Winter Wonderland TCW168
Foam Brush - optional
DecoArt Decou-Page - optional
Crafter's Companion - Spectrum Noir Pastels (PP2)
Sharpie Metallic Silver Marker
Zva Creative Crystal Gems
White Seam Binding
Glue Dots
Fusible Web (optional)
Tulle (optional)
Silver Cording
Flower
Needle
Die Cutting Machine
Zva Creative Crystal Gems
Non Stick Craft Mat
Seam Binding
Flower

Using your die cutting machine, die cut the Mitten, Cuff and Snowflake from the Evolon Paper.  You may wish to add Fusible Webbing to the Evolon Paper from which you are cutting the Cuff and Snowflake, that way you can easily attach them to the mitten.  If you don't have webbing on hand, no worries, you can attach the embellishments with Decou-Page.

When using the Evolon Paper, be sure to work on a covered surface, as your mediums may bleed through.


Using the eBrush, Sharpie Adapter and Metallic Silver Sharpie, add color to the "cuff" and snowflake that was cut from Evolon Paper and also to the Zva Creative Crystal Gems.


Using the eBrush with the Spectrum Noir Adapter and Spectrum Noir PP2 Marker, spray over Evolon Paper using the Winter Wonderland Stencil.  Move stencil and repeat until paper is covered. 


Repeat steps on other mitten.  You may want to do both sides of the mitten for a more finished look.


Using needle and Silver Cording, add stitches as shown.


Add cuff and snowflake to mitten as shown.  You can use Decou-Page to adhere these cut pieces. OR as I mentioned above, before die cutting the pieces, add fusible webbing to the Evolon Paper, then iron the cuff and snowflake to ensure that they will not fall off.  


Blanket stitch the edges using Silver Cording to adhere the two mittens together and embellish as desired.

Thanks for stopping by the Craftwell Blog, I hope you have found inspiration in my post!

For more inspiration, please visit my blog.


example image


November 24, 2014

Altered Keepsake Box

Ebrush Design Team: Mitsyana Wright Week 4 Cycle 1

Another beautiful project from Mitsy! You can tell how much she loves her eBrush and I think the feeling is mutual!

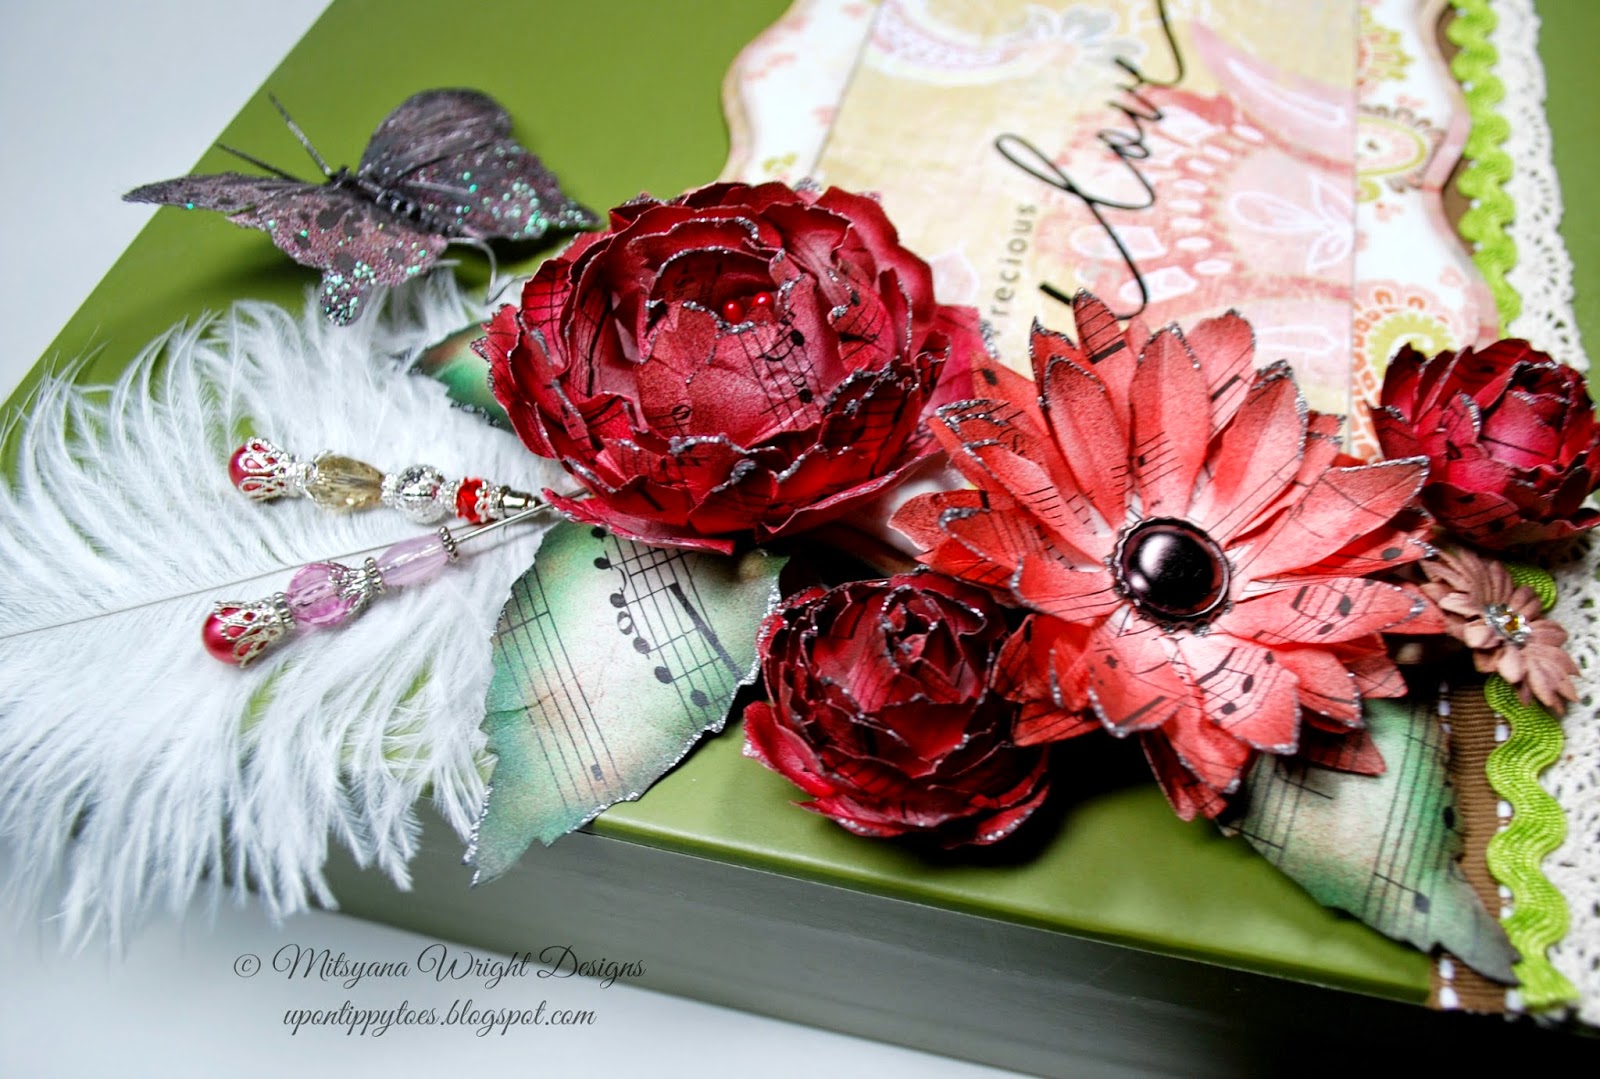
Hello Crafty Friends, Mitsy here to share with you this elegant keepsake box I made for a very close family friend. 


Supplies Needed
Storage Box/ Photo Box (letter size)

eBrush by Craftwell with SP (Sharpie) adapter head
Sharpies( lt, green, dk. green, red, orange, brown, gray)
Flower steel rule die (Sizzix/ Tim Holts - Tattered Florals)
Embossing Tool
Hot Glue Gun and Glue Sticks
Stamens
Ostrich feather
Feather Butterfly
Chipboard Frame
Rub-ons
Assorted Ribbon and Lace
Decorative Stick Pins
Pre-made Paper Flowers (Prima Marketing Inc.)
Patterned Paper or Sheet Music
Assorted Brads

Cut you patterned paper using Tattered Florals die. You will need at 5 flowers to make 1 complete flower. To make the the 3 peonies on my box I cut out 5 large & 6 medium (6 petal flower), 5 daisies
(9 petal flower), and 3 leaves.
I eBrushed my peonies with my red sharpie and then brown. And ebrushed my daisies with an orange sharpie and then brown. Adding the brown deepens the color so it doesn't look so flat. With my embossing tool I curled my flowers into a bowl shape and stack them together, alternating petals. 

For the leaves I started with the light green sharpie, then dark green, and added orange and brown  around the edges. I again used my embossing tool to curl the edges of the leaves.

I bought these stamens in the baking department of a major craft store, They come in a variety of colors but I always have white on hand because they can be colored to match any color scheme. I ebrushed these with just my red sharpie.

The stamen are double sided and come with a bulb at each end so I cut them in half and inserted about 12 stamen (6 halved) into a hole I punched of the top flower. Secured it with hot glue.

Then I attached the leaves to the flower with hot glue.

These butterflies are pretty in just plain white but it was a little too stark for my project. I toned it way down by ebrushing it in gray black. One of my favorite things about using the ebrush is that most colors spray on translucent... and when sprayed over glitter the shine still shows through. I don't lose any of the sparkly effect!

I added my rub-on sentiment to the pre-made chipboard frame. Hot glued my ribbon down to my box,  before hot gluing my frame. Then hot glued my flowers, feather and butterfly on top of my frame. I inserted my decorative stick pins behind the base of the flower. I did not glue them into place... some people like to wear their pins, so I left that option up to them.


and there you have it a beautiful keepsake box to hold treasured memories. It also makes a very elegant gift box that would surely "wow" it's recipient! 

I made this one to give to my children's god-mother. It will house a scrapbook full of  our children's pictures. She is such a beautiful person and I wanted something that reflected her loving nature.

Hope you have a Beautifully Crafty Day!!

~Mitsy
To see more of my work, visit my blog at:
upontippytoes.blogspot.com
'
 
Copyright © 2014 Craftwell Blog. Designed by OddThemes - Published By Gooyaabi Templates