

Hello, Crafty Friends!! It's a new term with Craftwell's Cut'n'boss team and I'm so excited to start this term off with a bang!! Today, I have a group of cards to share and will teach you how I made amazing 3D embellishments with a variety of Teresa Collins dies.
Supplies Used
Cut'n'boss (Craftwell)
Teresa Collins Pocket Dies- Today, Thankful Holiday, Girl's Best Friend, Lover's Lane (Craftwell)
Truly Mitsyana- Terrific Tags (Brutus Monroe)
Mega Runner (Xyron)
Creative Station Lite w/ 5" Permanent Adhesive Refill Cartridge (Xyron)
Natural Burlap Stack (DCWV)
Classy Copper Stack ( DCWV)
Brads (Prima Marketing Inc)
Crop-a-dile (We R Memory Keepers)
Liquid Lacquer
Pages from an old book
Hemp twine

First, I used my Cut'n'boss machine and several different Teresa Collins dies, I cut out my diecuts from pages from an old book. With a large cutting platform, I can cut out several dies at once.
Also, these dies are very durable. So durable that I cut through 5 pages at a time. These pages were from an old book and cut very easily. I easily could have cut through more b the looks of it.

Next, I cut out these frames from metalic paper from DCWV's Classy Copper Premium Stack. This sheet had a houndstooth pattern to it and when diecut, gave the appearance of hammered metal... very cool!!

The Cut'n' boss doesn't only cut Craftwell brand dies but other competitor brands as well!! And not just for paper either!! Here I used one of my tag dies from the Terrific Tags set with DCWV's Natural burlap!! How freaking awesome is that?! For amazing results I used the following platform combo...
From Bottom to Top
D PLATE
A PLATE
B PLATE
MATERIAL
DIE (CUTTING EDGE FACING MATERIAL)
A PLATE
Run this combo through your machine a few time to ensure best cutting results.
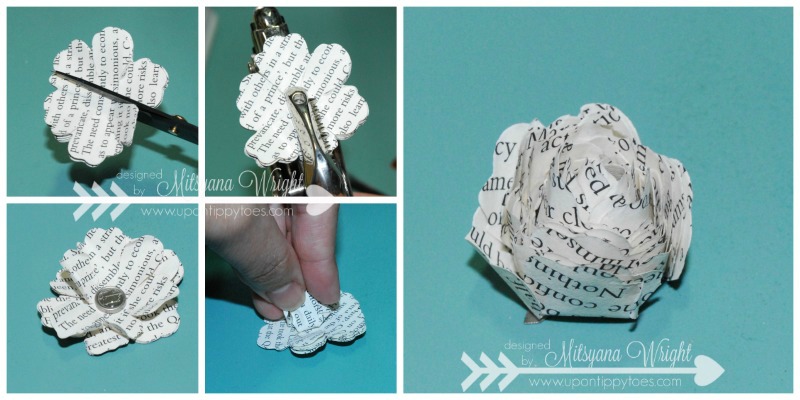
To make the rose I used the smallest flower from the Teresa Collins Girl's Best Friend set. I stacked my 5 layers on top of each other. And cut slits about a 1/4" toward the center of my flower, crating flower petals.
Then I punched a hole in the center of my flower and fastened it with a brad.
Then, I pulled each petal upward toward the center. I skipped every other petal while working on a rotation. This ensured that each petal was separated.
Then I curled the edges out the outer petals by pulling the edges slightly back.

For the daisy, I used the smallest flower from the Thankful Holiday set. Again, I used 5 layers cut from and old book pages. This time I cut my hole first, inserted my brad, then cut my slits for the petals. Then I rotated each flower so that the flower petal below showed from between the petal from above.
Next, I pinched each petal in half . I did this to each petal for each of my flower layers.
The butterfly was the easiest of all the dies to make three dimensional...
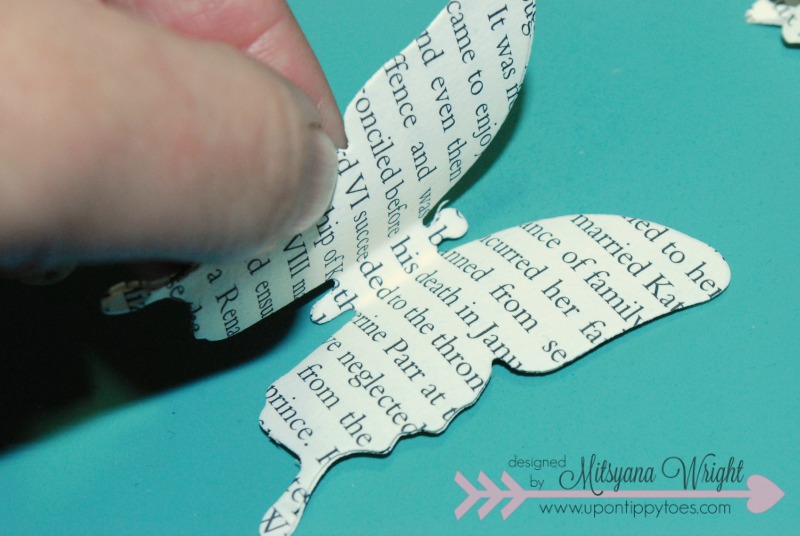
This time, I used only 4 layers. I glued just the bodies (not the wings) of the butterfly together. When my glue dried I bent the wings up.

I used my Creative Station Lite to attach my copper frames and some of my flat die cuts, like my butterfly, leaves, and frames.

I used the tag die on each card fronts but on one card I turned it sideways for a different look and tucked a doily die cut under it. and trimmed off the overhanging edges. You don't need to have use your dies upright... a lot of the times if you tilt or turn your diecuts it give a whole new look.
Here are a close up of all the cards I made with all the different embellishments I made.


I hope you enjoyed a quick break down on how I create my embellishments!!

For more inspiration please visit my personal blog at:
Until, next time...
Happy Crafting!!


Post a Comment