
Ebrush Design Team: Barbara Rankin Week 12 Cycle 3
Hello everyone! Barbara here today. The design team is featuring anything home decor this month, so I am going to share some easy desk accessories for you to make or give as a gift. I just want to remind you that this little machine is amazing and so easy to use. If you don't have one, I hope you will check it out.

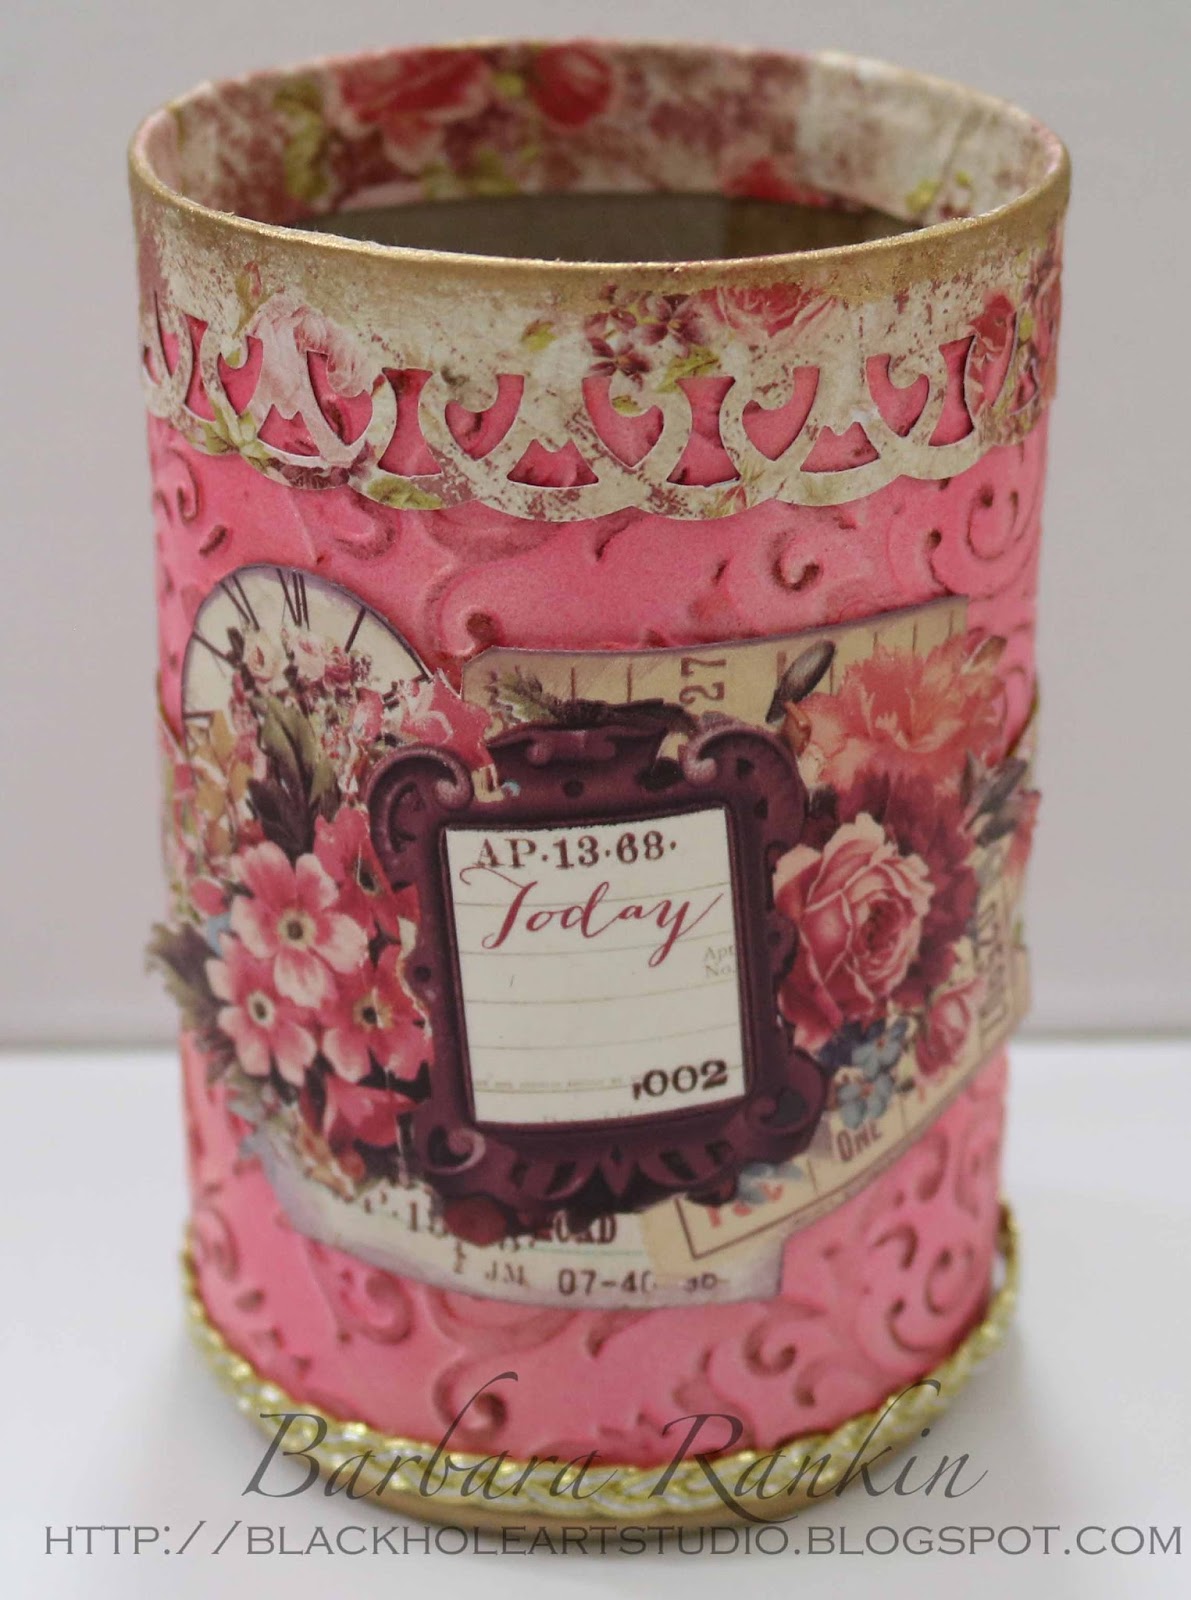
Here are the pieces I plan to work with. Aside from the vegetable tin, the remaining pieces were purchased in the dollar bin at my local craft store. They are not bad looking as they are, but I plan to decorate them to my personal taste (or the taste of your recipient).

Let's start with the vegetable tin by removing the paper and using it to measure the circumference of the tin. You could also use a flexible measuring tape, but this is easier. My measurements for the outside are 4" tall by 9-½" wide.

Before cutting my paper to that size, I decided to take an entire sheet of white card stock and emboss it with the Teresa Collins Beautiful Brocade embossing folder. This will give me lots of embossed paper to work with.

Start adding color to the paper with the Copic Markers.

I used Copic Markers in this order: RV02 - RV04 - RV11 - RV14.

I wanted to warm the color up a bit, so I added Y02 Canary Yellow over the top.

Highlight the embossing by rubbing Aged Mahogany ink pad over the high spots.

Cut the embossed paper to 4" x 9-½", and a piece of script paper slightly less than 4-¼" x 9-½".

Wrap and glue the embossed paper around the outside of the can. Insert script paper into the tin can and adhere paper with a bit of glue along the seam.

Cut a 2" x 12" strip of print paper and punch the edge with a decorative paper punch. I scored a straight line approximately 3/8" from the inside punched edge.

Fold the paper along the score line and trim to 9-1/2" long. Fold the strip over the top of the tin can with the decorative side outward and glue the piece over the top, as shown. This covers the top edge and protects hands from possible sharp metal that may not have been cut properly with the can opener. (Tip: You may need to trim the side of the paper that goes into the can a bit to keep it from forming too many creases as you glue it in place.)

Punch another strip of print paper with the punch, but punch both sides to make a decorative "ribbon". Layer the paper over a piece of gold ribbon the same size and adhere to center of can. I also glued a piece of gold cording around the bottom and added gold metallic wax along the top edge.

I fussy cut the print image from the paper collection and adhered to the center of the can, as shown.
I started to eBrush the bottom edge of the round magnetic tin, but decided to add the gold metallic wax instead because that is all that will show after I add a paper strip. I protected the top of the tin with a piece of washi tape so I could gild the top of the can, too.


I masked the acetate center of the lid so I could eBrush the sides with the same colors as before without adding color to the center. I held the mask in place with a clamp, as shown.

When I finished adding the colors, I removed the mask and punched another circle from the print paper and glued it to the center. (see photo below this one).

Cut a strip from the embossed, eBrushed paper to 1-5/8" x 7-1/2". Wrap and adhere paper to bottom portion of round magnetic tin. Punch another paper "ribbon" and adhere to the bottom, layering over gold ribbon, as shown. Punch or fussy cut the clock image and adhere, and glue a piece of gold braid along the edge of the top.

eBrush the metal embossed square tile and the large key with a combination of the same colors. Add gold metallic paste to the edges and the embossed areas to highlight them.

The key was colored and gilded with the same colors and glued to the top of the tile.

Two wooden clothes pins were covered with print paper on the front, and a magnet was glued to the back.


This tile has a hanger on the back, but if you needed to make a hanger for it, you could tie ribbon or chain around the key before glueing it in place. This makes a nice note holder with the decorative clothes hanger clips. By the way, I did not show it in the photo, but the small round magnetic tin can also be attached to this tile.

Lastly, the pot was colored and gilded with the same colors.

The shape of the pot was hard to glue paper to because it is conical, so I simply tied a pretty gold ribbon around it.

With the remaining scraps of embossed paper, I cut out circles and then cut a spiral shape into them to make a few flowers for other projects.

Before rolling the flower, I sprayed the back of the paper with some yellow and pink for contrast.

I am using a quilling tool, but you can use a bamboo skewer or just your fingers to roll these flowers up and glue them to the bottom piece, as shown below.

When the glue dries, you can open the layers out and give it a shabby chic look, like this.

And if you want the top darker, just hit the flower with your eBrush and more of the same colors. Easy peasy.

I love my eBrush!!!

Supplies used:
Copic Markers (RV02, RV04, RV11, RV14, Y02
Empty vegetable tin
Metal pot, 6"x6" embossed metal tile, round magnetic tin, large key
Prima Tales of You & Me paper collection
Decorative paper edger punch
Gold ribbon
Gold braid trim
Fast grab glue
Scoring tool
Thanks so much for stopping by. I hope I have been able to inspire you to try some DIY projects, and maybe make your own desk accessories set. The eBrush made quick work of it, and I was done in no time at all. Stop by the Craftwell blog for more inspiration from the team.


Post a Comment