
DO NOT MISS
>>Follow our Facebook page for updates! >>Join our Craftwell Design Team: Apply Now!
Showing posts with label guest post. Show all posts

February 16, 2017

Guest Designer Andrea Webster

Ebrushed Fashion Statement! We are delighted to have Andrea share her wonderful post with us today!


2017-02-05 13.26.01 copy


Hi, I'm Andrea and I was so excited to be asked to be a guest blogger and share a recent eBrush project with you.   -- So let's get this started.
I always find skirts on the racks at the local thrift shops and they are usually just as nice as the ones I find a local department stores.  To get the best results, I use white, tan or khaki colored skirts.

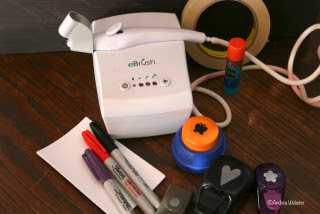
You'll need: 
masking tape
stenciling material (I used index cards)
punches  - heart, flower and butterfly
eBrush and marker adapter
Sharpie markers (red, purple and black)
Glue stick
2017-02-05 13.22.58 copy


1.  Glue two index cards together, repeat.  Tape the two sets of cards together for a stencil nearly 10 inches in length. 

2.  Using the punches, create your design by punching shapes in the index cards.  
I used hearts, butterflies for one stencil and two different flowers for the other stencil.  When punching out your design, be careful about how close you get to the bottom of the index cards and the edges.  If you get too close to either  and you don't have sufficient tape down, you may have some overspray where you don't want it on the skirt.

2017-02-05 13.23.54 copy
3.  Place a piece of cardboard under the skirt (avoids bleeding onto the other side of the skirt.
4.  Place the stencil in the spot you want to use the stencil and tape down.  Taping it down will help eliminate the chance of   the color(s) being sprayed where you don't want it.
5.  Choose the color or colors you want to use. I used black, red and purple.

2017-02-05 13.24.07 copy

6.  Adjust your marker to make sure you get the best spray and begin spraying.
7.  After spraying it the first time, move the stencil to a new area and repeat as desired around the skirt.
8.  After you have completed the design, turn the skirt inside out and set the color by placing in the dryer for about 5-10 minutes, OR iron to set the color.  Make sure to use the correct temperature for the fabric.
Here's another skirt using the same technique and stencils

Skirt2
Thanks for letting me share something I enjoy doing.  My eBrush has been so much fun and I give it a workout on a regular basis.  Hope you'll get your eBrush ready for some creative fun too!

June 27, 2016

Guest Designer Beth Wheeler Shares Tip and Technique!

Beth Wheeler is a very active and creative designer! She is a member of the facebook group "eBrush by Craftwell". She loves to share her work and her techniques. We are delighted to have her on the CraftwellUSA Blog today! Thank you Beth!

Hi everyone Beth here today with a blog post sharing a gate card I created using the eBosser and eBrush. As well as a sneak peek of a project where I used a  blender marker in my eBrush for the background. 

The eBosser and eBrush are my two go to tools and they sure save a lot of money. Especially when you can take things like corrugated cardboard and turn into embellishments.


I started out by sprinkling Brusho Colour Crystals on the raised side of the embossing folder. I then sprayed my card stock with water and embossed like usual with the eBosser.

Once the cardstock dried I brushed an Iridescent medium which because the crystals are water soluble blended the colors more. 

The fun of using powder pigments this way is you never know how it is going to turn out. Results will vary on the paper you use and how wet the paper is. Just remember some papers and cardstock have a tendency to curl. I often will leave my embossed piece in the folder and let it dry overnight. With a book on top of the folder.

Next step was to take thin corrugated cardboard and dies and cutting it with the eBosser. I love how nicely and easily the eBosser cuts out the cardboard. You can’t really tell in the photo but the flower petals were also run through with an embossing folder.

Then I took two different alcohol markers and using the eBrush colored my cut outs. It was fun seeing the different looks using the same two markers depending on which color I started with. Especially when I used a blender marker in the eBrush after applying the colors. I could have left the pieces at this stage like they were but I wanted more of a metal look so brushed iridescent medium on. For the flower I used Liquid Pearl for the center.

The final touch was to stamp the sentiment and cut it apart. Then attach ribbon to keep the card closed.

If you have not used an alcohol blending marker in the ebrush you will want to try it. You can lighten colors. Mix two colors together. Get almost a watercolor look.

Here is a piece I recently did using the blending marker on the sand after brushing two colors.  I also used the blender marker in the darker part of the sky as I was afraid it was too dark for the stars to show when I stamped. The music background was not eBrushed but the color matches the sand. That is why I love my eBrush. Matching colors is so easy.


Don't be afraid to experiment with both your embossing machine and eBrush.

Thank you for stopping by and I hope you will try pigment powders in an embossing folder. As well as a alcohol blender marker in your eBrush. Also don't forget to try using things like corrugated cardboard. Have fun!

January 1, 2016

Getting into the eBrush for the New Year!

Happy New Year's Friday! Looking back and sharing great Techniques! Yolie Burke!

I am so excited to share another great card from  Yolie Burke! This is an incredible card filled with great techniques!


Translation: "There is calm after the storm"


Hello and welcome, this is Yolie.  Today I am sharing a quick and easy card to make using the eBrush and Sharpie markers.  Here are a few of the supplies I used:


I first eBrushed the colors of the rainbow; I set the setting to high on and eBrushed over the white cardstock three times with each color.  My purple marker is low on ink, therefore I didn't get the airbrush look, but that's OK.  I love how it turned out and how it's the brightest color, but then again purple is my favorite color. ;)

After I eBrushed my rainbow, I inked the grid stamp with gold metallic ink and stenciled the hearts with gold metallic modeling paste.
I then cut a piece of acetate to create the banner; stamped the sentiment with StazOn black ink, added a bit of gold twine and adhered it with mini glue dots.
The sentiment translates, "There is calm after the storm"


Here is another look at the card:


I hope you enjoyed my project today. Thank you for visiting!
Yolie
Thank you Yolie!

July 31, 2015

Flashback Friday! 'Trendy Tags'

Guest Designer: Tyra Babington

All month long, we are utilizing the social media themed dies 'Stay Connected' by Teresa Collins in all of the design team projects. And in the spirit of social media connection, we  invited a guest to connect with us by creating a project using the dies! Meet our guest designer, Tyra Babington! When we saw her projects we knew we had to feature her as a guest! Her style is trendy, modern and clean! We love it! 

See her projects below!

Hello, its Tyra and I am delighted to join the Craftwell blog today as a Guest.  


I used the Stay Connected Die Set to create these clean and simple tags that are perfect as a gift tag or a fun note of encouragement tucked inside a lunchbox!


These dies are also great for masculine themed projects or cards for co-workers! Mix and match your favorite social media phrases for a look that's on trend! 

Thanks so much for stopping by!


Tyra :)


Thanks Tyra! Be sure to stay connected to Tyra by following her on her blog! Also find her on facebook and flickr! 

Social Media:

Are you loving the masculine colors? Be sure to leave Tyra some love!

April 7, 2015

Guest Post!!! From Katie Smith!! eBrush Maven!

Hey everyone, Katie here! I'm so excited to be guest posting here on the Craftwell blog. Today I wanted to share this picture frame I restyled using the eBrush!

I'm a member of the Hazel and Ruby design team and I just love combing my eBrush with my Hazel and Ruby Stencil Masks!

This project is actually VERY similar to a journal I made back in February. I loved how the journal turned out and I thought it would be neat to use the same technique on a picture frame, so here it is!


I used the Spellbinders Shapeabilities Foliage Die Set to cut the leaves from Hazel and Ruby's "Cut your own Stencil" material to create my masks.

Here's how I made my frame-

1. Paint your frame with a coat of gesso. I think this makes the colors more vibrant.

2. Take a lighter color marker and the eBrush and color the frame. I used a light minty green.


3. Place your masks on top of your frame. I didn't cut out enough masks to cover the whole frame, so I'm working in sections.


4. Take a brighter/darker marker and load it into your eBrush. Spray over the masks.


If you need to (like I did) move your masks to the next section of the frame and repeat step 4.


5. Remove your masks and you're done!! Wasn't that easy?


I love love love how this frame turned out. The bright green makes me happy and I love using my eBrush on projects!

Thanks to Craftwell and Debi for letting me guest post! If you want to see more of my projects, stop by my blog.

February 24, 2015

Calm after the storm - Guest Designer Yolie Burke!


I am so excited to share another great card from Guest Designer, Yolie Burke! This is an incredible card filled with great techniques!


Translation: "There is calm after the storm"


Hello and welcome, this is Yolie.  Today I am sharing a quick and easy card to make using the eBrush and Sharpie markers.  Here are a few of the supplies I used:


I first eBrushed the colors of the rainbow; I set the setting to high on and eBrushed over the white cardstock three times with each color.  My purple marker is low on ink, therefore I didn't get the airbrush look, but that's OK.  I love how it turned out and how it's the brightest color, but then again purple is my favorite color. ;)

After I eBrushed my rainbow, I inked the grid stamp with gold metallic ink and stenciled the hearts with gold metallic modeling paste.
I then cut a piece of acetate to create the banner; stamped the sentiment with StazOn black ink, added a bit of gold twine and adhered it with mini glue dots.
The sentiment translates, "There is calm after the storm"


Here is another look at the card:


I hope you enjoyed my project today. Thank you for visiting!
Yolie
Thank you Yolie!

February 21, 2015

Valentine Gable Gift Box

We are delighted to have as a guest designer, Jodi Isenberg-Clark. She is a very talented lady! She is also on the Spectrum Noir Design Team! We love when Jodi presents us with her work! Even though Valentine's day has passed, this is a project whose gift is a delight!

Hello, and welcome to my latest project, a valentine gable box! For this project, I combined my Craftwell eBrush with my Spectrum Noir markers to create this cute gift box that I cut out with my Cricut.
To begin, I used my Cricut to cut out a bunch of different heart shapes in different sizes. I used both the positive and negative shapes for eBrush masking. I first used the negative shapes and placed them where I wanted my darkest hearts to be, then covered the remaining paper (using vellum here) with scraps to protect from overspray. The four heart shapes will be sprayed in the picture below.
HeartMasks1 
Using various shades of Bright Pink Spectrum Noir markers, I started with the lightest color, sprayed a coat over my paper, then proceeded to spray a coat of each different color that I was using to create my dark pink hearts. After eBrushing the hearts, and then removing the masks, my paper looks like this:
Hearts1
After completing the darkest hearts, I laid some of the positive heart shapes in various spots over my paper, creating masked areas that are protected from ink spray.
HeartMasks2
I proceeded to eBrush each color over the entire paper again, making sure to go over the first four hearts that are on the paper to darken them even more. After eBrushing the same colors over the the entire background, I removed some of the heart shapes, then eBrushed the same colors again, going from lightest to darkest, making sure to go over all of the paper, including the hearts that are already eBrushed.
Hearts2
Repeat this process until all hearts have been removed and the entire background has been eBrushed with layers of your chosen colors. It should look something like this:
Hearts3
Next, I cut out the gable box using my Cricut. I cut out a window on both the front and back of the box and glued in a section of my background to fill the window.
Inside1
The completed project looks like this:
Gable1

Love this sweet project!
I love guest designers! Please check out Jodi’s Blog  http://clarkscraftycorner.wordpress.com/

January 31, 2015

Guest Post by Beth Wheeler - Glitter Queen

I am so happy to be able to share this lovely guest post with you! Beth is a prolific eBrush artist and is very active on the eBrush by Craftwell Facebook group. She is very inventive and creative. I hope that you will join and interact with all of our members!

Good day eBrush fans. This is Beth the Glitter Queen with a totally gorgeous Valentine’s card to share with you. I wish you could see it in person as the photo does not do it justice.   Grab a cup of coffee or drink of your choice and join me on a crafting adventure using the eBrush.

Add caption


I had to do some modifying of my original technique to use with the eBrush and when I finished the card I thought why didn’t I eBrush the tissue paper first. I used acrylic floor wax but you can substitute white glue that you have thinned.  I prefer the acrylic floor wax as I get more of a translucent look plus I happen to have a bottle left over from making Christmas ornaments a couple of years ago. I would rather be crafting than waxing floors.

Let’s get started. Supplies you will need. Thin plastic I use plastic from page protectors. An embossing folder. I used a Darice one. I don’t know the name of it. As well as some kind of embossing machine.  Tissue wrapping paper. Acrylic floor wax or white glue which you have thinned with water. Of course your eBrush and markers of your choice. I used Spectrum Noir markers from the  purple set. Ultra fine or fine Glitter is optional. Normally I use just one color but for this card I used several different colors. If you wish to color the embossed plastic then markers which will work on plastic. I used a Sharpie.


First you will run your plastic through your embossing machine. Ebrush your wrapping tissue, Do a larger piece than the size of your embossed plastic as you may need to do some patching. Then decide whether you want to use the embossed side as your front or the debossed side. You will get a slightly different look if you use the debossed side as the front.  Take either your glue or your floor wax and using a sponge brush apply to the back side of the plastic. Place your tissue paper over the plastic and use the sponge brush to adhere it using a pouncing motion.  Don’t panic if you should get a hole. Just tear off a small piece of tissue paper and patch the hole. Once the tissue paper is down tight while it is still wet you will sprinkle glitter if you are going to use it. I like to lightly sprinkle my glitter and do it in layers.  I like to turn the piece over as I work with the glitter to see how it is looking in the front. Another reason for having a larger piece of wrapping tissue as you can turn your plastic panel over to look at it without getting your hands messy. When you are satisfied let dry. trim to size and  then finish your project.

This technique can be used for more than just cards. If you have an embossing machine which will hold larger embossing folders you can use this technique to make an insert for in a glass container and use a battery operated candle. Of course you can also do this technique without embossing the plastic. You can even stamp on the plastic using an ink like Stazon and adhering the tissue paper to the back.

I hope you will try this technique. It is a fun technique and the results are stunning. Thank you for stopping by.

January 23, 2015

Just For You

Guest Designer: Pam MacKay

We have a gorgeous card by guest designer Pam MacKay! See how she created this gorgeous heart wreath card below!

Hello Pam MacKay here as a guest designer for Craftwell.  I am really excited and honored to have been asked to share my card with you using my favorite embossing folded with small dots. I have been making cards and teaching card making for over 15 years. I am a stay at home crafter!! I am in my woman's cave for at least 2 to 3 hours a day and believe me I could be there all day but I do have to pay attention to the hubby and feed him on occasion!! Making cards is a wonderful creative outlet and I just love it!


1.     First you start out with a 5 1/2 x 8 1/2 white card stock folded in half.  Then you cut a piece of white card stock 5 1/4 x 4 1/8 and run it through your embossing machine using the dotted embossing folder.


2.  Then you cut or punch out about 30 hearts of various shapes and sizes in red and 10 branches or leaves in white.


3.  Next cut out a 4 inch ring in red.


4.  Layer the hearts around the ring (I added a little bend to the hearts with an embossing tool) then add the branches or leaves.  At the end ink a few of the hearts with black ink and use pop dots to add to the wreath


5.  Finally add Rhinestones and a white raffia bow to complete you project.


Thank you for designing for us Pam! 

Be sure to leave Pam a comment! She would love to hear your thoughts on her project!

January 3, 2015

Valentine's Card from Guest Designer - Penny Ward!

Welcome our Guest Designer - Penny Ward!
Penny has joined us today with a beautiful Valentine's Day project! Please leave her a note and let her know that you too are enamored with her card! 


Hello eBrush friends! Penny Ward here today as a Guest Designer and I am so thrilled to have been invited. I have been using the eBrush for a couple of months now, and it has become my favorite card making tool. 
With the holidays behind us, I am moving onto Valentines cards. (Where did 2014 go?)

I love using stencils with my eBrush and I usually end up making my own with thin metal dies and clear acrylic cardstock. Run a baby wipe over it when you are finished and it is ready to use again.

I love the look of splatters on my cards and it is so easy to make your own “paint” with a little water and irRESISTible spray, reinker or an ink pad.

A portion of my sentiment has been heat embossed, trimmed and popped up with foam adhesive. I love using my practice scraps for sentiments or embellishments.

Don’t limit your eBrush to just paper. How about color matching your twine?

My base card is White cardstock cut to 5.5 x 8.5 inches, then folded in half. eBrush opposite corners for an unusual look, then adhere card front to base with foam adhesive.

Die cut an extra heart, adhere to card front over the twine with foam adhesive. Coat heart with Neon Pink Amplify!, (shhh…this is a brand new product being introduced at CHA, but you never saw it here) then heat with a heat gun and watch the magic happen. 

Make a tiny bow from leftover twine and adhere to puffy heart embellishment. Place small dots of irRESISTible Pico Neon Pink as desired.
I hope you picked up a tidbit or two from my creation today. We would love to see what you are working on with your eBrush. Visit our eBrush by Craftwell Facebook page and post a picture….you just might be our next Guest Designer.

Supplies:
Craftwell:  eBrush, eBosser
Spectrum Noir markers:  LV1, LV2, PL2, PL5, BP4
Imagine Crafts/Tsukineko:  irRESISTible Neon Pico Pink, Amplify! Neon Pink, Memento Luxe Elderberry ink, White embossing powder,
Simon Says Stamp - Sending & Wishing stamp set
Craft Mat
The Twinery:  Lilac stripped twine
Miscellaneous:  Acrylic cardstock, foam adhesive, heat gun, tape

Thank you so much Penny for sharing this wonderful project! I bet that many will try some of the great techniques you shared!
'
 
Copyright © 2014 Craftwell Blog. Designed by OddThemes - Published By Gooyaabi Templates