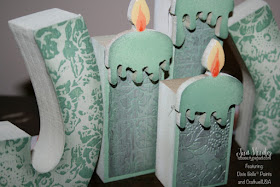
Hi all. It's my turn today on the Craftwell blog. Hoping you're all getting in the mood for some fun holiday crafting. I chose a fun wood project for today featuring Dixie Belle Paint, our sponsor for the month. The Chalk paint is creamy and a delight to work with.
You'll need
Wood letters, candle cuts (ThoughtsinVinyl.com)
Dixie Bell Paint (Mint Julep)
Sealer
Embossing folder
Cut-n-boss
Foil, cardstock (Foiled paper - see the basic technique here)
eBrush (with siphon adapter)
Acrylic paint (off white, white, yellow, light orange, deep orange)
Small paint brush
brayer (see the technique I used here)
Xyron Creative Station (with permanent adhesive)
Glue (I used a hot glue gun, but you could use a good quality wood glue as well.
Glossy effects
Rather than make this post extremely image heavy, I'll refer you back to the posts on my blog Monday and Tuesday to review the process of the foiled paper and "painting" the letters J and Y.
Prep your wood pieces. Sand, use a tack cloth to remove any residual sawdust or dirt if necessary. You want a smooth, clean surface to work with.

Using the eBrush and white/off-white paint with the siphon adapter, spray all of the pieces of the wood (front and sides). I got really good coverage and didn't use a whole lot of paint either. Let dry. If you want, you can put a second coat on, but my pieces didn't require a second base coat.
Switch out colors. Stir the Dixie Belle Paint before adding to your siphon cup or bottle. Dilute slightly -- less than a 1 -1 mixture (paint- (less water)) Spray the candle pieces as desired. I wanted just the edges of the candles to show color. The melted wax pieces were colored, leaving the flames still showing their base coat. Don't put the eBrush away yet!!!!
Prepare your foiled paper -- review the basic technique here -- I chose to use the Cut n Boss to emboss the foil and eBrush to spray on the color on the version used in the project -- wiping away some of the excess color with a paper towel. Sorry, no eBrush photos of this step, but the color was so much nicer than the one done with the foam brush!
Once the paint was dry, apply the foiled paper -- that had previously been cut to the appropriate size and put through the xyron for edge to edge coverage of adhesive. Center the foiled paper on the candle base and lightly burnish into place. Paint the flames. Once the flames have dried thoroughly, spray a light coat of sealer on each of the pieces. I did front and sides. (I chose not to finish the back of this project as my ultimate goal is to mount the piece in a shadow box.
I wanted a little more gloss, so I lightly sanded the flame (to add a little tooth and remove the sealer) and added some glossy effects to the flames and set that aside to dry for a couple of hours. The glossy effects added a little more dimension too.
When all of the pieces are completely dry, assemble the melted wax to the candle bases.
I chose to use the technique from this post to apply paint to the J and Y for the remaining parts of the project. So much fun! and easy too.


Once the paint has dried on your wood, if desired, add a little more color along the edges. You can use the eBrush and the siphon and more Dixie Belle Paint. Sign your project! AND Don't forget to clean that embossing folder!

I really like how it looks! Thanks for stopping by today and please, drop by next week for another fun holiday home decor project featuring Dixie Belle Paint and the eBrush! For more projects featuring the eBrush and Cut-n-Boss, visit my blog!
Happy Crafting!


Super cool.....Ebrush looks so fun to use!
ReplyDeleteThat is beautiful! Love the color
ReplyDeleteGorgeous! Love the techniques you used!
ReplyDelete